Linux/Ubuntu2021. 3. 21. 23:15

Ubuntu 18.04 LTS 에서 설치하는 방법은 이곳에 : https://blog.lael.be/post/7264

Ubuntu 14.04 LTS 에서 설치하는 방법은 이곳에 : https://blog.lael.be/post/4518  비밀번호 ubuntu 입니다.

 이 글은 Ubuntu 16.04 LTS 에 맞추어 작성되었습니다.

#16.10.04 무료 보안인증서(SSL) 적용방법이 추가됨

무료 보안인증서 설치방법이 추가되었습니다. HTTPS 사용을 원하신다면, 본문을 다 읽으신 후 다음의 글로 이동해주세요.

https://blog.lael.be/post/5107


이 문서는 2010년 4월 12일에 처음 쓰여졌으며, 주기적으로 업데이트/유지보수 되고 있습니다.

이 문서는 항상 최신버전(Edge Version)의 세팅법을 설명합니다.


이 글에서는 자동화되고 유지보수 관리되는 설치방법을 설명하고 있습니다.

아래의 방법대로 설치한 후에 언제든지


1


apt-get update


1


apt-get upgrade


명령을 사용하면, 항상 빠르고 안전한 최신버전의 서버 소프트웨어를 사용하실 수 있습니다.


* 이 글은 Ubuntu 에 PHP 웹서버를 세팅하는 방법을 소개하고 있습니다.

* PHP를 최신버전으로 구축하고 싶다면 https://blog.lael.be/post/2600 글로 이동하세요. (Nginx + PHP7-FPM + MariaDB)

- CentOS 에서 PHP 를 구축하고 싶다면 https://blog.lael.be/post/1721 (Apache + PHP + MariaDB)

* Ubuntu 에서 JSP 웹서버 세팅을 원하시면 https://blog.lael.be/post/858 글로 이동하세요.

* Ubuntu 에서 PHP와 JSP를 동시 구동하고 싶으시면 https://blog.lael.be/post/1023 글로 이동하세요.

* Ubuntu 가상서버호스팅을 찾는 중이라면 https://blog.lael.be/post/44 글로 이동하세요.


현재 배포된 Ubuntu 버전은 아래와 같습니다.


운영체제의 수명이 긴 LTS 버전을 설치하도록 합시다. (버전숫자가 높다고 더 좋다는 뜻은 아님)


Ubuntu 운영체제에 관해서는 http://en.wikipedia.org/wiki/Ubuntu_(operating_system) 를 참조하세요.


이 문서에서 설치는 Ubuntu 16.04 LTS를 기준으로 합니다. (14.04 와는 패키지가 약간 다를 수 있음)

참고로
Ubuntu 14.04 LTS 다운로드 이미지는 http://releases.ubuntu.com/14.04/ubuntu-14.04.5-server-amd64.iso 이며,
Ubuntu 16.04 LTS 다운로드 이미지는 http://releases.ubuntu.com/16.04/ubuntu-16.04.4-server-amd64.iso 입니다.


일반 사업체 및 실무 서비스에서 사용할 수 있는 안정적인 세팅법을 알려드리겠습니다.


0) root 권한으로 변경

기본으로 주어진 계정이 root 가 아닐 경우에만 0번을 따라하세요.
본문의 모든 명령어는 root 의 권한에서 실행해야합니다. 자신에게 주어진 계정이 root 계정이 아니라면 다음의 명령어로 root 로 전환해 주도록 합시다.

자신의 계정 보기

# whoami

sudo 명령어 실행. root 권한으로 root 로 로그인하는 명령어를 실행한다.

# sudo su

자신의 계정 보기

# whoami


기본 계정의 UserID 는 그림과 다를 수 있음. 위 예시에서 기본 아이디는 ubuntu 이다.

sudo 명령어를 사용할 수 있는 계정은 root 와 동급이니 비밀번호 관리에 신중해야한다. 기본 계정의 비밀번호를 매우긴 어려운 것으로 변경해주도록 하자.

# passwd ubuntu


1) 리눅스 버전체크

#uname -a Linux Lael-ubuntu-xenial 4.4.0-21-generic #37-Ubuntu SMP Mon Apr 18 18:33:37 UTC 2016 x86_64 x86_64 x86_64 GNU/Linux

2) Ubuntu 버전체크

#cat /etc/issue Ubuntu 20.04.2 LTS \n \l

조금 더 자세하게 운영체제 버전정보를 알아보고 싶다면

# lsb_release -a

해당 명령어는 Ubuntu 에서는 기본적으로 설치되어 있지만 CentOS 계열에서는 기본패키지가 아니니 사용하려면 다음 명령어로 설치해주어야 합니다.

# yum install redhat-lsb-core

3) 하드용량체크

#df -h Filesystem Size Used Avail Use% Mounted on udev 2.0G 0 2.0G 0% /dev tmpfs 396M 6.2M 390M 2% /run /dev/vda1 85G 3.6G 77G 5% / tmpfs 2.0G 192K 2.0G 1% /dev/shm tmpfs 5.0M 0 5.0M 0% /run/lock tmpfs 2.0G 0 2.0G 0% /sys/fs/cgroup tmpfs 396M 92K 396M 1% /run/user/1000 tmpfs 396M 0 396M 0% /run/user/0

대략 다 더하면 90G가 나온다.


4) 메모리 체크

#free -m total used free shared buff/cache available Mem: 3951 770 2262 10 918 3116 Swap: 4093 0 4093

3951M의 전체메모리중 현재 770M을 사용하고 있고 3116M가 비어있다.


4-1) CPU 코어수 확인

cpu정보 프로세스를 읽어서 processor 항목이 몇개인지 갯수를 셉니다.

#cat /proc/cpuinfo | grep processor | wc -l


위의 사진은 6 core 를 뜻합니다.

한번 정도는 다음의 명령어를 확인해 보세요.

#cat /proc/cpuinfo | grep processor#cat /proc/cpuinfo


5) 현재 서버에 설치된 패키지 최신버전으로 업그레이드

APT 목록 갱신

APT란 Advanced Packaging Tool 을 뜻합니다.
우리는 apt 라는 우분투에 내장된 프로그램을 이용해서 프로그램을 쉽게 설치/제거 할 수 있습니다.


패키지 목록 갱신.

#apt-get update


현재 운영체제에 설치되어있는 프로그램 최신버전패치

#apt-get upgrade

6) 시스템 시간 설정

이것을 하지 않으면 영국 시간을 불러올 것이다.

물론 초기 설치할 때 Asia/Seoul 을 설정했다면 이 작업을 할 필요는 없다. 하지만 또 한다고 해서 문제되지는 않는다.

- 데비안 패키지 재설정 TimeZone Data 를 실행한다.

#dpkg-reconfigure tzdata

GUI 환경이 나올 텐데, 순서대로 Asia - Seoul 을 선택하면 된다.


7) Hostname 설정

이 서버에 이름을 정하는 것이다. 이름을 잘 정해 두어야 나중에 다중 서버작업을 할 때 헷갈리지 않는다.


위의 뜻은 “li599-115 서버에 root 사용자” 라는 뜻이다.

서버 이름은 FQDN(Fully Qualified Domain Name)을 쓰는 것이 좋다.

참고로 라엘이의 이 블로그 서버의 hostname은 blog.lael.be 이다.


#vi /etc/hostname

빈 파일일 건데(또는 기존 hostname이 쓰여있을것임.) 원하는 이름으로 바꾼다.

권장하는 단어는 이 서버에 연결될 대표 도메인이다. 예를 들어 blog.lael.be 같은 것.


적용한다.

#hostname -F /etc/hostname


서버에 재 접속하면 적용된 것을 확인 할 수 있을 것이다.


hostname 값은 서버작업자에게 서버이름을 알려주는 역할을 하며, 아무 의미없는 글자를 적어도 된다.

일부 sendmail 같은 프로그램에서 다른 서버와 통신시 사용하기도 한다.


- hostname 을 FQDN 으로 설정하는 것을 권장하지만, 외부와 연결이 없는 서버이거나 자신이 쓰고 싶은 이름이 있다면 (팀명이나, 회사명, 서비스명 등) 그것으로 해도 된다.

예를 들어 myserver1, new1111 같이 자신이 하고 싶은대로 정했다고 한다면, 서버의 /etc/hosts 에 해당 이름을 등록해두도록 하자.

hostname 이 유효한 도메인 네임일 경우에는 이 작업(/etc/hosts)을 건너뛰세요.

127.0.0.1    myserver1


추가) 메일 발송프로그램 설치하기

많은 프로그램에서 mail() 함수를 사용한다. 이 함수는 서버의 sendmail 프로그램에게 메일발송을 요청한다.

메일문의, 가입시 환영메일, 비밀번호 찾기 메일, 이메일인증 등 널리 사용된다. 서버가 메일 발송을 할 수 있게 sendmail 을 설치하자.

# apt-get install sendmail

이것은 오직 웹사이트에서 메일을 보내기 위한 것이다.

아이디@당신의도메인.com 같은 것을 하고 싶다면 절대로 직접 구축하려고 하지 말고 구글앱스, 도메인 구입처, 클라우드서버 업체의 메일호스팅, 서버호스팅업체의 메일호스팅 을 사용하도록 하자.


# vi /etc/mail/local-host-names


localhost 를 제외하고 나머지 항목은 지운다. 이곳에 쓰여진 도메인은 sendmail 발송시 목적 메일서버조회(mx record query)를 하지않고 로컬로 보낸다.


8) Apache2 설치

#apt-get install apache2

16.04 LTS 에서는 apache 2.4.x 가 설치된다. (2016년 4월 21일 현재 최신버전은 Apache 2.4.18 이다.)

가끔씩 apt-get update  apt-get upgrade 를 실행하면 아무런 문제없이 최신버전으로 업데이트 될 것이다.
설치가 완료되면 자동적용 및 시작된다.

버전체크

apache2 -v


확인해본다.
http://256.123.213.213 (서버의아이피)
웹브라우져에 기본 설명페이지가 뜨면 성공.
(참고로 기본으로 보여지는 파일은 /var/www/html/index.html 이다.)
기본 파일을 지운다.


#rm /var/www/html/index.html

기타 주로 사용되는 모듈을 활성화, 필요없는 모듈은 비활성화 한다.
아래 모듈에 대한 자세한 설명은… 생략한다.
사용에 문제가 발생하지 않는 최상의 방식이라고 이해하면 된다.

#a2enmod rewrite #a2enmod headers #a2enmod ssl #a2dismod -f autoindex


#추가 보안패치. (.git, .svn, .env 등 dot로 시작하는 파일 및 폴더 보호, Web Access가 되어서는 안될 파일들의 접근 제어)

# vi /etc/apache2/apache2.conf

파일 중간의 <FilesMatch “^\.ht”> 구문 다음에 추가한다.


/etc/apache2/apache2.conf 설정파일 중간에 추가

1

2

3

4

5

6

7

8

9

10

11

12

13

14

15

16

17

18

19


# deny file, folder start with dot

<DirectoryMatch "^\.|\/\.">

    Require all denied

</DirectoryMatch>


# deny (log file, binary, certificate, shell script, sql dump file) access.

<FilesMatch "\.(?i:log|binary|pem|enc|crt|conf|cnf|sql|sh|key|yml|lock|gitignore)$">

    Require all denied

</FilesMatch>


# deny access.

<FilesMatch "(?i:composer\.json|contributing\.md|license\.txt|readme\.rst|readme\.md|readme\.txt|copyright|artisan|gulpfile\.js|package\.json|phpunit\.xml|access_log|error_log|gruntfile\.js|bower\.json|changelog\.md|console|legalnotice|license|security\.md|privacy\.md)$">

    Require all denied

</FilesMatch>


# Allow Lets Encrypt Domain Validation Program

<DirectoryMatch "\.well-known/acme-challenge/">

    Require all granted

</DirectoryMatch>


9) PHP 7.4 설치

PHP 5 를 설치하고 싶으시면 Ubuntu 14.04 LTS 를 설치하세요.

--

#apt-get install php


20.04 에서는 PHP 7.4.x 가 설치된다.


PHP-아파치 연동모듈 설치

#apt-get install libapache2-mod-php7.4


기타 주로 사용되는 모듈을 설치한다.
- 암호화 모듈

#apt-get install php-mcrypt
computingforgeeks.com/install-php-mcrypt-extension-on-ubuntu/


- 다국어 처리모듈

#apt-get install php-mbstring


- 이미지처리 모듈

#apt-get install php-gd


- 원격지 정보 불러는 모듈 (워드프레스, 드루팔 등에서 쓰임)

#apt-get install php-curl php-xml


-추가로 설치하고 싶은 모듈이 있으면

#apt-cache search php-

라고 입력해서 설치가능한 패키지를 검색후 install 하도록 하자.


- 아파치 재시작(적용을 위해서)

#service apache2 restart

버전체크
#php -v

PHP 7.0.4-7ubuntu2 (cli) ( NTS )
Copyright (c) 1997-2016 The PHP Group
Zend Engine v3.0.0, Copyright (c) 1998-2016 Zend Technologies
with Zend OPcache v7.0.6-dev, Copyright (c) 1999-2016, by Zend Technologies

7.0.4 버전이다. (당신이 설치한 버전은 이것보다 높을 것이다.)


10 - 1) MariaDB 설치

mysql 과 mariadb 는 완전 API 호환된다.


#apt-get install mariadb-server

MariaDB 10.0.24 이 설치된다.


MariaDB 초기화.

14.04 LTS까지는 자동으로 처리되던 작업인데.. 분리되었다.

아무튼 데이터베이스 초기화 작업을 하도록 하자.

다음의 명령어 실행하자.

/usr/bin/mysql_secure_installation

모르면 엔터 누르면 된다. (비밀번호만 설정하고 나머지는 엔터)

잘못한 것 같으면 위 명령어를 다시 실행하면 된다.


:: root 의 인증 플러그인 정보 제거하기

MySQL에 플러그인이라는 개념이 생겼다. 그 중 하나가 서버사이드 인증이다.

예를들어 Linux의 myuser1 사용자와 MySQL(MariaDB)의 myuser1 과 연결이 되는 경우이다. (비밀번호 필요없이 쉘인증)

root 사용자가 기본값으로 unix_socket Auth Plugin 이 설정되어 있는데… 이건 실 사용에 많은 불편함을 준다.  기존과 같이 비밀번호 인증 방식으로 바꾸도록 하자.

Linux root 사용자로 로그인한 상태에서

# mysql

(현재는 unix_socket 인증방식이라서 Linux root 사용자는 MySQL(MariaDB) root 계정에 비밀번호 없이 로그인 할 수 있다)


use mysql; update user set plugin='' where User='root'; flush privileges; exit;


-----------


#apt-get install php-mysql

DB 연동모듈 설치. 완전 호환되기 때문에 mysql 이라고 해도 mariadb 사용가능.


MYSQL 콘솔 클라이언트 버전체크
#mysql -V mysql
Ver 15.1 Distrib 10.0.24-MariaDB, for debian-linux-gnu (x86_64) using readline 5.2


10 - 2) 기본 언어셋 설정(중요)

이 단계를 건너뛰면 DB가 latin1 으로 생성되며 추후 DB작업에 문제가 생길 수 있다.

#vi /etc/mysql/mariadb.conf.d/50-server.cnf


(vi 에디터 사용방법을 모른다면 ftp 클라이언트를 사용하여 서버에 로그인 후 해당파일을 수정하고 덮어쓰기한다.)


[mysqld] 항목에 다음 2 줄을 추가한다.

2015년도 부터는 아래와 같이 utf8mb4 속성을 사용하세요.

이 속성은 utf8확장입니다. 기존의 모든 utf8과 상위 호환됩니다. (utf8 에서 utf8mb4 로의 변환은 손실이 일어나지 않습니다.)


utf8mb4 속성은 스마트폰 이모티콘 문자(emoji)를 저장할 수 있습니다.

자세한 설명은 이곳에(https://blog.lael.be/post/917) 있습니다.


/etc/mysql/mariadb.conf.d/50-server.cnf 에 추가

1

2


character-set-server = utf8mb4

collation-server = utf8mb4_unicode_ci


변경사항 적용

#service mysql restart


11) PHP 권한 설정

웹 서비스 구동시 발생할 수 있는 Nobody 퍼미션 관련 문제를 해결하기 위해 관련 프로그램을 설치한다.
이 세팅을 하면 shell의 권한과 sftp의 권한과 web의 권한이 동일하게 취급되며 보안도 좋게된다.
순서대로 쓰면 된다.

# apt-cache search mpm-itk

libapache2-mpm-itk - multiuser module for Apache


#apt-get install libapache2-mpm-itk
#chmod 711 /home
#chmod -R 700 /home/*

(/home/* 안에 아무파일도 없을 경우 마지막 구문은 에러가 날 수 있다. 에러가 나면 무시하도록 하자.)


11-1) PHP 실행확장자 변경


php 를 해석하는 확장자가 꽤 많이 있다.

#vi /etc/apache2/mods-available/php7.4.conf


.php .php3 .php4 .php5 .php7 .pht .phtml  확장자 파일이 기본적으로 php를 해석할 수 있게 되어있다.

웹페이지에서 파일업로드 구현시 이 확장자 파일을 제대로 막아주지 못하면 사이트가 위험하게 된다.


.php 를 제외한 나머지의 접근을 차단하자.


1

2

3


<FilesMatch ".+\.ph(p3|p4|p5|p7|t|tml)$">

    Require all denied

</FilesMatch>


--------------------------------------------

적용을 위해서 아파치 재시작

#service apache2 restart


11-2) PHP Default timezone 설정하기.

이 값을 설정하지 않으면 시스템 timezone 을 사용합니다.

PHP Default timezone 을 설정하는 것은 필수는 아니지만 매우 권장하는 작업입니다. 설정해주세요.

동일한 작업 2개의 파일에 적용해 주어야 합니다.
이건 Apache2 - PHP 일때 참조하는 설정파일입니다.

#vi /etc/php/7.4/apache2/php.ini

이건 Cron이나 Console에서 PHP를 직접실행할때 참조하는 설정파일입니다.

#vi /etc/php/7.4/cli/php.ini


date.timezone 값을 찾아서 주석을 제거하고 시간을 설정해주세요.


이 값을 찾아서


이렇게 변경.


#service apache2 restart


나중에 mytest.php 파일을 만들고 웹브라우져에서 실행시킨 뒤 위와 같이 설정되어 있으면 정상이다.


mytest.php

1


<?php phpinfo(); ?>


Default timezone 이 설정되어 있으면 정상.


12) 계정생성 및 동작테스트

원래 표준명령어는 useradd 이지만    ubuntu는 사용하기 좋게 adduser 를 지원한다.
리눅스 관련 서적을 보면 둘다 계정생성용 명령어라고 되어있다.
쉬운 설정을 위해 adduser를 사용

#adduser myuser1

(참고로 위와 반대동작을 하는 계정삭제 명령어는 - 계정을 삭제하고 홈디렉토리도 삭제함 -

#userdel -r myuser1

입니다.)

보통 웹루트는 홈디렉토리에 하지 않습니다.
저는 주로 www 디렉토리를 사용합니다.사용자변경 후 www 디렉토리를 생성하고 빠져나오기

#su -l myuser1
#mkdir www
#exit

13) 웹사이트 Apache 환경설정파일 작성

#16.12.20 설정 가이드가 추가됨

환경설정을 쉽게하도록 도와주는, 환경설정 생성기가 추가되었습니다.

https://webmaster.cafe/tools/apache-conf-generator/


다음의 내용을 작성한다.
아래 예제에서는 사이트 환경설정파일명을 lael.be 로 가정하고 진행한다.
당신의 도메인, 사용자 아이디, 별도의 구분단어로 설정해서 사용하도록 하자.

#vi /etc/apache2/sites-available/lael.be.conf

/etc/apache2/sites-available/lael.be.conf 에 저장한다.


1

2

3

4

5

6

7

8

9

10

11

12

13

14

15

16

17

18

19

20

21

22

23


<VirtualHost *:80>

    #main domain

    ServerName lael.be


    #additional domain

    ServerAlias www.lael.be

    ServerAlias my-anotherdomain.com


    #document Root

    DocumentRoot /home/myuser1/www/


    #additional setting

    <Directory /home/myuser1/www/>

        Options FollowSymLinks MultiViews

        AllowOverride All

        require all granted

    </Directory>


    AssignUserID myuser1 myuser1


    ErrorLog ${APACHE_LOG_DIR}/lael.be-error.log

    CustomLog ${APACHE_LOG_DIR}/lael.be-access.log combined

</VirtualHost>


ServerAlias 는 사용안하면 빼도 되는 줄이다.

#15.09.16 추가

당신이 만약 SSL(https) 를 적용하고자 한다면 lael.be.conf 파일 하단에 다음의 코드를 추가하세요. 즉 VirtualHost 영역을 하나 더 추가.


1

2

3

4

5

6

7

8

9

10

11

12

13

14

15

16

17

18

19

20

21

22

23

24

25

26

27

28

29

30

31

32

33

34

35

36

37

38


<VirtualHost *:443>

    #main domain

    ServerName lael.be


    #additional domain

    ServerAlias www.lael.be

    ServerAlias my-anotherdomain.com


    #document Root

    DocumentRoot /home/myuser1/www/


    #additional setting

    <Directory /home/myuser1/www/>

        Options FollowSymLinks MultiViews

        AllowOverride All

        require all granted

    </Directory>


    AssignUserID myuser1 myuser1


    ErrorLog ${APACHE_LOG_DIR}/lael.be-error.log

    CustomLog ${APACHE_LOG_DIR}/lael.be-access.log combined


    Header always set Strict-Transport-Security "max-age=31536000"


    SSLEngine on


    SSLProtocol all -SSLv2 -SSLv3


    SSLCipherSuite ECDHE-RSA-AES128-GCM-SHA256:ECDHE-ECDSA-AES128-GCM-SHA256:ECDHE-RSA-AES256-GCM-SHA384:ECDHE-ECDSA-AES256-GCM-SHA384:DHE-RSA-AES128-GCM-SHA256:DHE-DSS-AES128-GCM-SHA256:kEDH+AESGCM:ECDHE-RSA-AES128-SHA256:ECDHE-ECDSA-AES128-SHA256:ECDHE-RSA-AES128-SHA:ECDHE-ECDSA-AES128-SHA:ECDHE-RSA-AES256-SHA384:ECDHE-ECDSA-AES256-SHA384:ECDHE-RSA-AES256-SHA:ECDHE-ECDSA-AES256-SHA:DHE-RSA-AES128-SHA256:DHE-RSA-AES128-SHA:DHE-DSS-AES128-SHA256:DHE-RSA-AES256-SHA256:DHE-DSS-AES256-SHA:DHE-RSA-AES256-SHA:AES128-GCM-SHA256:AES256-GCM-SHA384:AES128-SHA256:AES256-SHA256:AES128-SHA:AES256-SHA:AES:CAMELLIA:DES-CBC3-SHA:!aNULL:!eNULL:!EXPORT:!DES:!RC4:!MD5:!PSK:!aECDH:!EDH-DSS-DES-CBC3-SHA:!EDH-RSA-DES-CBC3-SHA:!KRB5-DES-CBC3-SHA


    SSLHonorCipherOrder on


    SSLCertificateFile "/home/myuser1/ssl/mysite_ssl.crt"

    SSLCertificateKeyFile "/home/myuser1/ssl/mysite_ssl.key"

    SSLCertificateChainFile "/home/myuser1/ssl/mysite_ssl.certchain.crt"


</VirtualHost>


https://www.sslshopper.com/ssl-checker.html#hostname=blog.lael.be  (SSL Chain test - 인증서가 올바르게 설치되어 있는지)

https://www.ssllabs.com/ssltest/analyze.html?d=blog.lael.be (SSL Algorithm test - 안전한 암호화 통신이 설정되어 있는지)

Chain test  모두 Valid 이어야하고, SSL Algorithm test  A 이상이면 정상적인 운영이 가능하다.

라엘이가 여러 설정 값에 대해서 테스트를 해 보았고, 최적의 권장설정 값을 위와 같이 적어두었으니 그대로 쓰면 된다.

위의 설정값으로 SSL을 설치하면 A+등급을 받을 수 있을 것이다.


.

인증서 적용 테스트는 위의 사이트를 이용하여라.

인증서 체인 파일이란 “인증서에 대한 인증서” 파일이다.


< 그림 : 이 블로그는 위의 단계를 거쳐 인증된다. 이것을 체인 인증 이라고 한다. >

대통령이 당신을 인증할 때 직권으로 인증하는 것이 아니라, 대통령 -> 서울시장 -> 강남구청장 -> 삼성동장 -> 당신 의 단계를 거친다. 검증하려면 모든 단계의 보증 증서를 제공해야 하는 것이다.

인증서 파일에는 삼성동장 -> 당신  의 정보가 들어있고, (암호화 통신시 공개됨)

인증서 키 파일에는 암호화 통신을 위한 정보가 들어있고 (은행 보안카드 로 비유. 외부에 공개되지 않음.)

인증서 체인 파일에는 대통령 -> 서울시장, 서울시장 -> 강남구청장, 강남구청장 -> 삼성동장 의 정보가 들어있다. (체인 인증이라고 한다. 연결고리 인증)

인증서 체인을 올바르게 작성하지 않으면 Firefox 브라우저 Android Chrome 브라우저에서 “인증서 정보부족” 오류가 발생하게 된다.


14) 사이트 활성화 및 적용

명령어는
#a2ensite 사이트환경설정파일명
입니다.

#a2ensite lael.be

(참고로 사이트 비활성화는

#a2dissite lael.be

입니다.)

- 아파치 설정 다시 불러오기(적용을 위해)

#service apache2 reload


15) 연동테스트

apache 와 php, 그리고 mariadb 를 모두 사용하는 프로그램을 실행시켜보자.

phpmyadmin 공식사이트 : https://www.phpmyadmin.net/


설치 못하시는 분이 꽤 있으셔서 따로 설치법을 적습니다.

여러 설치방법이 있겠지만 저는 다음과 같이 설치합니다.


압축해제 프로그램 설치# apt-get install unzip


압축파일 다운로드# cd /var/www/html


https://www.phpmyadmin.net/ 사이트로 이동 후 위의 그림과 같이 입력하여 최신버전을 설치할 수 있도록 하자.

이 글에서는 글 작성 시각 현재 최신버전인 4.5.2 를 설치할 것이다. phpmyadmin 은 매우 견고하게 만들어진 프로그램으로써 4.5.2를 설치해도 보안취약점이 있지는 않겠지만 최신버전을 설치하는 습관을 기르도록 하자. (혹시나 말하지만, Alpha나 Beta 같은 개발자-최신버전을 설치하라는 뜻이 아니라 널리 사용되어 검증된 Release Channel 최신버전 를 사용하라는 것이다.)

# wget https://files.phpmyadmin.net/phpMyAdmin/4.5.2/phpMyAdmin-4.5.2-all-languages.zip


압축해제

# unzip phpMyAdmin-4.5.2-all-languages.zip


폴더 이름변경

# mv phpMyAdmin-4.5.2-all-languages phpMyAdmin


다운받은파일 삭제

# rm phpMyAdmin-4.5.2-all-languages.zip

도메인주소 말고 서버의 아이피를 입력해야 기본사이트로 들어갈 수 있다.

만약 기본사이트 이외의 사이트에 설치하고 싶다면 /var/www/html 위치 대신 /home/myuser1/www 같은 곳에 phpmyadmin 코드를 넣도록 하자.

http://111.222.333.444/dbmyadmin/


[TIP] 간혹 방금 설치한 디비의 root 비밀번호가 기억이 안나는 분들도 있을 것이다. 이 경우에는 다음의 명령어를 사용하여 mariadb 를 재설치 하도록 하자.
- 제거
# apt-get purge mariadb-server
- 설치
# apt-get install mariadb-server


- 재부팅

복잡한 세팅이 끝났으니 한번 숨을 고르고 가자.

# reboot

재부팅 후에 phpinfo 페이지와 phpmyadmin 가 잘 실행된다면 “재부팅이 가능한 서버” 라고 볼 수 있다.


16) Apache 추가 보안 설정

- 기본 언어셋 설정

#vi /etc/apache2/conf-available/charset.conf

기본 언어값 UTF-8 에 대해서 주석처리되어 있을 텐데 주석(#)을 제거해 준다.


- 추가 보안 설정

#vi /etc/apache2/conf-available/security.conf

매우 권장하는 보안설정이므로 Ubuntu Apache 패키지 제작자가 미리 써두었다.
이미 다 쓰여 있으니까 주석(#) 만 제거하자.


- 아파치 설정 다시 불러오기(적용을 위해)

#service apache2 reload


옵션) SSH 기본 포트번호 변경

#이 작업은 무작위 대입공격(Brutu force attack)의 시도를 차단해줍니다.
보통 IP주소 : 22번 포트를 스캔해서 ssh와 연결되면 무작위 로그인 시도를 하는 프로그램이 엄청 많은데,
포트번호만 바꾸어주어도 방어가 되거든요.

!! IPTABLES 방화벽, SSH 포트번호 변경, Fail2ban 중에서 하나만 적용하세요!!

1) 나는 KS 클라우드 or 아마존 클라우드를 사용하고 있어! -> 클라우드 방화벽 쓰세요 !!
2) 나는 허용된 IP만 서버에 접속하게 할거야 -> IPTABLES !!
3) 나는 사용자의 IP를 특정지을 수 없는데 무차별대입 공격은 방어할거야 -> Fail2ban !!
4) 나는 나만 아는 포트번호로 서버에 접속할 거야 -> SSH 포트변경!!

[개인 프로젝트, 회사의 서비스 -> IPTABLES]
[웹호스팅 -> Fail2ban 또는 SSH 포트변경]

SSH 기본 포트번호인 22번을 다른 번호로 바꿉니다.
기억하기 쉬운 숫자로 변경하세요.


#vi /etc/ssh/sshd_config

Port 22   를 찾아서 임의의 숫자 : 10022, 34522 등 기억하기 쉬운 숫자로 설정.

포트번호는 10000번 이상의 숫자를 선택하시길 권장합니다.


#service ssh restart


옵션) 방화벽 적용하기

방화벽의 중요성을 알고 싶다면

# tailf /var/log/auth.log

를 입력해보도록 하자.  (Control + C 를 눌러 프로그램 종료)

별도의 방화벽 설정이 없었다면 벌써 중국에서 서버에 로그인 시도를 하고 있을 것이다.


이러한 무차별 로그인 시도를 다음 중 어느 하나를 사용해서 막을 수 있다.

가장 편한 것은 fail2ban 이다. (한줄만 타이핑하면 방어됨)
(https://blog.lael.be/post/858#fail2ban) 로 이동해서 설정하세요.
* 접속자의 IP 가 고정되어 있으면 방화벽 설정을 통해, 특정 아이피에서만 서버에 접속할 수 있도록 설정해주세요.


현재 방화벽 설정 보기. (List)

#iptables -L


INPUT (서버로 들어오는 것 관리), FORWARD (서버에서 내부망으로 연결관리;잘 안씀), OUTPUT (서버에서 나가는 것 관리)
로 이루어져 있다.

보통 FORWARD와 OUTPUT은 건들이지 않고 INPUT 만 수정한다.
policy ACCEPT 라는 뜻은 아무 조건도 해당하지 않았을 때 ACCEPT 하라는 것이다.

먼저 현재 방화벽 설정을 파일로 저장한다. 언제든 현재의 상태로 되돌릴 수 있기 위해서 이다.

#cd ~
#mkdir firewall_rules
#cd firewall_rules
#iptables-save > 151214.rules                 현재 날짜 쓰세요.

이제 방화벽을 복구해 보자.

#iptables-restore < 151214.rules
#iptables -L

>>설정 시작.
규칙 : 아이피 111.222.111.222 에 대해서 destination port 가 22 이면 ACCEPT 하여라.

#iptables -A INPUT -s 111.222.111.222/32 -p tcp -m state --state NEW -m tcp --dport 22 -j ACCEPT

아이피 바꾸지 마시고 위의 예시 (111.222.111.222) 그대로 입력하세요.

#iptables -L


이제 현재 상태에 대해서 방화벽 설정파일을 다시 생성해보도록 하자.

#iptables-save > 151214.rules


SFTP나 vi, cat 으로 해당 151214.rules 를 열어보자.

열고나서 코드의 뜻을 대충 해석해보아라. (간단하다.)

하단 *filter 부분에

-A INPUT -s 111.222.111.222/32 -p tcp -m state --state NEW -m tcp --dport 22 -j ACCEPT

가 보이는가?


여러분은 이곳에 아래의 코드를 집어넣어야 한다.

순서가 중요하다. IF-ELSE 같이 동작하기 때문에 조건에 맞으면 바로 지정된 동작을 한다.

211.105.192.168 아이피만 지정하고 싶을 때 -> -s 211.105.192.168/32

211.105.192.* 아이피 그룹을 지정하고 싶을 때 -> -s 211.105.192.0/24

211.105.*.* 아이피 그룹을 지정하고 싶을 때 -> -s 211.105.0.0/16

목적지 포트가 22번(ssh) 포트일 때 -> -dport 22

목적지 포트가 80번(http) 포트일 때 -> -dport 80

목적지 포트가 443번(https) 포트일 때 -> -dport 443


아래는

1. 이미 연결된 것은 허용
2. ping 허용
3. loopback 허용
4. 111.222.111.222 의 22번 포트 접근 허용
5. 123.111.123.111 의 22번 포트 접근 허용
6. 80 포트 접근 허용 (-s 옵션이 없으므로 누구나 허용)
7. 443 포트 접근 허용 (-s 옵션이 없으므로 누구나 허용)
8. 차단
9. FORWARD 차단

의 코드이다.

아까 생성한 .rules 파일을 열어서 아래의 코드를 그림과 같이 코드를 추가하여라. 이때 반드시 당신의 아이피를 추가하여라.

추가가 잘못되어도 어차피 1번의 조건에 의해서 당신의 연결이 끊기지는 않겠지만 새로운 연결은 차단될 것이다.


1

2

3

4

5

6

7

8

9


-A INPUT -m state --state RELATED,ESTABLISHED -j ACCEPT

-A INPUT -p icmp -j ACCEPT

-A INPUT -i lo -j ACCEPT

-A INPUT -s 111.222.111.222/32 -p tcp -m state --state NEW -m tcp --dport 22 -j ACCEPT

-A INPUT -s 123.111.123.111/32 -p tcp -m state --state NEW -m tcp --dport 22 -j ACCEPT

-A INPUT -p tcp -m state --state NEW -m tcp --dport 80 -j ACCEPT

-A INPUT -p tcp -m state --state NEW -m tcp --dport 443 -j ACCEPT

-A INPUT -j REJECT --reject-with icmp-host-prohibited

-A FORWARD -j REJECT --reject-with icmp-host-prohibited


#iptables-restore < 151214.rules
#iptables -L

!!!반드시 현재 쉘 연결을 끊지 말고!!!

현재 연결은 1번 조건에 의해서 반드시 허용이기 때문에 괜찮다.


새로 연결창 띄워서 테스트해 보아라.

만약 원하는대로 동작하지 않는다면 다시 .rules 파일을 수정하고 iptables-restore 하여라.

방화벽 설정이 머리가 아프다면

# iptables -F

 초기화 하고 내일 다시 시도해 보아라.


이 설정은 재부팅이 되면 초기화 된다.

설정을 지속시키도록 하자.

iptables-persistent 설치


#apt-get install iptables-persistent

Yes (엔터), Yes (엔터)


/etc/iptables 라는 폴더가 생성되고

rules.v4, rules.v6 가 생성된다.


부팅시 실행되는 파일을 갱신하자.

#iptables-save > /etc/iptables/rules.v4


ipv6 차단하기

#vi /etc/sysctl.conf

맨 밑에


1

2

3


net.ipv6.conf.all.disable_ipv6 = 1

net.ipv6.conf.default.disable_ipv6 = 1

net.ipv6.conf.lo.disable_ipv6 = 1


추가.


설정파일 적용

#sysctl -p


검사

#cat /proc/sys/net/ipv6/conf/all/disable_ipv6

1 이면 disable 된 상태이다.


재부팅

#reboot


재부팅 후에 방화벽 규칙이 유지가 되면 성공이다.

#iptables -L


옵션) 계정별 트래픽 양 제한하기. Apache Mod Cband install.

- 2015.06.01. Ubuntu 14.04 LTS 테스트 완료. 
- 순간속도(대역폭), 총 전송량(쿼터), 동시접속연결을 제한하는 모듈입니다.
장애가 일어날 것 같은 값들을 Hard Boundary 로 정해놓으면 장애가 일어날 것 같은 환경에서 서버가 잘 돌아가는 것을 볼 수 있을 것입니다.

저도 서버 서비스의 장애를 막기 위해서 실 서비스에 이것을 사용하고 있습니다.
다만 저 같은 경우 분산처리를 해 두었기 때문에 개별 서버에 적용한 제한치보다 실제 서비스는 더 높은 처리를 보여줍니다. (100의 제한을 건 서버 5대에 분산처리하면 전체적으로 500의 제한이 걸린 것 처럼 보이겠죠?)


Mod Cband  Apache2 모듈입니다.

다음의 기능이 가능합니다.

1) 대역폭 제한 (Bandwidth limit)
2) 동시 접속자 제한 (Concurrent user)
3) 트래픽 제한 (Transfer quota)
통계 용도로만 사용할 수도 있다.


현재 공식사이트가 닫혀있어서 대체할 만한 다운로드 경로를 적는다.

1) mod cband 공식사이트 : http://cband.linux.pl/  (안열림.)
2) mod cband 메인 개발자 블로그 : http://dembol.org/blog/mod_cband/ (다운로드 링크가 동작안함)
3) source forge 링크 : http://sourceforge.net/projects/cband/files/ (최신버전이 아님)

4) 현존하는 것 중에서 가장 최선의 선택 https://fossies.org/linux/www/apache_httpd_modules/mod-cband-0.9.7.5.tgz/

5) 라엘이 블로그 백업용 파일 (4번과 완전히 동일한 파일) mod-cband-0.9.7.5.zip


1] mod cband 는 apxs 라는 아파치 확장 개발 라이브러리를 필요로 합니다.
#apt-get install apache2-dev


2] apache cband module 다운로드
#wget https://fossies.org/linux/www/apache_httpd_modules/mod-cband-0.9.7.5.tgz


3] 압축을 풀고 설치
#tar -xzvf mod-cband-0.9.7.5.tgz#cd mod-cband-0.9.7.5


3-1] 패치.

apxs 가 업데이트 되면서 변수명이 몇개 바뀌었다.

#vi src/mod_cband.c

찾기 : remote_addr      ,    바꾸기 : client_addr       1365번째줄1회만 치환되어야 함.


찾기 : remote_ip       ,    바꾸기 : client_ip     4회 치환되어야 함.


3-2]  설치 계속 진행.#./configure#make#make install


4] cband 모니터링 페이지 생성
#vi /etc/apache2/mods-available/cband.conf


1

2

3

4

5

6

7

8

9

10

11

12

13

14

15

<IfModule mod_cband.c>

    <Location /cband-status>

        SetHandler cband-status

        AuthName "adminpage"

        AuthType Basic

        AuthUserFile /home/.htpasswd

        require valid-user

    </Location>

    <Location /cband-status-me>

        SetHandler cband-status-me

        Order deny,allow

        Deny from all

        Allow from all

    </Location>

</IfModule>


#htpasswd -c -m /home/.htpasswd admin


5] 아파치 모듈 켜기
#a2enmod cband


6] 적용을 위해서 아파치 재시작
#service apache2 restart


7] 확인

웹브라우져로

서버아이피/cband-status-me

서버아이피/cband-status

에 들어가 보자.

지금은 모두 무제한이므로 아무 항목이 뜨지 않을 것이다.


8] 설정하기.

https://www.linux.co.kr/home/lecture/?leccode=10588

위의 링크 글을 참조하여 이미 생성해서 사용중인 sites-available 안의 virtualhost 파일을 수정한다.


9] 설정 예제.

각 사이트의 <virtualhost> 구문에 Cband 설정 값을 추가한다. 다 쓸 필요는 없다. 필요한 제한만 두도록 하자.


당신이 웹호스팅을 운영중이라면 CBandLimit 구문과 CBandPeriod 구문을 사용하여라.


당신이 동영상 사이트나, 자료실을 운영중이라면 CBandSpeed 와 CbandExceededSpeed 를 사용하여라.


1

2

3

4

5

6

7

8

9

10

11

12

13

14

15

16

17

18

19

20

21

22

<VirtualHost *:80>

    #main domain

    ServerName lael.be

    #something

    #~~~

    #~~~


    <IfModule mod_cband.c>

        #4주동안 6GB 전송량 제한을 둠. 초과시 503 Service 에러페이지가 뜸.

        CBandLimit 6G

        CBandPeriod 4W

        #트래픽 조각. 이 상황의 경우 1주일마다 1.5GB 가 보급된다.

        #트래픽이 CbandPeriod 기간동안 골고루 사용되기를 원할때 설정한다.

        CBandPeriodSlice 1W


        #동영상(flv, mp4)이나 자료실 서비스를 하고 싶을때에만 아래의 속도제한 구문작성

        CBandSpeed 500kbps 10 30

        CBandExceededSpeed 128kbps 5 15

        #CBandScoreboard /var/www/scoreboard/domain.com.scoreboard

    </IfModule>


</VirtualHost>


옵션 ) 서버 동시접속자 설정 변경하기. (15.11.20 추가)

다음의 페이지를 많이 참조했습니다. (http://www.zarafa.com/wiki/index.php/Apache_tuning)

문의주시는 분들 중에 간혹 의도치않은 대박(?)이 일어나신 분들이 있더라. 동시접속 튜닝법을 설명하고자 한다.


몇가지 배경지식 설명.

- http 웹페이지는 stateless(connectionless) 입니다. 즉 페이지 불러올 때에만 서버와 연결하고 페이지 로드가 끝난 후에는 연결을 끊습니다.

- 1개의 연결당 평균 메모리 소모량은 20MB 입니다. (라엘이가 관리하는 여러서버의 평균값을 내보았음)

- Ubuntu Apache 의 기본 동시접속자 제한은 150개 입니다. 1000개의 동시접속이 연결되면 150개는 즉시 처리진행되고, 나머지 850개는 대기열에서 대기하다가 차례대로 처리됩니다.

1] 서버 연결당 얼마나 메모리를 소모하는지 확인ps -ylC apache2 | awk '{x += $8;y += 1} END {print "Apache Memory Usage (MB): "x/1024; print "Average Proccess Size (MB): "x/((y-1)*1024)}'

2] 서버에 여유 메모리 자원이 얼마나 있는지 확인

서버를 재부팅한 후에 아파치를 종료후 서버의 메모리를 확인해본다.

# free -m


3] 하드웨어 자원을 고려한 가용 동시연결수 계산

여유 메모리 / 1연결당 메모리     하면 된다.

2000MB free memory 가 있고, 1연결당 20MB 를 사용한다면 = 100개의 동시연결 가능. (300~500 동시접속자 처리가능)


4] 사이트의 필요 동시연결수 계산

450명의 사용자가 있고 3초주기로 페이지 이동이 일어난다고 가정하자. 페이지 출력 실행시간은 2초라고 가정하자.

필요 동시연결수 = 450 / 3 * 2 = 300


5] 동시연결수 설정 변경.# vi /etc/apache2/mods-available/mpm_prefork.conf

MaxRequestWorkers 값을 수정해야 합니다.

ServerLimit 라는 옵션의 기본값이 256이기 때문에 MaxRequestWorkers 값이 256보다 작으면 따로 적을 필요가 없으며, 256보다 크면 그와 같은 값으로 ServerLimit 도 설정해야 합니다.

동시연결 제한 300 예제 설정법.

1

2

3

4

5

6

7

8

<IfModule mpm_prefork_module>

    StartServers 5

    MinSpareServers 5

    MaxSpareServers 10

    MaxRequestWorkers 300

    ServerLimit 300

    MaxConnectionsPerChild 0

</IfModule>


출처: blog.lael.be/post/73

'Linux > Ubuntu' 카테고리의 다른 글

Ubuntu VNC 설치  (0) 2021.03.20
Ubuntu Network & WOL  (0) 2021.03.17
Ubuntu 20.04 LTS Server 버전 설치  (0) 2021.03.16
Posted by iWithJoy
Linux/Ubuntu2021. 3. 20. 23:59

$ sudo apt install tasksel -y
$ sudo tasksel

VNC is a system that allows you to remotely control another computer. It allows you to relay your mouse and keyboard inputs as if you were physically sitting in front of the system, when in fact you could be on the other side of the world.

In this guide, we will go over the steps to setup a VNC server on your Ubuntu 20.04 system. When we're done, you'll be able to access your system remotely from anywhere, provided that your client system and the VNC server have an internet connection.

In this tutorial you will learn:

  • How to install and configure TightVNC Server
  • How to install and configure XFCE desktop manager
  • How to connect to our VNC server with TightVNC Viewer
  • How to tunnel VNC connections through SSH
  • How to manage multiple VNC desktops with a Systemd script

Connecting to a VNC server

Software Requirements and Linux Command Line ConventionsCategoryRequirements, Conventions or Software Version Used

System Installed or upgraded Ubuntu 20.04 Focal Fossa
Software TightVNC Server, XFCE desktop manager, TightVNC Viewer
Other Privileged access to your Linux system as root or via the sudo command.
Conventions # - requires given linux commands to be executed with root privileges either directly as a root user or by use of sudo command
$ - requires given linux commands to be executed as a regular non-privileged user

Install VNC server


Looking for Linux Systems Analyst !

The UAF Geophysical Institute, is looking for an experienced Linux Systems Analyst to join their team of research cyber infrastructure analysts and engineers. LOCATION: Fairbanks, Alaska, USA

APPLY NOW


We'll need to install a few packages first. There are multiple options for VNC server software, but we'll be going with TightVNC Server for this tutorial. Along with VNC, we also need a graphical desktop. XFCE is a good choice, so that's what we'll be covering here.

    1. Start by opening a terminal and entering the following command to install TightVNC server and the XFCE desktop manager core files:
      $ sudo apt install tightvncserver xfce4 xfce4-goodies
    2. After the packages are done installing, we need to configure a username and password that will be used to connect to the VNC server by a client. Create a password with this command:$ vncpasswd
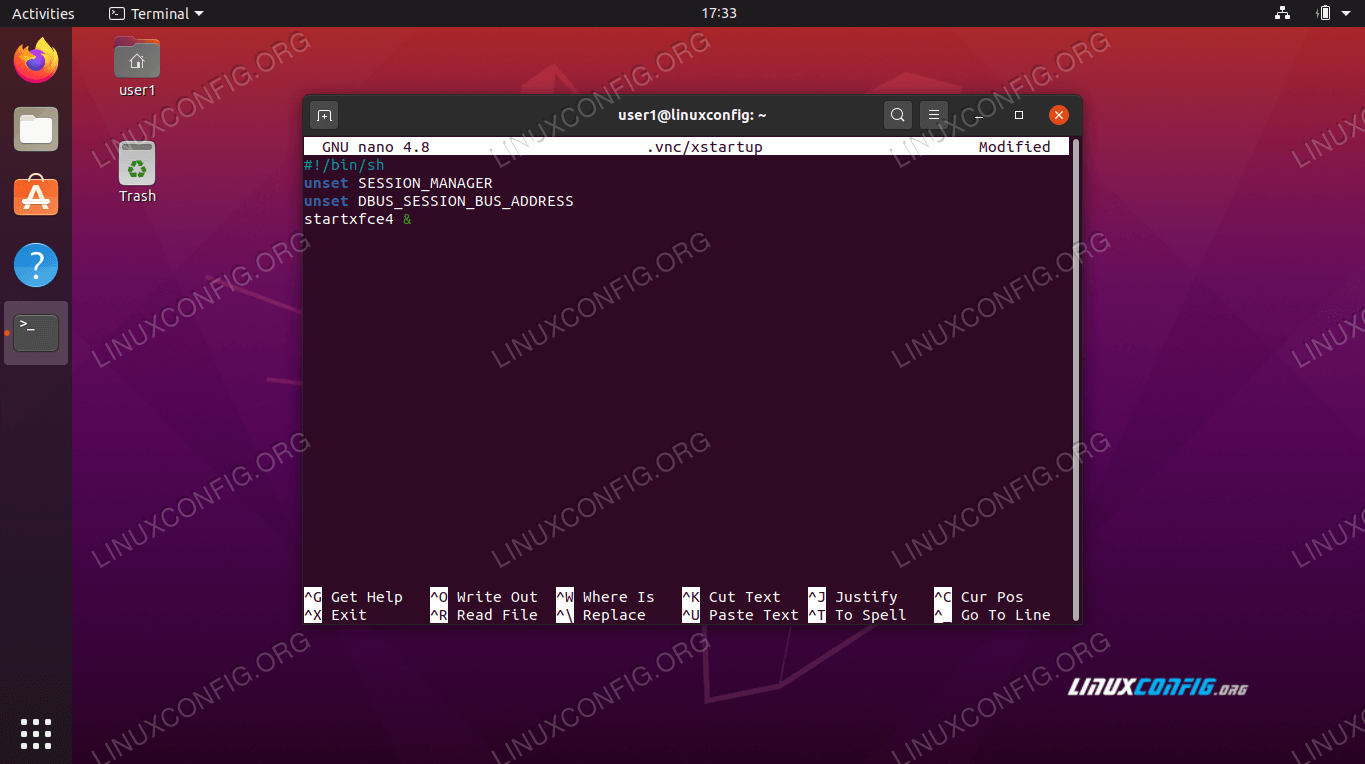
    3. Next, let's configure VNC to start the XFCE desktop environment when a client connects. Use nano or the text editor of your preference (ex. Atom, Sublime) to create the following file:
      $ nano ~/.vnc/xstartup


$ systemctl set-default graphical.target


  1. Insert the following few lines and then save your changes and exit the file:

    #!/bin/sh
    unset SESSION_MANAGER
    unset DBUS_SESSION_BUS_ADDRESS
    startxfce4 &
    xstartup configuration file
  2. With those changes made, edit the permissions of the file to make it executable:$ chmod +x ~/.vnc/xstartup

Start VNC server


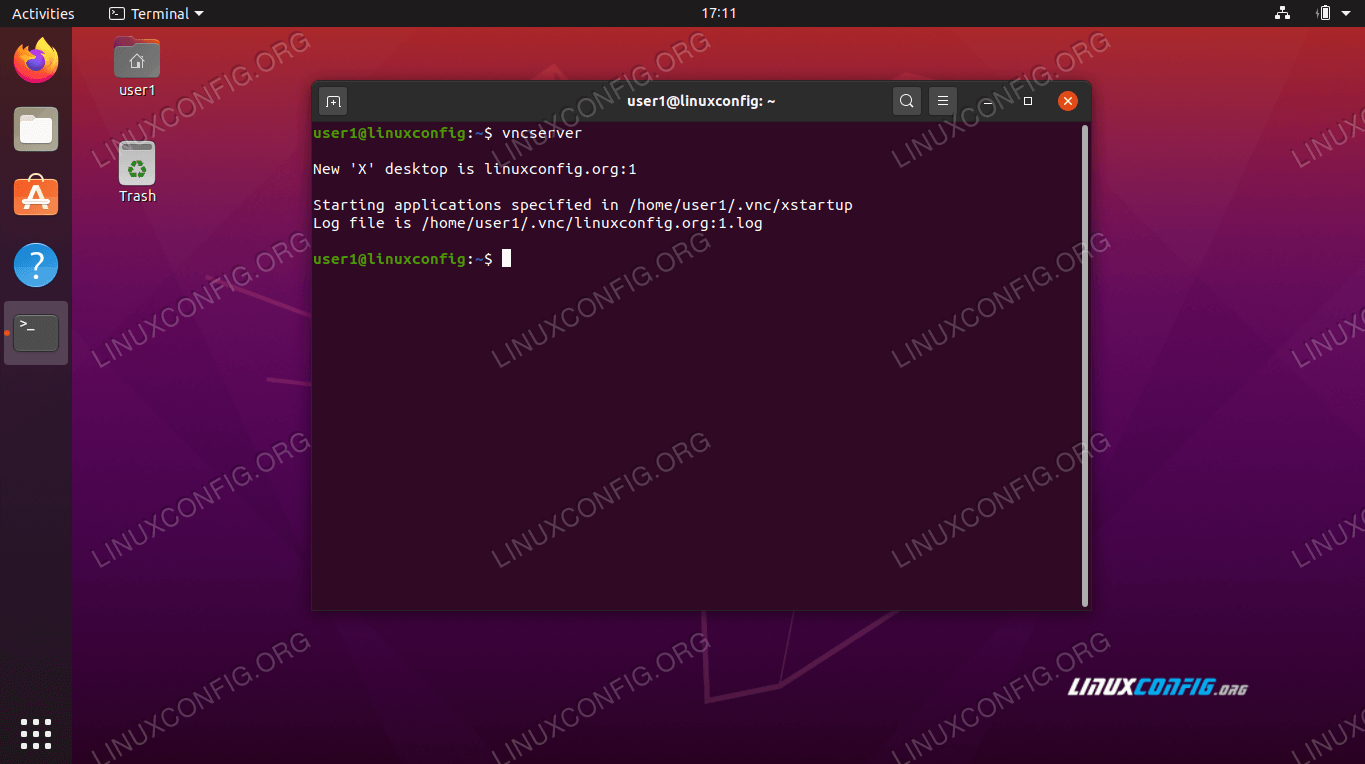
VNC runs as a service on your system. In order for clients to connect, the VNC server must obviously be running and listening for incoming connection attempts. With our configuration complete, we are ready to start VNC server with the following command:

$ vncserver

If your terminal returns some output like in the screenshot below, your VNC server is running correctly.

Launch VNC server

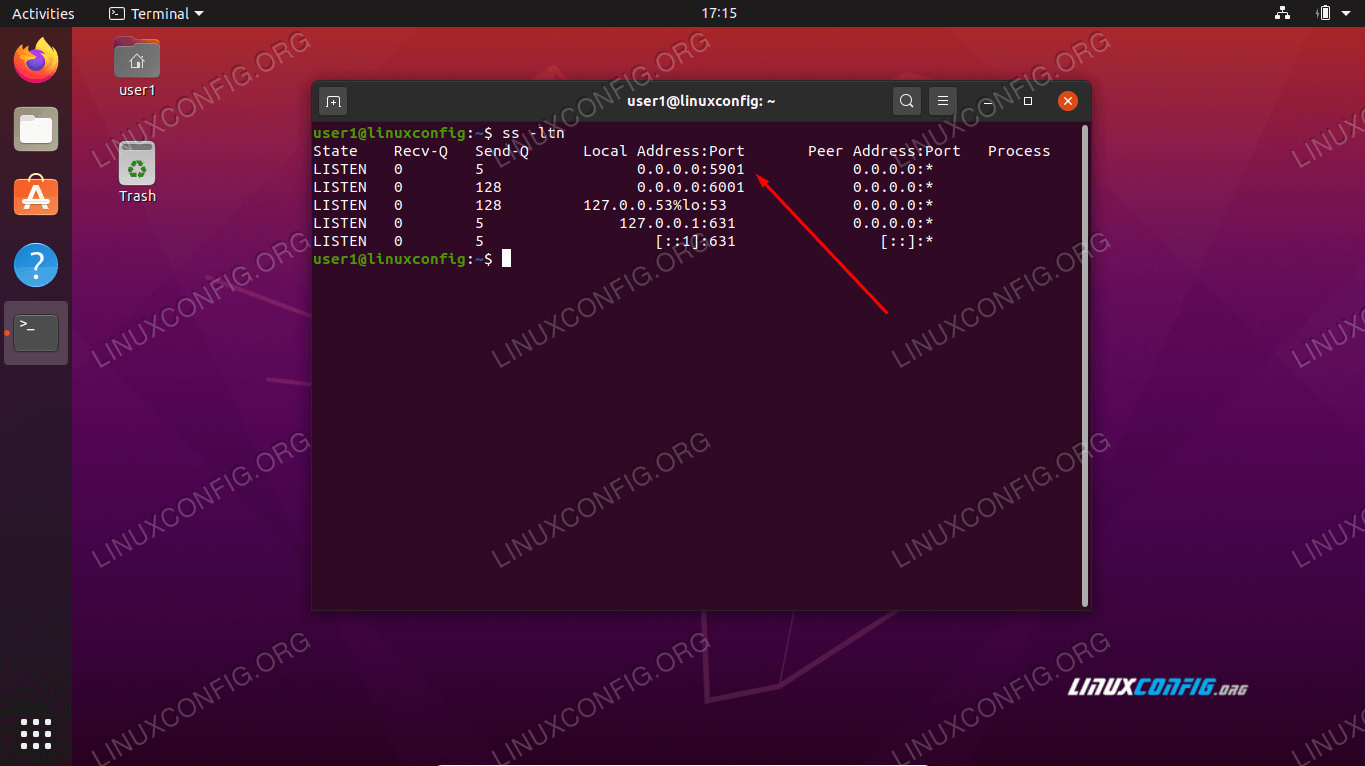
VNC will use a new port for every remote desktop that is created. At this point, your system should be listening on port 5901 for incoming VNC connections. You can see this for yourself with the ss -ltn command:

$ ss -ltn

VNC listening on port 5901

If you have the UFW firewall enabled, you'll need to open port 5901 so it doesn't block incoming VNC connections:

$ sudo ufw allow from any to any port 5901 proto tcp Rule added Rule added (v6)


Looking for Linux Systems Analyst !

The UAF Geophysical Institute, is looking for an experienced Linux Systems Analyst to join their team of research cyber infrastructure analysts and engineers. LOCATION: Fairbanks, Alaska, USA

APPLY NOW


Connect to VNC server

There are a lot of choices in the way of VNC clients and any of them should be capable of connecting to your newly launched VNC server. If you don't already have a preferred client to use, follow along with us as we cover the instructions for connecting to the VNC server with the TightVNC Viewer.

    1. Start by installing the xtightvncviewer package on your Ubuntu client system:$ sudo apt install xtightvncviewer
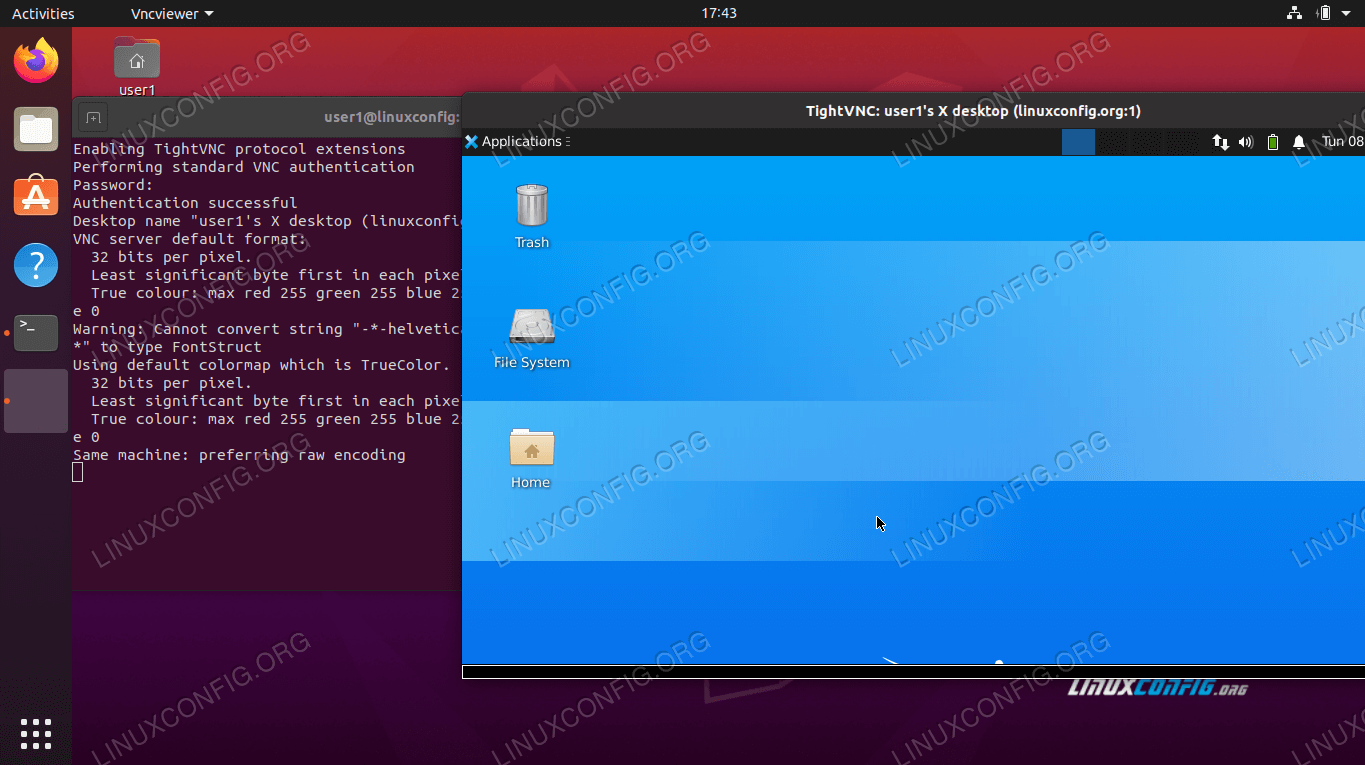
    2. Once the VNC client is installed, you can use the vncviewer command, followed by either the hostname or IP address of the VNC server, in order to connect to it.$ vncviewer linuxconfig.org:1 Enter your password that we created previously when setting up VNC Server. If all went well, you will be presented with a XFCE desktop session running on the remote VNC server Ubuntu system:
      Connect to VNC server


Tunnel VNC through SSH

For extra security, you can tunnel the VNC connection through SSH on your VNC server. Of course, this is assuming that you have SSH access on the VNC server. If you'd like the added security, follow along with these steps:

    1. If you don't already have SSH installed, that's a pretty obvious prerequisite for this to work:$ sudo apt install ssh
    2. Next, create an SSH tunnel on a local port 5901 leading to a remote port 5901 on your VNC server. In the following command, make sure you replace user1 and linuxconfig with the username and hostname of your VNC server:$ ssh -L 5901:127.0.0.1:5901 -N -f -l user1 linuxconfig The above command will open a local port 5901 on a localhost loopback network interface 127.0.0.1:

      $ ss -ltn

      State Recv-Q Send-Q Local Address:Port Peer Address:Port LISTEN 0 128 0.0.0.0:22 0.0.0.0:* LISTEN 0 5 127.0.0.1:631 0.0.0.0:* LISTEN 0 128 127.0.0.1:6010 0.0.0.0:* LISTEN 0 128 127.0.0.1:6011 0.0.0.0:* LISTEN 0 128 0.0.0.0:38299 0.0.0.0:* LISTEN 0 128 127.0.0.1:5901 0.0.0.0:*


  1. Next, use the local port 5901 to connect to a remote VNC server via the SSH tunnel:$ vncviewer localhost:1

VNC server system startup script

While this configuration works, you may have a scenario where you need to manage multiple VNC desktop sessions. In that case, creating a systemd startup script can facilitate that.

Use nano or another text editor to create the following file:

$ sudo nano /etc/systemd/system/vncserver@.service

Once you have the file opened, insert the following lines while replacing the user1 username with the username of your VNC user on Line 7 and Line 10. Optionally, change the screen resolution settings and apply other vncserver options or arguments:

[Unit]
Description=Systemd VNC server startup script for Ubuntu 20.04

After=syslog.target network.target

[Service]
Type=forking

User=user1
ExecStartPre=-/usr/bin/vncserver -kill :%i &> /dev/null
ExecStart=/usr/bin/vncserver -localhost no -depth 24 -geometry 1280x1024 :%i

PIDFile=/home/user1/.vnc/%H:%i.pid
ExecStop=/usr/bin/vncserver -kill :%i

[Install]
WantedBy=multi-user.target


Looking for Linux Systems Analyst !

The UAF Geophysical Institute, is looking for an experienced Linux Systems Analyst to join their team of research cyber infrastructure analysts and engineers. LOCATION: Fairbanks, Alaska, USA

APPLY NOW


Systemd startup file

Next, reload Systemd for the changes to take effect:

$ sudo systemctl daemon-reload

To start VNC desktop 1, enter:

$ sudo service vncserver@1 start

To stop VNC desktop 1, execute:

$ sudo service vncserver@1 stop

The following linux command will enable the VNC desktop 1 to start after reboot:

$ sudo systemctl enable vncserver@1

$ sudo systemctl start vncserver@1
$ sudo systemctl status vncserver@1
$ vncserver -localhost no

To start VNC desktop 2, enter:

$ sudo service vncserver@2 start


출처: linuxconfig.org/vnc-server-on-ubuntu-20-04-focal-fossa-linux


1. 우분투 데스크탑 설치하기

우선 다음 명령어를 입력하여 우분투를 업데이트해줍니다.

sudo apt update && sudo apt upgrade

다음 명령어를 입력하여 우분투 데스크탑을 설치해줍니다.

sudo apt-get install ubuntu-desktop

시간이 좀 오래 걸리니 기다려주세요.


2. VNC 설치하기

VNC를 통해 원격접속하기 위해서는 원격 접속을 당할 시스템과 원격 접속을 할 시스템 양쪽 모두에 VNC 프로그램이 설치되어있어야 합니다.

WSL2의 우분투는 원격 접속을 당할 시스템이므로 VNC서버를 설치해주겠습니다.


다음 명령어를 입력해 VNC서버를 설치해줍니다.

sudo apt-get install tigervnc-standalone-server

이번엔 dotnet-runtime을 설치해줍니다.

sudo wget https://packages.microsoft.com/config/ubuntu/20.04/packages-microsoft-prod.deb -O packages-microsoft-prod.deb
sudo dpkg -i packages-microsoft-prod.deb
sudo apt update
sudo apt install dotnet-runtime-3.1

이번엔 systemd-genie를 설치해줍니다.

아래 명령어를 입력하여 파일을 하나 만들어주세요.

sudo nano /etc/apt/sources.list.d/wsl-translinux.list

만들어진 파일에 다음과 같은 내용을 붙여넣어줍니다.

deb [trusted=yes] https://wsl-translinux.arkane-systems.net/apt/ /

이제 다음 명령어를 입력하여 설치를 마무리합니다.

sudo apt update
sudo apt install systemd-genie


3. VNC 환경설정

다음 명령어를 입력하여 비밀번호를 설정해줍니다.

선택 옵션에서는 n을 입력하여주세요.

vncpasswd

다음 명령어를 입력하여 한번 더 반복해주세요.

sudo vncpasswd

마지막입니다.

한번 더 반복해주세요.

sudo -u gdm vncpasswd

이제 기존의 X를 Xvnc로 대체해주겠습니다.

다음 명령어를 입력하여 Xorg스크립트를 백업해주세요.

sudo mv /usr/bin/Xorg /usr/bin/Xorg_old

이제 다음 명령어를 입력하여 새로운 Xorg 스크립트를 만들어줍니다.

sudo nano /usr/bin/Xorg

만들어진 스크립트에 다음 내용을 붙여넣기 해줍니다.

#!/bin/bash
for arg do
  shift
  case $arg in
    # Xvnc doesn't support vtxx argument. So we convert to ttyxx instead
    vt*)
      set -- "$@" "${arg//vt/tty}"
      ;;
    # -keeptty is not supported at all by Xvnc
    -keeptty)
      ;;
    # -novtswitch is not supported at all by Xvnc
    -novtswitch)
      ;;
    # other arguments are kept intact
    *)
      set -- "$@" "$arg"
      ;;
  esac
done

# Here you can change or add options to fit your needs
command=("/usr/bin/Xvnc" "-geometry" "1024x768" "-PasswordFile" "${HOME:-/root}/.vnc/passwd" "$@") 

systemd-cat -t /usr/bin/Xorg echo "Starting Xvnc:" "${command[@]}"

exec "${command[@]}"

이제 다음 명령어로 파일에 대한 권한을 설정해줍니다.

sudo chmod 0755 /usr/bin/Xorg

다음 명령어를 입력하여 재부팅시켜주세요

genie -s

이제 준비가 끝났습니다.


4. IP 확인하기

다음 명령어를 입력하여 net-tools를 설치해주세요.

sudo apt install net-tools

다음 명령어로 IP를 확인해줍니다.

ifconfig

제가 빨갛게 칠한 부분이 여러분의 IP입니다.

출처: bebutae.tistory.com/145?category=943715

'Linux > Ubuntu' 카테고리의 다른 글

Ubuntu 웹서버 구축  (0) 2021.03.21
Ubuntu Network & WOL  (0) 2021.03.17
Ubuntu 20.04 LTS Server 버전 설치  (0) 2021.03.16
Posted by iWithJoy
Linux/Ubuntu2021. 3. 17. 23:24

우분투 Netplan

우분투 18.04 설치하고 사용하고 계신 분들은 아시겠지만, 이전 LTS 버전과 가장 큰 차이점 중에서 하나가 바로 네트워크 설정 방법 변경된 것일 겁니다.
사실 Netplan은 우분투 18.04 이전 버전인 17.10 버전부터 네트워크 설정을 관리하기 위해서 사용되었습니다. Netplan은 기존의 우분투 네트워크 인터페이스를 관리하기 위해서 사용되는 파일들(/etc/network/interfaces)을 대체하기 위한 툴입니다. 우분투 18.04 LTS 버전 부터는 기존의 설정 파일이 아닌, /etc/netplan/*.yaml 를 사용해 주셔야합니다.

새로운 인터페이스 설정파일들은 /etc/netplan 디렉터리에 존재하며, 크게 NetworkManager 와 networkd 으로 renderer 값을 갖습니다.

  • NetworkManager : 데스크탑 컴퓨터에서 사용됩니다. 이 값이 renderer로 사용되었을 경우 NetworkManager GUI를 통해서 네트워크 인터페이스가 관리되게 됩니다. 직접 Netplan 설정 파일을 통해 네트워크 설정을 하는것이 아니고 NetworkManager의 GUI를 통해서 설정되게 됩니다.
  • networkd : 주로 서버에서 사용되는 renderer입니다. 이 글에서는 networkd의 renderer 값으로 설정 방법을 설명드리도록 하겠습니다.

Netplan 설정 파일 구조

설정 파일의 최상위 노드 정보는 network 입니다. network는 “version: 2” (Curtin에서 사용되는 YAML), 그리고 renderer 등이 정의 됩니다. 그리고 renderer 값에 따라 “ethernets:”, “wifis:”, “bridges:” 와 같은 디바이스 정의 그룹이 추가 정의되게 됩니다. 각각의 디바이스 블럭은 map 형태로 세부적인 형태로 정의가 이뤄지게 됩니다. 보다 자세한 내용은 아래의 설정 파일을 통해서 설명드리도록 하겠습니다.

우분투 18.04 네트워크 설정

설정 파일
만약 우분투 18.04 데스크탑 버전을 설치하신 경우, /etc/netplan 디렉터리의 설정파일을 확인하시면 아래와 같은 내용이 있습니다.

# Let NetworkManager manage all devices on this system network: version: 2 renderer: NetworkManager

NetworkManager을 renderer으로 사용한다는 내용으로, NetworkManager의 GUI를 이용하여 네트워크 설정이 이뤄지게 됩니다.

이더넷 DHCP 설정

아래의 설정 내용은 이더넷 enp6s0 인터페이스를 DHCP 방식으로 설정하는 내용입니다.

network: 
  version: 2 
  renderer: networkd
  ethernets: enp3s0: 
  dhcp4: yes 
  dhcp6: yes

설정 내용을 작성 후, 아래의 명령어를 실행하면 설정 내용이 적용되게 됩니다.

$ sudo netplan apply

이더넷 고정 IP 설정
아래의 설정 내용은 이더넷 enp6s0 인터페이스를 고정 IP 방식으로 설정하는 내용입니다.

network: 
  version: 2 
  renderer: networkd 
  ethernets: 
    enp3s0: 
      addresses: 
      - 192.168.11.111/24 
      gateway4: 192.168.11.1 
      nameservers: 
#        addresses: [168.126.63.1,8.8.8.8]
        addresses
: 
        - 8.8.8.8
        search:
        - 8.8.4.4

위의 내용으로 설정 후에 다음 명령어를 실행하면, 네트워크 설정이 적용되게 됩니다.

$ sudo netplan apply


무선랜 설정

무선랜 인터페스 wlp2s0 에 무선랜을 설정하는 예제 내용입니다.

network: 
  version: 2 
  renderer: networkd 
  wifis: 
    wlp2s0: 
      dhcp4: yes 
      access-points: 
        "network_ssid_name": 
          password: "**********"

주소는 DHCP 방식으로 할당받는 예제이며, AP(Access Point) 정보를 SSID 정보와 패스워드를 위와 같이 입력하면 됩니다.
그리고 아래의 명령어를 실행하면 설정이 적용되게 됩니다.

$ sudo netplan apply

출처: hiseon.me/linux/ubuntu/ubuntu-18-04-netplan/


리눅스 WiFi 연결 명령어

Network Manager 정지

우분투 리눅스 등의 데스크탑 환경에서는 Network Manager 데몬이 네트워크를 관리하는데 사용됩니다. Network Manager가 실행중일 경우 이 데몬을 아래의 명령어로 먼저 정지해 주시기 바랍니다.

$ sudo /etc/init.d/network-manager stop

최신 우분투 버전에서 사용되는 netplan 과 관련해서는 아래의 글을 참고해 주시기 바랍니다.

우분투 18.04 네트워크 설정

리눅스 WiFi 연결 명령어

무선랜 인터페이스 확인

다음의 명령어로 인터페이스 이름을 확인합니다.

$ iw dev

명령어 실행 결과, 무선랜 카드 인터페이스 이름은 wlxe84e06710cec 으로 확인되고 있습니다. 앞으로 이 인터페이스 이름을 이용하여 설정에 사용되게 됩니다.

무선랜 인터페이스 활성화

그리고 아래의 명령어로 인터페이스를 확인 합니다.

$ sudo ip link show wlxe84e06710cec

현재 무선랜 카드가 활성화 되어있지 않으므로, 다음 명령어를 사용하여 무선랜 카드를 활성화 합니다.

$ sudo ip link set wlxe84e06710cec up

그리고 다시 무선랜 카드 정보를 확인합니다. 처음과 다르게 활성화 된 무선랜 카드 정보를 확인 할 수 있습니다.

$ sudo ip link show wlxe84e06710cec

연결 상태 확인

다음 명령어를 사용하여, 현재 무선랜 카드의 연결 상태를 확인 합니다.

$ iw wlxe84e06710cec link

현재 WiFi에 연결되어 있지 않은 걸 알 수 있습니다.

WiF 스캔

다음 명령어를 사용하여 WiFi 정보를 스캔합니다. 스캔 후 나타나는 WiFi 중에서 비밀번호가 없는 WiFi 와 WPA/WPA2 암호화 방식을 사용하는 WiFi에 대해서 나눠서 설명드리도록 하겠습니다.

공개된 WiFi 일 경우

공개된 WiFi 일 경우 아래와 같은 명령어를 사용하여, SSID를 확인 한 다음 바로 WiFi에 연결 할 수 있습니다.

아래의 명령어는 iptime 이라는 WiFi에 접속하는 명령어 입니다. 그 다음 연결접속 정보를 확인 후 IP를 할당 받으면 됩니다.

$ iw wlxe84e06710cec scan $ sudo iw dev wlxe84e06710cec connect iptime

비공개된 WiFi 일 경우 (WPA/WPA2)

WPA/WPA2 암호화 방식을 사용하는 WiFi 정보입니다. 네트워크를 스캔하면 다음과 비슷한 결과가 나타납니다.

$ iw wlxe84e06710cec scan // 생략 BSS 34:cc:28:05:f0:58(on wlxe84e06710cec) TSF: 175628935496 usec (2d, 00:47:08) freq: 2432 beacon interval: 100 TUs capability: ESS Privacy ShortSlotTime (0x0411) signal: -69.00 dBm last seen: 800 ms ago Information elements from Probe Response frame: SSID: ktEgg_F058 WPA: * Version: 1 * Group cipher: TKIP * Pairwise ciphers: TKIP CCMP * Authentication suites: PSK RSN: * Version: 1 * Group cipher: TKIP * Pairwise ciphers: TKIP CCMP * Authentication suites: PSK * Capabilities: 1-PTKSA-RC 1-GTKSA-RC (0x0000) // 생략

위의 스캔된 정보에서 가장 중요한 내용이 SSID 와 암호화 프로토콜입니다. RSN 방식이 WPA2 를 나타냅니다. WiFi의 SSID 이름이 ktEgg_F058 일 경우 설정 후 접속하는 방법입니다.

아래의 명령어를 실행 후, WiFi 패스워드를 입력하면 설정 파일이 생성되게 됩니다.

$ sudo wpa_passphrase ktEgg_F058 > wpa_supplicant.conf

이 설정 파일을 이용하여 다음 명령어를 이용하여 WiFi 에 접속하면 됩니다.

$ sudo wpa_supplicant -B -i wlxe84e06710cec -c wpa_supplicant.conf

위의 명령어에서 사용된 옵션의 의미는 다음과 같습니다.

  • -B : 백그리운드 실행
  • -i wlxe84e06710cec : 무선랜 인터페이스 이름
  • -c wpa_supplicant.conf : WiFi 설정 파일 경로

WiFi 연결 정보 확인

WiFi 에 접속 후 연결 정보를 확인 합니다.

$ sudo iw wlxe84e06710cec link

명령어 실행 결과 SSID 가 출력되며, 연결 정보가 나타나는 것을 확인 할 수 있습니다.

DHCP 주소 할당

성공적으로 WiFi에 접속되게 되면, 아래의 명령어로 IP 주소를 할당 받습니다.

$ sudo dhclient wlxe84e06710cec

위의 명령어 실행 결과, 에러 없이 IP 주소가 할당되었을 경우 WiFi 연결이 성공적으로 이뤄진 것입니다.

출처: hiseon.me/network/linux-wifi-command-line/


VNC를 이용한 우분투 원격접속하기

서버로 사용하기 위해서느 원격 접속이 필수인데, 지난 번 포스팅처럼 xrdp를 이용하면 Windows에서는 접속이 가능하지만 스마트폰 같은 다른 운영체제에서는 프로토콜 에러라는 메세지와 함께 접속이 안되는 문제가 있다. 그래서 rdp가 아닌 vnc를 이용한 원격접속 방법을 시도했다. rdp를 이용하면 로컬에서는 접속이 끊기고 원격지에서만 PC를 제어하지만 VNC는 로컬 시스템에 사용자가 로그인되어 있어야하고, 같은 화면을 보면서 PC를 제어하게 된다. 스마트폰 초창기에 유행한 크레이지 리모트나, 팀뷰어를 생각하면 된다.


우분투 최신 LTS 버전인 18.04 기준

 Windows에서 원격 데스크톱 허용하듯이 이렇게만 설정해주면 리눅스끼리의 원격 접속은 문제없지만, 다른 운영체제에서 접속하는데는 암호화 관련 문제가 있다. 그래서 관련 설정을 꺼주어야 한다. 아래 명령어로 dconf 에디터를 설치해준다.

apt install dconf-editor


dconf-editor 실행 후 /org/gnome/desktop/remote-access 항목으로 들어가서 require-encryption 옵션을 꺼준다.


Play 스토어에서 VNC로 검색을 하고 제일 위에 있는 앱을 설치해봤다. VNC는 기본포트로 5900을 사용하는데, 암호화 기능도 끈 상태이기 때문에 다른 포트로 바꿔서 사용하는게 좋을 것 같다.

출처: https://junhyeok.tistory.com/690 [Half Time]


우분투 WOL 설정하기

그 동안 우분투에서도 잘 써왔다고 생각했던 WOL(Wake On Lan) 기능이 얼마전부터 잘 작동되지 않는다. 그래서 이번에도 검색을 해보니 메인보드 바이오스의 설정 외에도 운영체제에서 랜카드 설정이 필요하다고 한다. Windows나 우분투 16.04 PC를 사용할 때는 별도 설정이 없어도 대부분 잘되었기 때문에 신경쓰지 않던 부분인데 아마 우분투 18.04를 새로 설치하면서부터 뭔가 변경되었나보다.

1.ethtool 설치 : ethtool이라는 명령어를 통해서 PC가 꺼졌을때 랜카드가 대기하도록 해야한다.
sudo apt install ethtool 를 입력해서 ethtool을 먼저 설치한다.

2. ifconfig를 통해서 랜카드 정보를 확인한다. enp6s0라고 쓰여있는 부분을 기억해둔다.
사용자에 따라 약간씩 다를 수 있다.
sudo apt install net-tools 를 입력해서 설치 후에 ifconfig 사용이 가능하다.

 ethtool 명령으로 랜카드의 상태를 확인해본다. Wake-on: g 라고 되어있으면 wol 기능이 활성화된 것이다. d는 비활성화(disabled)를 의미한다. 스크린샷은 활성화 상태로 만든 후에 찍은 것이라 g로 나와있다.

sudo nano /etc/rc.local

나노 에디터를 이용해서 /etc 디렉토리에 rc.local 이라는 파일을 만들고 아래 내용을 입력한다. rc.local은 Windows의 시작프로그램과 같은 역할이라고 보면 된다.

#!/bin/bash
ethtool -s enp6s0 wol g
exit 0

나노 에디터는 Ctrl + O로 저장, Ctrl + X로 종료해준다.

sudo chmod +x /etc/rc.local 

좀전에 만든 rc.local 파일을 chmod +x 명령어로 실행파일로 만들어준다. 

sudo /etc/rc.local
실행 후,

sudo ethtool enp6s0
명령으로 Wake-on: g 로 되어 있는지 확인한다.

출처: https://junhyeok.tistory.com/704 [Half Time]


우분투 VNC server 설치

How To Install VNC Server on Ubuntu 20.04


Introduction

Virtual Network Computing, or VNC, is a connection system that allows you to use your keyboard and mouse to interact with a graphical desktop environment on a remote server. It makes managing files, software, and settings on a remote server easier for users who are not yet comfortable with the command line.

In this guide, you’ll set up a VNC server with TightVNC on an Ubuntu 20.04 server and connect to it securely through an SSH tunnel. Then, you’ll use a VNC client program on your local machine to interact with your server through a graphical desktop environment.

Prerequisites

To complete this tutorial, you’ll need:

  • One Ubuntu 20.04 server with a non-root administrative user and a firewall configured with UFW. To set this up, follow our initial server setup guide for Ubuntu 20.04.
  • A local computer with a VNC client installed. The VNC client you use must support connections over SSH tunnels:

Step 1 — Installing the Desktop Environment and VNC Server

By default, an Ubuntu 20.04 server does not come with a graphical desktop environment or a VNC server installed, so you’ll begin by installing those.

You have many options when it comes to which VNC server and desktop environment you choose. In this tutorial, you will install packages for the latest Xfce desktop environment and the TightVNC package available from the official Ubuntu repository. Both Xfce and TightVNC are known for being lightweight and fast, which will help ensure that the VNC connection will be smooth and stable even on slower internet connections.

After connecting to your server with SSH, update your list of packages:

  • sudo apt update


Now install Xfce along with the xfce4-goodies package, which contains a few enhancements for the desktop environment:

  • sudo apt install xfce4 xfce4-goodies


During installation, you may be prompted to choose a default display manager for Xfce. A display manager is a program that allows you to select and log in to a desktop environment through a graphical interface. You’ll only be using Xfce when you connect with a VNC client, and in these Xfce sessions you’ll already be logged in as your non-root Ubuntu user. So for the purposes of this tutorial, your choice of display manager isn’t pertinent. Select either one and press ENTER.

Once that installation completes, install the TightVNC server:

  • sudo apt install tightvncserver


Next, run the vncserver command to set a VNC access password, create the initial configuration files, and start a VNC server instance:

  • vncserver


You’ll be prompted to enter and verify a password to access your machine remotely:

Output

You will require a password to access your desktops. Password: Verify:

The password must be between six and eight characters long. Passwords more than 8 characters will be truncated automatically.

Once you verify the password, you’ll have the option to create a view-only password. Users who log in with the view-only password will not be able to control the VNC instance with their mouse or keyboard. This is a helpful option if you want to demonstrate something to other people using your VNC server, but this isn’t required.

The process then creates the necessary default configuration files and connection information for the server. Additionally, it launches a default server instance on port 5901. This port is called a display port, and is referred to by VNC as :1. VNC can launch multiple instances on other display ports, with :2 referring to port 5902, :3 referring to 5903, and so on:

Output

Would you like to enter a view-only password (y/n)? n xauth: file /home/sammy/.Xauthority does not exist New 'X' desktop is your_hostname:1 Creating default startup script /home/sammy/.vnc/xstartup Starting applications specified in /home/sammy/.vnc/xstartup Log file is /home/sammy/.vnc/your_hostname:1.log

Note that if you ever want to change your password or add a view-only password, you can do so with the vncpasswd command:

  • vncpasswd


At this point, the VNC server is installed and running. Now let’s configure it to launch Xfce and give us access to the server through a graphical interface.

Step 2 — Configuring the VNC Server

The VNC server needs to know which commands to execute when it starts up. Specifically, VNC needs to know which graphical desktop environment it should connect to.

The commands that the VNC server runs at startup are located in a configuration file called xstartup in the .vnc folder under your home directory. The startup script was created when you ran the vncserver command in the previous step, but you’ll create your own to launch the Xfce desktop.

Because you are going to be changing how the VNC server is configured, first stop the VNC server instance that is running on port 5901 with the following command:

  • vncserver -kill :1


The output will look like this, although you’ll see a different PID:

Output

Killing Xtightvnc process ID 17648

Before you modify the xstartup file, back up the original:

  • mv ~/.vnc/xstartup ~/.vnc/xstartup.bak


Copy

Now create a new xstartup file and open it in a text editor, such as nano:

  • nano ~/.vnc/xstartup


Copy

Then add the following lines to the file:

~/.vnc/xstartup

#!/bin/bash
xrdb $HOME/.Xresources
startxfce4 & 

Copy

The first line is a shebang. In executable plain-text files on *nix platforms, a shebang tells the system what interpreter to pass that file to for execution. In this case, you’re passing the file to the Bash interpreter. This will allow each successive line to be executed as commands, in order.

The first command in the file, xrdb $HOME/.Xresources, tells VNC’s GUI framework to read the server user’s .Xresources file. .Xresources is where a user can make changes to certain settings of the graphical desktop, like terminal colors, cursor themes, and font rendering. The second command tells the server to launch Xfce. Whenever you start or restart the VNC server, these commands will execute automatically.

Save and close the file after adding these lines. If you used nano, do so by pressing CTRL + X, Y, then ENTER.

To ensure that the VNC server will be able to use this new startup file properly, you’ll need to make it executable:

  • chmod +x ~/.vnc/xstartup


Copy

Then restart the VNC server:

  • vncserver -localhost


Copy

Notice that this time the command includes the -localhost option, which binds the VNC server to your server’s loopback interface. This will cause VNC to only allow connections that originate from the server on which it’s installed.

In the next step, you’ll establish an SSH tunnel between your local machine and your server, essentially tricking VNC into thinking that the connection from your local machine originated on your server. This strategy will add an extra layer of security around VNC, as the only users who will be able to access it are those that already have SSH access to your server.

You’ll see output similar to this:

Output

New 'X' desktop is your_hostname:1 Starting applications specified in /home/sammy/.vnc/xstartup Log file is /home/sammy/.vnc/your_hostname:1.log

With the configuration in place, you’re ready to connect to the VNC server from your local machine.

Step 3 — Connecting to the VNC Desktop Securely

VNC itself doesn’t use secure protocols when connecting. To securely connect to your server, you’ll establish an SSH tunnel and then tell your VNC client to connect using that tunnel rather than making a direct connection.

Create an SSH connection on your local computer that securely forwards to the localhost connection for VNC. You can do this via the terminal on Linux or macOS with the following ssh command:

  • ssh -L 59000:localhost:5901 -C -N -l sammy your_server_ip


Copy

Here’s what this ssh command’s options mean:

  • -L 59000:localhost:5901: The -L switch specifies that the given port on the local computer (59000) is to be forwarded to the given host and port on the destination server (localhost:5901, meaning port 5901 on the destination server, defined as your_server_ip). Note that the local port you specify is somewhat arbitrary; as long as the port isn’t already bound to another service, you can use it as the forwarding port for your tunnel.
  • -C: This flag enables compression which can help minimize resource consumption and speed things up.
  • -N: This option tells ssh that you don’t want to execute any remote commands. This setting is useful when you just want to forward ports.
  • -l sammy your_server_ip: The -l switch let’s you specify the user you want to log in as once you connect to the server. Make sure to replace sammy and your_server_ip with the name of your non-root user and your server’s IP address.

Note: This command establishes an SSH tunnel that forwards information from port 5901 on your VNC server to port 59000 on your local machine via port 22 on each machine, the default port for SSH. Assuming you followed the prerequisite Initial Server Setup guide for Ubuntu 20.04, you will have added a UFW rule to allow connections to your server over OpenSSH.

This is more secure than simply opening up your server’s firewall to allow connections to port 5901, as that would allow anyone to access your server over VNC. By connecting over an SSH tunnel, you’re limiting VNC access to machines that already have SSH access to the server.

If you are using PuTTY to connect to your server, you can create an SSH tunnel by right-clicking on the top bar of the terminal window, and then clicking the Change Settings… option:

Find the Connection branch in the tree menu on the left-hand side of the PuTTY Reconfiguration window. Expand the SSH branch and click on Tunnels. On the Options controlling SSH port forwarding screen, enter 59000 as the Source Port and localhost:5901 as the Destination, like this:

Then click the Add button, and then the Apply button to implement the tunnel.

Once the tunnel is running, use a VNC client to connect to localhost:59000. You’ll be prompted to authenticate using the password you set in Step 1.

Once you are connected, you’ll see the default Xfce desktop. It should look something like this:

You can access files in your home directory with the file manager or from the command line, as seen here:

Press CTRL+C in your local terminal to stop the SSH tunnel and return to your prompt. This will disconnect your VNC session as well.

Now you can configure your VNC server to run as a systemd service.

Step 4 — Running VNC as a System Service

By setting up the VNC server to run as a systemd service you can start, stop, and restart it as needed, like any other service. You can also use systemd’s management commands to ensure that VNC starts when your server boots up.

First, create a new unit file called /etc/systemd/system/vncserver@.service:

  • sudo nano /etc/systemd/system/vncserver@.service


The @ symbol at the end of the name will let us pass in an argument you can use in the service configuration. You’ll use this to specify the VNC display port you want to use when you manage the service.

Add the following lines to the file. Be sure to change the value of User, Group, WorkingDirectory, and the username in the value of PIDFILE to match your username:
/etc/systemd/system/vncserver@.service
-----------------------------------------------------------------------------------
[Unit]
Description=Start TightVNC server at startup
After=syslog.target network.target

[Service]
Type=forking
User=sammy
Group=sammy
WorkingDirectory=/home/sammy

PIDFile=/home/sammy/.vnc/%H:%i.pid
ExecStartPre=-/usr/bin/vncserver -kill :%i > /dev/null 2>&1
ExecStart=/usr/bin/vncserver -depth 24 -geometry 1280x800 -localhost :%i
ExecStop=/usr/bin/vncserver -kill :%i

[Install]
WantedBy=multi-user.target
-----------------------------------------------------------------------------------

The ExecStartPre command stops VNC if it’s already running. The ExecStart command starts VNC and sets the color depth to 24-bit color with a resolution of 1280x800. You can modify these startup options as well to meet your needs. Also, note that the ExecStart command again includes the -localhost option.

Save and close the file.

Next, make the system aware of the new unit file:

  • sudo systemctl daemon-reload


Enable the unit file:

  • sudo systemctl enable vncserver@1.service


The 1 following the @ sign signifies which display number the service should appear over, in this case the default :1 as was discussed in Step 2.

Stop the current instance of the VNC server if it’s still running:

  • vncserver -kill :1


Then start it as you would start any other systemd service:

  • sudo systemctl start vncserver@1


You can verify that it started with this command:

  • sudo systemctl status vncserver@1


If it started correctly, the output should look like this:

Output

● vncserver@1.service - Start TightVNC server at startup Loaded: loaded (/etc/systemd/system/vncserver@.service; enabled; vendor preset: enabled) Active: active (running) since Thu 2020-05-07 17:23:50 UTC; 6s ago Process: 39768 ExecStartPre=/usr/bin/vncserver -kill :1 > /dev/null 2>&1 (code=exited, status=2) Process: 39772 ExecStart=/usr/bin/vncserver -depth 24 -geometry 1280x800 :1 (code=exited, status=0/SUCCESS) Main PID: 39795 (Xtightvnc) ...

Your VNC server is now ready to use whenever your server boots up, and you can manage it with systemctl commands like any other systemd service.

However, there won’t be any difference on the client side. To reconnect, start your SSH tunnel again:

  • ssh -L 59000:localhost:5901 -C -N -l sammy your_server_ip


Copy

Then make a new connection using your VNC client software to localhost:59000 to connect to your server.

Conclusion

You now have a secured VNC server up and running on your Ubuntu 20.04 server. Now you’ll be able to manage your files, software, and settings with a user-friendly graphical interface, and you’ll be able to run graphical software like web browsers remotely.

출처: tecadmin.net/install-vnc-server-on-ubuntu-20-04/www.digitalocean.com/community/tutorials/how-to-install-and-configure-vnc-on-ubuntu-20-04


아래는 참고내용 ----------

vnc 리스트 보기

$ vncserver -list


vnc 지우기

특정 번호로 지우기

여기서 1은 5901 포트의 맨뒤 1

$ vncserver -kill :1

전체 지우기

$ vncserver -kill :*


connection refused

vnc viewer를 통해서 접속하려는데 connection refused 가 뜸...

netstat -tnlp를 통해서 확인 결과

::1:5901 식으로 이상하게 표시되어있음


vncserver 명령어 실행 시 추가 조건 추가

$ vncserver -localhost no


아니면 /etc/vnc.conf 변경

$ vim /etc/vnc.conf

파일 중간에 $localhost = "no"; 추가


1

2

3

4

5

6

7

8

9

10

11

# $localhost should the TigerVNC server only listen on localhost for

#            incoming VNC connections.

#

# Example: $localhost = "yes";

# Example: $localhost = "no";

#

# Default: $localhost = "yes"; # if $SecurityTypes does not contain any TLS*

#                              #    or X509* security types or the $SecurityTypes

#                              #    does contain at least on *None security type.

# Default: $localhost = "no";  # Otherwise

$localhost = "no";

Colored by Color Scripter

cs


출처: 0902.tistory.com/24


1. Tiger VNC Server 설치

$ sudo apt-get install tigervnc-standalone-server tigervnc-xorg-extension

2. 비밀번호 설정

$ vncpasswd

3. xstartup 작성
  "~/.vnc/xstartup" 파일을 열어 아래와 같이 작성한다.

#!/bin/sh

# Start Gnome 3 Desktop

[ -x /etc/vnc/xstartup ] && exec /etc/vnc/xstartup

[ -r $HOME/.Xresources ] && xrdb $HOME/.Xresources

vncconfig -iconic &

dbus-launch --exit-with-session gnome-session &

xstartup 파일 예제 (캡쳐)

4. 서버 실행

$ vncserver -localhost no

잘 수행되고 있는지는 "vncserver -list" 명령으로 확인할 수 있습니다.-localhost 옵션에 no를 주지 않으면 default 설정에 의해 localhost 에 의한 접근만 허용됩니다.
따라서 외부 접속을 허용하려면 해당 옵션을 주어야 합니다.

vncserver -list 명령 결과 확인 (정상적으로 생성된 Session List가 표시됨)

5. 접속 잘 되는지 확인

https://www.realvnc.com/en/connect/download/viewer/linux/

RealVNC의 Stand-alone 실행 파일로 테스트 해보았습니다.
(해당 vncviewer는 기업에서 사용할 경우 돈을 내야 합니다. 유의하시기 바랍니다.)

Download 후 chmod +x <실행파일> 로 실행 권한 부여 후 실행합니다.
IP는 가급적 localhost나 127.0.0.1 대신 공인 IP를 활용하여 외부 접속이 잘 되는지 확인하시기 바랍니다.

※ 위에서 X DISPLAY 가 :2 일 경우 5902 포트입니다.

출처: https://z-wony.tistory.com/19 [끄적끄적 프로그래밍]

'Linux > Ubuntu' 카테고리의 다른 글

Ubuntu 웹서버 구축  (0) 2021.03.21
Ubuntu VNC 설치  (0) 2021.03.20
Ubuntu 20.04 LTS Server 버전 설치  (0) 2021.03.16
Posted by iWithJoy
Linux/Ubuntu2021. 3. 16. 21:45

Ubuntu는 기본적으로 Desktop 버전과 Server 버전이 있습니다.
CentOS로 치면 표준 설치와 minimal 설치정도로 비교할 수 있을것 같네요.

차이점

Desktop 설치를 하게되면 기본적인 GUI 환경과 어느정도 유틸리티가 설치되어서 용량이 꽤 나가게 되는데
Server 버전을 설치하게 되면 최소한의 유틸리티가 설치되게 됩니다.

그래서 이번에는 제가 사용중인 ESXi OS환경에서 Ubuntu 20.04 LTS Server 버전을 설치해보도록 하겠습니다.

Ubuntu 20.04 LTS Server ISO 다운로드

우분투 공식홈페이지로 접속해서 다운로드하면됩니다.

https://ubuntu.com/download/server

다운로드가 완료되면 ESXi 데이터 스토어에 옮겨줍니다.

Ubuntu 20.04 LTS OS 설치

머신 새로만들기로 진행하겠습니다.

간단하게 이름과 OS 설정

스펙은 주고싶은대로 주시고 ISO 파일도 설정해주시면됩니다.(아까 업로드한걸로)

다 만들어졌으면 전원 켜기 버튼

기본설정

처음 language에는 한글이 없어 english로 시작합니다.

키보드는 다행히(?) 한글이있네요 찾아서 선택

네트워크 부분이 중요합니다.
여기서 고정 IP로 설정하지않으면 설치하고나서 바꿔주셔도 되긴합니다만.. 귀찮으니 여기서 합니다

Edit IPv4를 누르고 DHCP를 Manual로 변경해줍니다.
그리고 아래와 같은 형식으로 ip주소들을 넣어주면 됩니다.

프록시서버는 기본적으로 다들 사용안하실거라고 생각합니다.

미러서버도 많은데.. 귀찮으니 기본으로 갑시다.

스토리지 설정입니다.

카카오 미러로 변경: kr.archive.ubuntu.com 을 mirror.kakao.com 으로 수정

설치하실 저장장치를 선택하시고, LVM은 필요에 따라 설정하시고, 일단, 제거합니다.

설정한 장치가 포맷된다는 확인창이 표시되는데 확인 후, [ Continue ] 선택하시면 됩니다.

이제 거의 끝났습니다.
서버의 Hostname과 사용할 유저정보를 입력해주세요.

서버같은 경우 GUI가 없기 때문에 터미널로 접근하리라 생각됩니다
Open SSH는 필수입니다.

이외에 필요한것들을 선택해서 깔아주세요.
저는 웬만해서 여기서는 설치하지않고 터미널에서 직접설치합니다.

설치진행중..

다 끝나면 리부팅 하라고 나옵니다.(Cdrom Unmount하라고 나오는데 그때 Enter 한번눌러주면됩니다)

설정한 계정정보를 입력해주면 로그인 완료입니다.

기본적으로 커널 5.4 사용에 기본파일 용량으로 4.1G 정도 사용 중

출처: blog.dalso.org/linux/ubuntu-20-04-lts/9074


우분투 server OS에 데스크탑 GUI 설치

sudo apt-get update

sudo apt-get upgrade


sudo apt-get install ubuntu-desktop

를 입력하면 다운로드를 끝내고 설치까지 알아서 자동으로 진행한다.


설치가 끝나고나면 별도의 재부팅없이

startx

를 입력하면 익숙한 그놈(GNOME: GNU Network Object Model Environment) 데스크탑 GUI가 보일것이다. 이후 재부팅시에도 적용됩니다.

출처: blog.naver.com/grkr90/221889423598


우분투 저장소 변경

먼저 우분투를 포함한 각 리눅스 배포판들은 리눅스에서 돌아가는 주요 프로그램들을 저장소라는 곳에 한데 모아 제공하고 있습니다. 이러한 프로그램을 패키지라고 부르는데요. 터미널에서 간단한 명령어로 설정 없이 손쉽게 설치할 수 있습니다.

그러나 이 저장소에 올라가 있는 패키지들은 최신 버전이 아닌 경우가 많고 때에 따라서는 사용자 리눅스의 환경설정과 맞지 않아 설치가 되지 않는 경우가 있습니다.

그래서 리눅스를 잘 다루시는 분들은 직접 소스를 다운받아 자신의 리눅스 환경에 맞게 컴파일하여 설치하게 되는데요. 이렇게 하면 안정성이 굉장히 올라가게 됩니다.

그렇지만 이 컴파일 설치는 요구하는 제반지식이 상당하기 때문에 쉽게 시도할 수 있는 일은 아닙니다.

그렇다고 초심자 분들이 크게 걱정하실 필요는 없습니다. 저장소를 이용한 설치도 일반적인 환경에는 매우 안정적으로 설치되기 때문입니다.

컴파일 설치가 궁금하시다면 인터넷에 공개된 다른 유능한 분들의 설명을 참고하시기 바랍니다.

리눅스 저장소는 전세계에 미러 사이트가 있습니다. 물론 우리나라에도 여러 미러 사이트가 존재합니다.

우분투 설치 시 사는 곳을 서울로 설정해 설치할 경우 기본 저장소로 등록되어 있는 카이스트 미러로 기본 설정되어 있습니다.


우리나라에서는 다음의 미러 서버를 사용할 수 있습니다.

카이스트 미러 (http://ftp.kaist.ac.kr/, http://kr.archive.ubuntu.com/) ,

카카오 미러(http://mirror.kakao.com/), 네오위즈 미러(http://ftp.neowiz.com/)

하루카상 미러(https://ftp.harukasan.org/) 등이 있습니다.

카이스트 미러는 우분투 설치시 지역 설정을 서울로 할 경우 설정되는 기본 미러 서버입니다.

카카오 미러는 속도가 빠르고 안정적이어서 우분투를 사용하는 많은 사람들이 주 미러 서버로 사용하는 미러 서버입니다.

하루카상 서버는 부경대가 서버를 제공하고 있는 미러 서버입니다.

폐쇄된 미러 서버

전에 네오위즈 서버(http://ftp.neowiz.com/)도 있으나 최근 폐쇄되었습니다.


우분투 저장소(리포지터리) 설정 변경

우분투는 APT 저장소를 이용합니다. 이 APT라는 단어를 자주 보게 될 겁니다. 패키지를 설치하거나 저장소 패키지 목록 업데이트, 패키지 업그레이드 등 다양한 명령에 쓰입니다.

우분투 기본 저장소가 카이스트 미러로 되어 있는데요. 이것을 카카오의 미러로 변경하고자 합니다. 이유는 회선이 빠르고 안정적이기 때문입니다.

카카오 미러의 모습입니다. 보시면 아시다시피 다양한 프로그램을 지원합니다.

사실 이 다음 카카오의 미러 주소는 여러번 바뀌었습니다. ftp.daum.net에서 ftp.daumkakao.com로 다시 mirror.kakao.com로 바뀌었습니다.

이제 본격적으로 기본 저장소 설정을 변경해봅시다.


터미널에서 저장소 설정 변경 - CLI 방식

터미널을 열고 다음의 명령을 차례대로 입력합니다.

study@study-VirtualBox:~$ cd /etc/apt study@study-VirtualBox:/etc/apt$ sudo cp sources.list sources_original.list [sudo] study의 암호: study@study-VirtualBox:/etc/apt$

이 sources.list 파일이 저장소 주소가 설정되어 있는 파일입니다.

혹시 모를 일을 대비해 원본 파일을 백업해 둡니다.

그 다음 다음과 같이 입력합니다.

study@study-VirtualBox:/etc/apt$ sudo vi sources.list

그럼 위 그림과 같이 터미널 창이 변하게 됩니다.

이것이 터미널 상 Text 편집기 Vi의 모습입니다. 서버 관리자들은 CLI로만 서버를 관리하기 때문에 이 Vi를 자주 사용하게 됩니다.

맛보기로 vi를 이용한 편집의 예를 보여 드리기 위해 이 저장소 주소 변경을 vi로 해보겠습니다. 다음부터는 GUI 기본 편집기인 gedit를 사용하게 될 것입니다.

위 그림 상태에서 :(쌍점)을 찍어 줍니다. 그럼 아래처럼 명령어 입력 상태가 됩니다.

이 상태에서 아래와 같이 입력해줍니다.

:%s/kr.archive.ubuntu.com/mirror.kakao.com/

위 그림처럼 하단에 14줄이 변경되었다고 나옵니다.

그 상태에서 다시 :(쌍점)을 눌러 명령 입력 상태로 만듭니다.

그리고 아래와 같이 입력해줍니다.

:%s/security.ubuntu.com/mirror.kakao.com/

그럼 위 그림처럼 6줄이 변경되었다고 나올 겁니다.

그럼 잘 수정된 겁니다. 이제 저장하고 빠져나가야겠지요?

마찬가지로 :(쌍점)을 찍고 아래와 같이 입력합니다.

:wq

저장하고 끝내기의 명령어입니다.

그럼 일반적인 터미널의 프롬프트 화면으로 돌아오게 됩니다.

터미널 창을 닫고 다시 실행킵시다. 사실 이럴 필요는 없습니다만 여러분이 다음 과정을 보다 편하게 볼 수 있도록 화면을 비우는 작업입니다. 물론 터미널 화면을 깨끗이 비우는 명령이 있습니다.

study@study-VirtualBox:~$ clear

라고 입력하면 그동안 쌓인 명령들이 지워집니다.

이제 저장소 패키지 목록 업데이트와 패키지 업그레이드 작업을 할 차례입니다.

이 내용은 다음 포스트에서 이어가도록 하겠습니다.


우분투의 소프트웨어&업데이트 앱에서 기본 저장소 설정 변경 - GUI 방식

우분투의 소프트웨어&업데이트 앱을 실행합니다. 이때 유의할 점은 소프트웨어&업데이터 앱이 아니라는 것입니다.


Ubuntu 소프트웨어 탭의 다운로드 위치 항목에서 기타를 선택합니다.


mirror.kakao.com을 고르고 서버 선택을 눌러줍니다.

그러면 인증 확인창이 뜹니다. 암호를 입력하여 인증해줍니다.


그러면 위 그림처럼 바뀌게 됩니다.

다운로드 위치(미러 서버)가 바뀐 것을 확인하고 닫기 버튼을 눌러줍니다.

패키지 다운로드 시 참조할 미러 서버 정보가 바뀌게 되어 위 그림과 같은 안내창이 뜹니다.

다시 읽기 버튼을 눌러줍니다.


위 그림과 같이 새로 바뀐 정보를 다시 읽고 완료되면 자동으로 창들이 사라집니다.

이것으로 우분투 저장소 설정 변경 작업이 끝납니다. 이제 패키지 다운로드 속도가 굉장히 빨라질 것입니다.


/etc/apt/sources.list 파일 내용

Ubuntu 20.04의 sources.list 수정 전 원본

#deb cdrom:[Ubuntu 20.04 LTS _Focal Fossa_ - Release amd64 (20200423)]/ focal main restricted

# See http://help.ubuntu.com/community/UpgradeNotes for how to upgrade to
# newer versions of the distribution.
deb http://kr.archive.ubuntu.com/ubuntu/ focal main restricted
# deb-src http://kr.archive.ubuntu.com/ubuntu/ focal main restricted

## Major bug fix updates produced after the final release of the
## distribution.
deb http://kr.archive.ubuntu.com/ubuntu/ focal-updates main restricted
# deb-src http://kr.archive.ubuntu.com/ubuntu/ focal-updates main restricted

## N.B. software from this repository is ENTIRELY UNSUPPORTED by the Ubuntu
## team. Also, please note that software in universe WILL NOT receive any
## review or updates from the Ubuntu security team.
deb http://kr.archive.ubuntu.com/ubuntu/ focal universe
# deb-src http://kr.archive.ubuntu.com/ubuntu/ focal universe
deb http://kr.archive.ubuntu.com/ubuntu/ focal-updates universe
# deb-src http://kr.archive.ubuntu.com/ubuntu/ focal-updates universe

## N.B. software from this repository is ENTIRELY UNSUPPORTED by the Ubuntu
## team, and may not be under a free licence. Please satisfy yourself as to
## your rights to use the software. Also, please note that software in
## multiverse WILL NOT receive any review or updates from the Ubuntu
## security team.
deb http://kr.archive.ubuntu.com/ubuntu/ focal multiverse
# deb-src http://kr.archive.ubuntu.com/ubuntu/ focal multiverse
deb http://kr.archive.ubuntu.com/ubuntu/ focal-updates multiverse
# deb-src http://kr.archive.ubuntu.com/ubuntu/ focal-updates multiverse

## N.B. software from this repository may not have been tested as
## extensively as that contained in the main release, although it includes
## newer versions of some applications which may provide useful features.
## Also, please note that software in backports WILL NOT receive any review
## or updates from the Ubuntu security team.
deb http://kr.archive.ubuntu.com/ubuntu/ focal-backports main restricted universe multiverse
# deb-src http://kr.archive.ubuntu.com/ubuntu/ focal-backports main restricted universe multiverse

## Uncomment the following two lines to add software from Canonical's
## 'partner' repository.
## This software is not part of Ubuntu, but is offered by Canonical and the
## respective vendors as a service to Ubuntu users.
# deb http://archive.canonical.com/ubuntu focal partner
# deb-src http://archive.canonical.com/ubuntu focal partner

deb http://security.ubuntu.com/ubuntu focal-security main restricted
# deb-src http://security.ubuntu.com/ubuntu focal-security main restricted
deb http://security.ubuntu.com/ubuntu focal-security universe
# deb-src http://security.ubuntu.com/ubuntu focal-security universe
deb http://security.ubuntu.com/ubuntu focal-security multiverse
# deb-src http://security.ubuntu.com/ubuntu focal-security multiverse

# This system was installed using small removable media
# (e.g. netinst, live or single CD). The matching "deb cdrom"
# entries were disabled at the end of the installation process.
# For information about how to configure apt package sources,
# see the sources.list(5) manual.


출처: https://wnw1005.tistory.com/26 [씨실과 날실 - IT]


우분투 20.04 한글 입력 설정

우분투 20.04에서 한글 입력기 설치 방법입니다. 아래의 내용은 VMware Workstation Player에 자동 설치로 설치된 Ubuntu Desktop을 기준으로 설명합니다. 입력기는 기본 설치된 ibus를 사용하고 우분투는 영문을 사용하고 있습니다.


1. 우측 상단 전원 아이콘을 클릭 후 Settings를 클릭합니다.

<그림1> 환경설정

2. 좌측 Setting 리스트에서 Region & Language를 선택한 후 Manage Installed Languages를 클릭합니다.

<그림2> Region & Language

3. 우분투를 영문으로 설치할 경우 <그림3>과 같이 언어 지원을 설치하라는 메시지가 출력되게 됩니다. Install을 클릭합니다.

<그림3> Language support 설치

4. root 계정에서만 설치가 가능하므로 <그림4>와 같은 메시지가 나옵니다. 암호를 입력하고 인증 버튼을 클릭합니다. 한글 입력기를 설치 중에 <그림4>와 같은 창이 몇 번 나오게 되는데 전부 암호를 입력하고 인증 버튼을 눌러야 정상적으로 설치가 됩니다.

<그림4> Authentication window

5. Install / Remove Languages... 버튼을 클릭합니다.

<그림5> Install / Remove Languages...

6. 스크롤바를 움직여서 Korean을 찾은 후에 체크 박스를 선택하고, Apply를 클릭합니다.

<그림6> Installed Languages

7. Language for menus and windows의 스크롤바를 움직여서 한국어가 정상적으로 설치되었는지 확인하고, 재부팅을 합니다.

<그림7> 한국어 설치 확인

8. Setting -> Region & Language로 이동 후에 1번 화살표가 가리키는 버튼을 클릭하면 Add an Input Source 창이 나오게 됩니다. 여기서 Korean을 선택하고 Add 버튼을 누릅니다. 만약 여기에 Korean이 보이지 않는다면 재부팅을 하지 않았다는 것이므로 재부팅 후에 다시 확인하시면 됩니다.

<그림8> 설치된 한국어 입력기 추가

9. <그림9>의 1번 박스를 선택 후에 Add 버튼을 클릭합니다. Korean이나 Korean (101/104 key compatible)를 선택하면 한영 전환이 안되므로 꼭 Korean (Halgul)을 선택해야 합니다.

<그림9> Add an Input Source

10. <그림10>와 같이 표시되면 정상적으로 한글 입력기가 설치된 것입니다.

<그림10> Input Sources

11. 우측 상단의 영문 표시(EN)을 클릭하고 Korean (Hangul)을 선택하면 한글 입력을 할 수 있습니다. 한/영 전환은 Shift+space를 사용합니다.

<그림11> 한글입력기 선택

12. <그림12>은 기본 설치된 웹 브라우저인 파이어폭스에서 네이버에 접속한 후에 검색창에 한글을 입력한 화면입니다.

<그림12> 웹 브라우저에 한글 입력


한/영 전환키 변경 :

IBusHangul 설정은 <그림11>의 입력기 선택 메뉴에서 Setup을 클릭하면 <그림13>과 같은 창이 나오게 됩니다. <그림13>의 Hangul Toggle Key를 보면 Hangul과 Shift+space가 있습니다. 키보드의 한/영 전환 버튼이나 Shift+space 키 중 하나를 이용해서 한/영 전환을 할 수 있다는 뜻인데, VMware에 설치된 우분투의 문제인지는 몰라도 키보드의 한/영 전환 버튼은 동작하지 않습니다. 만약 Shift+space 외 다른 키를 사용하고 싶다면 Add 버튼을 눌러서 추가할 수 있습니다.

<그림13> IBusHangul Setup

<그림13>의 Add 버튼을 누른 후에 <그림14>와 같은 창이 나오면, 한/영 전환키로 사용할 키를 누릅니다. 키 조합이 정상적으로 인식되면 <그림14>의 빨간색 박스 위치에 해당되는 키 조합이 표시되게 되므로, 정상적으로 인식하는 것을 확인하고 OK 버튼을 누르면 한/영 전환키로 추가되게 됩니다.

<그림14> 한/영 전환키 추가

[출처] 우분투 20.04 한글 입력 설정|작성자 techwriter


o Double Commander 설치: sudo apt-get install doublecmd-gtk


'Linux > Ubuntu' 카테고리의 다른 글

Ubuntu 웹서버 구축  (0) 2021.03.21
Ubuntu VNC 설치  (0) 2021.03.20
Ubuntu Network & WOL  (0) 2021.03.17
Posted by iWithJoy
Linux/CentOS2021. 3. 7. 16:31
  1. CentOS6 이전 버전 설치에 따른 yum 업데이트가 수행이 불가하여,
    /etc/yum.repos.d/CentOS-Base.repo를 아래와 같이 수행 후에 yum -y update 를 수행하였는데,
    원격접속이 되지 않아서, 서버 강제 리부팅을 수행하였는데,
    Kernel panic - not syncing: VFS: Unable to mount root fs on unknown-block(0,0) 이 나타나면서
    부팅이 불가하게 되었다.

CentOS-Base.repo

#

The mirror system uses the connecting IP address of the client and the

update status of each mirror to pick mirrors that are updated to and

geographically close to the client. You should use this for CentOS updates

unless you are manually picking other mirrors.

#

If the mirrorlist= does not work for you, as a fall back you can try the

remarked out baseurl= line instead.

#
#

[base]
name=CentOS-$releasever - Base
#mirrorlist=http://mirrorlist.centos.org/?release=$releasever&arch=$basearch&repo=os&infra=$infra
#baseurl=http://mirror.centos.org/centos/$releasever/os/$basearch/
baseurl=https://vault.centos.org/centos/$releasever/os/$basearch/
#gpgcheck=1
gpgcheck=0
gpgkey=file:///etc/pki/rpm-gpg/RPM-GPG-KEY-CentOS-6

#released updates
[updates]
name=CentOS-$releasever - Updates
#mirrorlist=http://mirrorlist.centos.org/?release=$releasever&arch=$basearch&repo=updates&infra=$infra
#baseurl=http://mirror.centos.org/centos/$releasever/updates/$basearch/
baseurl=https://vault.centos.org/centos/$releasever/os/$basearch/
#gpgcheck=1
gpgcheck=0
gpgkey=file:///etc/pki/rpm-gpg/RPM-GPG-KEY-CentOS-6

#additional packages that may be useful
[extras]
name=CentOS-$releasever - Extras
#mirrorlist=http://mirrorlist.centos.org/?release=$releasever&arch=$basearch&repo=extras&infra=$infra
#baseurl=http://mirror.centos.org/centos/$releasever/extras/$basearch/
baseurl=https://vault.centos.org/centos/$releasever/os/$basearch/
#gpgcheck=1
gpgcheck=0
gpgkey=file:///etc/pki/rpm-gpg/RPM-GPG-KEY-CentOS-6

#additional packages that extend functionality of existing packages
[centosplus]
name=CentOS-$releasever - Plus
#mirrorlist=http://mirrorlist.centos.org/?release=$releasever&arch=$basearch&repo=centosplus&infra=$infra
#baseurl=http://mirror.centos.org/centos/$releasever/centosplus/$basearch/
baseurl=https://vault.centos.org/centos/$releasever/os/$basearch/
#gpgcheck=1
gpgcheck=0
enabled=0
gpgkey=file:///etc/pki/rpm-gpg/RPM-GPG-KEY-CentOS-6

#contrib - packages by Centos Users
[contrib]
name=CentOS-$releasever - Contrib
#mirrorlist=http://mirrorlist.centos.org/?release=$releasever&arch=$basearch&repo=contrib&infra=$infra
#baseurl=http://mirror.centos.org/centos/$releasever/contrib/$basearch/
baseurl=https://vault.centos.org/centos/$releasever/os/$basearch/
#gpgcheck=1
gpgcheck=0
enabled=0
gpgkey=file:///etc/pki/rpm-gpg/RPM-GPG-KEY-CentOS-6


  1. Linux Rescue mode 로 부팅하기
    CD/DVD USB 등의 media 를 넣고 부팅
    Boot 화면에서 rescue 선택

3rd party driver 등이 필요할 경우 tab 키를 누르고 kernel parameter 수정
If your system requires a third-party driver provided on a driver disc to boot, load the driver with the additional option dd:
linux rescue dd

언어 선택 (Korean 이 있으나 Text 모드이므로 선택이 불가하므로 English 를 선택)

KeyBoard Type 선택
Rescue Method 선택(DVD 부팅이므로 기본 Local CD/DVD 선택)

Network 이 필요할 경우 Network 설정
Rescue mode 선택. Local 에 설치된 linux 를 찾아서 /mnt/sysimage 에 마운트하며 시스템을 복구하려면 Read-Write로 마운트해야 한다. Continue 선택.

rescue manager 에는 다음과 같이 3개의 메뉴가 표시됨. shell을 선택하면 shell prompt 가 기동되어 복구 작업을 할 수 있음.

복구
복구할 리눅스 시스템의 루트 암호를 변경하거나 패키지를 설치하는등의 복구 작업을 할 경우 해당 파티션이 root로 마운트 되어야 작업이 가능하므로 다음 chroot 명령어로 루트 파티션을 변경.

chroot /mnt/sysimage

chroot 를 수행했으면 yum 이나 passwd 등 시스템 변경은 복구 대상 시스템을 대상으로 이루어짐.

  1. 패닉이 발생한 커널부분 삭제 후, 리부팅

    vi /etc/grub.conf

    에서 panic이 발생한 커널부분을 삭제하고, 리부팅 수행

'Linux > CentOS' 카테고리의 다른 글

Apache KeepAlive 설정  (0) 2019.10.08
PHPIZE를 이용한 openSSL PHP 확장 모듈 설치  (0) 2013.09.16
집 컴퓨터를 웹서버로 만들기  (0) 2013.09.16
CentOS 6.4(x86 64Bit) 웹서버 설치  (0) 2013.09.15
리눅스 yum 명령어  (0) 2012.10.10
Posted by iWithJoy
Linux/CentOS2019. 10. 8. 23:07

# vi /usr/local/apache/conf/extra/httpd-default.conf

--------------------------------------------------------------------------------------------------------

#
Timeout 60

#
# KeepAlive: Whether or not to allow persistent connections (more than
# one request per connection). Set to "Off" to deactivate.
#
#KeepAlive On
KeepAlive Off

#
# MaxKeepAliveRequests: The maximum number of requests to allow
# during a persistent connection. Set to 0 to allow an unlimited amount.
# We recommend you leave this number high, for maximum performance.
#
#MaxKeepAliveRequests 100
MaxKeepAliveRequests 0

#
# KeepAliveTimeout: Number of seconds to wait for the next request from the
# same client on the same connection.
#
KeepAliveTimeout 5

:

--------------------------------------------------------------------------------------------------------

keepalive timeout 설정

1. 개요
   apache 의 keep alive 옵션을 on으로 하면 클라이언트와 apache 간의 tcp 커넥션을 keepalivetimeout 동안 유지하게 된다. keep alive timeout 설정과 관련하여 고려할 사항들을 정리하였음. 

2. 정의
KeepAliveTimeout
Amount of time the server will wait for subsequent requests on a persistent connection

3. 고려사항
  1) 사용자의 요청량 및 사용자수
     - 인터넷망에서 일반 사용자를 대상으로 접속자 수가 많고  요청량이 많은 웹서비스를 제공 경우,
       keep alivetime을 짧게 가져가는 것이 적절하다. (3초~5초)
     - 60초등과 같이 길게 가져갈경우에는 불필요한 tcp 세션을 유지하게 되고 웹서버의 메모리 사용량이 높아지게 되어 피크시간대에 갑자기 서비스가 안되는 등의 현상이 발생할 수 있다.
     - 폐쇄망에서 내부 사용자를 대상으로 접속자수가 적고, 요청량이 적은 웹서비스를 제공하는 경우,
       keepalivetimeout 시간을 30초~60초 길게 잡는 것이 성능상 유리하다.  
  2) 사용자의 요청간의 간격(think time)
     - 사용자가 한번 요청을 보내고, 다음번 요청을 보내는 간격을 think time이라고 한다. 이 think time과 keep alive time은 어느정도의 갭이 있어야 한다.
       실제 사이트에서 클라이언트 로그상으로는 웹서버로 요청을 보냈는데, 웹서버에는 요청 받은 로그가 없으며, 사용자 요청을 처리하지 못하는 문제가 1주 또는 2주간격으로 불규칙적으로 발생을 하는 경우가 있었다.
       원인은 keepalivetimeout 시간이 15초로 되어 있었는데, 사용자가 해당 화면에서 약 15초 정도 생각하고 요청을 보냈기 때문이었다.
       클라이언트 요청 패킷이 보내질때,  웹서버에서는 커넥션을 끊는 Fin 패킷이 보내지면서, 요청패킷이 웹서버로 전달이 되지 않고,  웹서버에 로그도 남지 않았던 것이다. 이후 keepalivetime을 길게 조정하여 문제를 해결하였다. 

[출처] [apache] keepalive timeout 설정에 대해서..|작성자 우보

Posted by iWithJoy
Linux/Android2016. 12. 30. 10:56
"현재 시간부터 한 달 이전 까지만 동기화 된다면 핸드폰 시간을 과거 시간으로 돌리면 되지 않을까?" 라는 생각에 도전해보았습니다.
 
---------------------------------------------------------------------------
 
1) 핸드폰을 비행중모드로 전환합니다.(시간을 동기화 하는 것을 막기 위해서입니다.)
 
2) '설정'을 들어간 뒤 '날짜 및 시간'을 선택하고 '자동'을 체크 해제 해줍니다.
 
3) '날짜 설정'에서 날짜를 원하는 과거의 시점으로 바꿉니다(구글 캘린더 2010.4.5 이후 일정을 얻고 싶다면 2010.4.2로 바꿔줍니다.)
 
4) '설정'을 들어간 뒤 '계정 및 동기화'를 선택해 줍니다. '배경데이터' '자동동기화' 체크 해제 해줍니다.
 
5) '설정'을 들어간 뒤 '응용프로그램' - '응용프로그램관리' 선택 후 메뉴 버튼울 눌러 '필터'-'모두' 클릭합니다.
 
6) '응용프로그램관리'에서 '일정' 클릭 후 '데이터 지우기'를 선택합니다. 같은 방법으로 '일정저장'도 데이터를 지워줍니다.
 
7) 와이파이를 킵니다.
 
8) '설정'을 들어간 뒤 '계정 및 동기화' 에서 '계정관리' - '일정동기화' 를 클릭합니다. (혹시 모르니 여러번 동기화 클릭해보았습니다.)
 
9) 확인해봅니다.
 
10) 성공! (이후 비행중 모드 해제해 주시면 자동으로 시간 돌아옵니다^_^ 날짜 및 시간에서 자동 선택해주셔도 됩니다.)

출처: http://www.clien.net/cs2/bbs/board.php?bo_table=lecture&wr_id=63127


'Linux > Android' 카테고리의 다른 글

android-x86 관련  (0) 2011.07.06
Posted by iWithJoy
Linux/CentOS2013. 9. 16. 13:47

PHP에서 OpenSSL을 이용하여 프로그래밍을 하고 싶지만, PHP 컴파일시 OpenSSL 기능을 disable 시킨 경우, OpenSSL 기능 사용을 재 컴파일이 아닌 모듈로 설치해보자!

시스템 설치 소프트웨어

OS : CentOS 6.0 x86_64(2.6.32-71)

아파치 : apache-2.2.21

PHP : php-5.3.8


고객사의 요청으로 PHP 재컴파일이 아닌 기존 운영되고 있는 서비스에 간단히 OpenSSL 기능을 설치해서 이용하고 싶다고 하여,  확장 모듈 설치 방법을 통해 해결 하였다.


PHP에 포함되어 있는 phpize 명령은 PHP 확장모듈을 위한 빌드환경을 만들기 위해 사용한다.   OpenSSL의 확장모듈의 소스는 PHP 소스버전의 {PHP 소스디렉토리}/ext/openssl 이름의 디렉터리 안에 있다.


OpenSSL 확장 모듈 소스에는 phpize를 통해 빌드환경을 만들기 위한 config.m4 매크로 파일이 존재한다. OpenSSL은 이유가 무엇인지 모르지만 config0.m4로 되어 있어 이걸 config.m4로 파일명을 변경한 후에 설치 하면 된다.(config0.m4로 되어 있는 정확한 이유를 아시는 분은 알려주세요.)


OpenSSL 모듈 컴파일 및 설치

$ cd ext/openssl

$ mv config0.m4 config.m4
$ phpize
$ ./configure
$ make
# make install


make install를 이용하여 설치가 완료 되면 modulename.so 파일 형태로 설치가 된다.

설치를 통해 생성된 so 모듈 파일을 php.ini의 환경설정 파일에서 extension 지시자를 통해 로드 하여 이용하면 된다.


설치 완료 후 테스트

설치가 완료 되었다면 아파치를 재시작 하기 보다는 리눅스 shell상에서 php 인터프리터를 이용하여 openssl enable 상태를 확인 할 수가 있다.


 php -r "echo phpinfo();" | grep -i openssl


출력내용

OpenSSL support => enabled
OpenSSL Library Version => OpenSSL 1.0.0-fips 29 Mar 2010
OpenSSL Header Version => OpenSSL 1.0.0-fips 29 Mar 2010
OpenSSL support => enabled


이상으로 PHP의 확장 모듈 설치 방법에 대해 알아 보았다. 기본적으로 설치 소스상에 포함되지 않는 확장 모듈 소스는 PECL 저장소를 통해 이용할 수 있으니 참고하기 바란다.


PHP Extension and Application Repository(PEAR) 는 확장과 어플을 관리
 
PHP Extension Community Library(PECL) 은 확장만 관리


출처: http://blog.naver.com/kamagod?Redirect=Log&logNo=150132950715

Posted by iWithJoy
Linux/CentOS2013. 9. 16. 09:18

집에 있는 컴퓨터를 외부에서 접속할 수 있는 서버로 만들어 봅시다.

서버로 사용할 컴퓨터엔 CentOS 6.4가 이미 깔려 있음을 가정 합니다.

사용 공유기는 ipTime n6004r 입니다.


접속 경로[?]를 보자면 다음과 같습니다.


            외부   ----------------------------    공유기   --------------------------   집 컴퓨터

                                                      (SK, KT등이 할당해준 ip)                           (CentOS Server)


공유기 설정으로 들어가면 (ipTime 기준 브라우저에서 192.168.0.1) 외부아이피 라는게 있을 겁니다.

외부에서 해당 ip로 접속 하면 공유기가 포트포워딩을 통하여 집에 설치된 서버로 포워딩을 해주고 해당 서버에서 웹페이지를 보여준다는 시나리오 입니다.


1. 우선 서버의 내부 ip를 고정시킵니다.

공유기 설정에서

고급설정 - 네트워크 관리 - 내부 네트워크 설정 으로 들어가서 수동 IP 할당 설정을 합니다.


여기서는 192.168.22.22 로 하였습니다.

수정합니다. 

192.168.0.222 로 하였습니다. 스샷대로 하지 마세요


공유기 설정이 끝났으면 서버의 ip 설정을 해줍니다


#] vi /etc/sysconfig/network-scripts/ifcfg-eth0

위의 명령어로 편집 창을 엽니다.

열어보면 CentOS 설치시 설정이나 퓨터의 환경 등등에 따라 조금씩 다르게 써있을 수 있습니다.

나오지 않은 부분은 패스 하고 다음과 같이 설정합니다.


BOOTPROTO="static"              //보통 dhcp로 되어있습니다. 고정 IP할당을 위해 static으로 바꿉시다"

IPADDR="192.168.0.222"           //공유기 설정에서 할당한 ip 입니다.

NETMASK="255.255.255.0"       

GATEWAY="192.168.0.1"          //공유기 주소

DNS1="8.8.8.8"                                

DNS2="8.8.4.4"


위 설정 중 DNS설정은 공유기 설정에서

고급 설정 - 네트워크 관리 -인터넷 연결정보

에 나오는 기본 DNS를 DNS1에 보조 DNS를 DNS2에 입력해 줍니다.

귀찮으면 위처럼 그냥 구글이 제공하는 DNS를 넣습니다.


설정 완료 후 저장.

그리고 service network restart 로 네트워크 서비스를 재시작 해줍니다.

그 후 ping 8.8.8.8 등으로 핑이 제대로 들어가는지 확인!

제대로 들어가면 완료 된 겁니다.


확실하게 하기위해 putty 등을 이용해서 접속도 해 봅시다.

ip는 내부 아이피인 192.168.0.222 포트는 22 입니다.


ps. 세팅하던 중 매우 멍청한 짓을 했습니다 -_-;;;;

192.168.22.22 로 설정 해놓고 보니 계속 network is unreachable 뜨고 기본 게이트웨이도 안잡히는 겁니다.

원인은 공유기에서 동적 ip 주소 범위가 192.168.0.2 ~ 192.168.0.254로 잡혀있는데... 그 범위를 넘어가는 ip를 설정해놓고 왜 안되나 하고 삽질한 것 -_-...

혹시나 제 멍청한 짓이 타산지석이 되도록 스크린샷은 바꾸지 않았습니다 ㅠㅠ


2. jdk와 tomcat 설치

이부분은 구글링하면 워낙 많기도 하고, 프로그래밍좀 해봤다 하면 워낙 많이 하는 부분이니 그냥 슝슝 넘어가겠습니다.

환경변수 설정 정도나 작성해 두겠습니다.


vi /etc/profile 을 하여 맨 밑에 다음과 같이 작성해 주세요.

JAVA_HOME=/usr/java/jdk1.7.0_25

CATALINA_HOME=/usr/local/apache-tomcat-7.0.42

PATH=$PATH:$JAVA_HOME/bin

그후 커맨드에서 source /etc/profile


3. 방화벽 열기.

2번까지만 한 후 톰캣이 설치된 폴더의 bin ($CATALINA_HOME/bin) 에 가서 톰캣을 실행 시켜주면 실행이 됩니다.

다만 지금 상황에선 외부에서도 내부망에서도 접속을 할 수 없습니다.

톰캣이 사용하는 8080포트가 centos의 기본 방화벽에 막혀있기 때문입니다.

iptables를 편집하여 포트를 열어줍시다


vi /etc/sysconfig/iptables  로 파일을 연 후

-A INPUT -m state -state NEW -m tcp -p tcp --dport 8080 -j ACCEPT

를 추가해 줍니다.

그리고

service iptables restart 로 재실행하면 완료 됩니다.


이제 내부망에서 http://192.168.0.222:8080 을 브라우저 주소에 입력하면 톰캣 시작 페이지가 뜨는걸 볼 수 있습니다.


4. 포트포워딩 및 ddns 등록

이제 마지막으로 외부에서 접속이 가능하도록 포트포워딩을 해주고 ddns서비스를 신청해야 합니다.


보통 가정에서 쓰는 인터넷은 유동ip가 할당이 되기 때문에 지금 할당된 ip로는 현재 접속이 된다고 해도 언제 접속이 안될지 알 수 없습니다.

이를 해결하기위해 주기적으로 변경된 ip와 사용자가 설정한 인터넷주소를 매칭시켜주는 서비스가 ddns서비스 입니다. 

많이 알려진 무료 ddns서비스로는 DNSever 등이 있는데요? 

저는 ipTime 공유기를 쓰다보니 공유기 1개당 ipTime에서 ddns서비스를 제공해 주더군요.


고급설정 - 특수기능 - DDNS 설정 으로 들어갑니다.

위 화면에서 호스트이름 abcdefd.iptime.org 이런 형태로 지어주시고 계정과 암호 할당 한 뒤 추가를 누릅니다.


그럼 화면에서와 같이 밑에 등록이 되는데요? 등록확인중 어쩌구 뜨면 접속상태 다시보기를 눌러줍시다.

그럼 정상등록이 되었다고 나올 겁니다.


이제 포트포워딩을 할 차례 입니다.


고급설정 - Nat/라우터관리 - 포트포워드 설정

으로 들어간 후

규칙이름 뭐 아무렇게 나 정해 주시고 

내부 IP는 192.168.0.222

프로토콜은 TCP

외부포트는 저는 :8080 을 생략하기 위해 80-80으로 하였습니다.

내부 포트는 톰캣이 실행되는 포트가 8080 이므로 8080해주셔야 합니다.


이렇게 완료 한후 이제 위에서 DDNS설정에서 설정해준

설정한이름.iptime.org 로 접속하면 이제 외부에서도 동일한 톰캣 화면을 볼 수 있습니다.


출처: http://notpeelbean.tistory.com/123

'Linux > CentOS' 카테고리의 다른 글

Apache KeepAlive 설정  (0) 2019.10.08
PHPIZE를 이용한 openSSL PHP 확장 모듈 설치  (0) 2013.09.16
CentOS 6.4(x86 64Bit) 웹서버 설치  (0) 2013.09.15
리눅스 yum 명령어  (0) 2012.10.10
BackupPC for CentOS  (0) 2012.10.09
Posted by iWithJoy
Linux/CentOS2013. 9. 15. 01:13

Web Server로 설치 후에


KDE를 설치하는 과정을 설명하도록 하겠다.

CentOS 버전은 6.4 이며 진행과정은 root권한을 획득한 후 진행한다.


우선 다음 명령으로 [X Window System] 그룹을 인스톨한다.

$ yum groupinstall "X Window System"


그러면 백 개 넘는 패키지가 설치될 것이라고 알려주고 사용자의 대답을 기다린다. "y"를 입력하여 진행한다.

Total download size: 47 M
Installed size: 139 M
Is this ok [y/N]: y


그리고 [KDE Desktop]을 설치한다.

$ yum groupinstall "KDE Desktop"


마찬가지로 백 몇십 개가 되는 패키지를 설치할 것이라고 메세지를 보여주고 사용자의 대답을 기다린다. 역시 "y"를 입력하여 진행한다.


이제 KDE 데스크탑을 실행해준다.

$ startx


참고사이트 : http://selene0301.tistory.com/266


GNOME를 설치하는 과정을 설명하도록 하겠다.

CentOS 버전은 6.4 이며 진행과정은 root권한을 획득한 후 진행한다.


다음과 같이 [Desktop]을 설치한다.

$  yum groupinstall "Desktop"


부팅시 자동으로 GUI 화면으로 부팅되도록 다음 명령어로 편집기를 연다.

$ vi /etc/inittab


다음과 같이 숫자를 3에서 5로 바꾸어주고 재부팅을 한다.

id:5:initdefault:


재부팅을 하면 GUI화면으로 로그인할 수 있다.


참고사이트 : http://selene0301.tistory.com/267


한글 키보드 설정

$ yum install ibus ibus-hangul ibus-anthy

System > Preferences > Input Method > 한글 선택 
Ctrl + Alt + Backspace
로그인 후에 System tray 에서 설정(한영 전환: Ctrl+Space(기본))


네트워크 설정
$ vi /etc/sysconfig/network-scripts/ifcfg-eth0
--------------------------------------------------------------------------------
:

ONBOOT=yes
NM_CONTROLLED=yes
BOOTPROTO=none
IPADDR=121.***.225.***
NETMASK=255.255.255.0
GATEWAY=121.***.225.***
DNS1=168.126.63.1
DNS2=168.126.63.2
PREFIX=24
DEFROUTE=yes
:
--------------------------------------------------------------------------------
$ service network stop
$ service network start
$ service network restart

만약, 호스트명(hostname)을 확인하려면,
# hostname
변경하려면,
# vi /etc/sysconfig/network
를 수행하여,
HOSTNAME=myhost
처럼 원하는 호스트명으로 수정하고, 저장한 뒤에 리부팅(# init 6)을 수행한다.
결과는 아래와 같다.
[root@myhost ~]# _


기본 프로그램 설치
adobe 프로그램 설치 요구되면, 해당 rpm 다운로드 후에
$ rpm -Uvh adobe-release-i386-1.0-1.noarch.rpm
Midnight Commander 설치
$ yum install mc
Krusader 설치
$ rpm -Uvh krusader-2.3.0-0.3.beta1.el6.R.x86_64.rpm
Teamviewer 설치
$ rpm -Uvh teamviewer_linux.rpm
설치 시에 전송 중지에 의한 오류가 발생하면, 아래와 같이 전송완료처리 후에 재설치
$ yum-complete-transaction


방화벽 설치
시스템 > 소프트웨어 추가/제거 > firewall
√ IPv6 support for iptables
√ Tools for managing Linux kernel packet filtering capabilities
√ system-config-firewall base components and command line tool
√ A text interface for basic firewall setup
√ A graphical interface for basic firewall setup
[적용] 수행
시스템 > 관리 > 방화벽
- 그 외의 포트
  . 5900, tcp, vnc-server
  . 5901, tcp
  . 5902, tcp
- 포트포워딩
  . 소스: eth0, tcp, 5900
  . 수신지: 로컬포트포워딩, 5901


VNC 설치
기존 VNC 중복설치에 의한 충돌의 경우, 아래와 같이 먼저 삭제
$ cd /usr/bin
$ ls -al vnc*
$ rm vnc*
$ yum -y remove vnc
$ yum -y remove vnc-server
VNC 재설치
$ yum -y install vnc
$ yum -y install vnc-server

필요에 따라 화면크기, 색상수 등을 설정
$ vi /usr/bin/vncserver

접속계정 설정
$ vi /etc/sysconfig/vncservers
--------------------------------------------------------------------------------
:
VNCSERVERS="1:username 2:root"
VNCSERVERARGS[1]="-geometry 1024x768"
VNCSERVERARGS[2]="-geometry 1024x768"
--------------------------------------------------------------------------------
접속 암호 설정(계정별 로그인하여 각각 설정 필요)
$ vncpasswd
만약, 계정 1개만 vnc서비스로 수행을 원하고, service vncserver start 수행 시에 오류 발생의 경우,
service vncserver stop 수행 후에 /etc/sysconfig/vncservers 를 수정하고,
root(su) 계정에서 다시 service vncserver start 수행 필요.
이때, /etc/sysconfig/vncservers 에
VNCSERVERS="1:username"
VNCSERVERARGS[1]="-geometry 1024x768"
 이면, /usr/bin/vncserver 설정의
$vncPort = 5900 + $displayNumber; 내용과 같이, 포트번호 5900+1=5901 이므로
해당 포트 5901을 방화벽에서 오픈처리 필요


서비스 시작 시에 수행될 설정내용을 확인하려면,
$ vi /root/.vnc/xstartup

필요시에 방화벽 환경설정 확인하여 변경 후, 재시작
$ netstat -antp
$ vi /etc/sysconfig/iptables
--------------------------------------------------------------------------------
# Firewall configuration written by system-config-firewall
# Manual customization of this file is not recommended.
*mangle
:PREROUTING ACCEPT [0:0]
:INPUT ACCEPT [0:0]
:FORWARD ACCEPT [0:0]
:OUTPUT ACCEPT [0:0]
:POSTROUTING ACCEPT [0:0]
-A PREROUTING -i eth0 -p tcp --dport 5900 -j MARK --set-mark 0x64
COMMIT
*nat
:PREROUTING ACCEPT [0:0]
:OUTPUT ACCEPT [0:0]
:POSTROUTING ACCEPT [0:0]
-A PREROUTING -i eth0 -p tcp --dport 5900 -m mark --mark 0x64 -j DNAT --to-destination :5901
COMMIT
*filter
:INPUT ACCEPT [0:0]
:FORWARD ACCEPT [0:0]
:OUTPUT ACCEPT [0:0]
-A INPUT -m state --state ESTABLISHED,RELATED -j ACCEPT
-A INPUT -p icmp -j ACCEPT
-A INPUT -i lo -j ACCEPT
-A INPUT -i eth0 -m state --state NEW -m tcp -p tcp --dport 5901 -m mark --mark 0x64 -j ACCEPT
-A INPUT -m state --state NEW -m tcp -p tcp --dport 53 -j ACCEPT
-A INPUT -m state --state NEW -m udp -p udp --dport 53 -j ACCEPT
-A INPUT -m state --state NEW -m tcp -p tcp --dport 22 -j ACCEPT
-A INPUT -m state --state NEW -m tcp -p tcp --dport 80 -j ACCEPT
-A INPUT -m state --state NEW -m tcp -p tcp --dport 443 -j ACCEPT
-A INPUT -m state --state NEW -m tcp -p tcp --dport 5900 -j ACCEPT
-A INPUT -m state --state NEW -m tcp -p tcp --dport 5901 -j ACCEPT
-A INPUT -m state --state NEW -m tcp -p tcp --dport 5902 -j ACCEPT
-A INPUT -j REJECT --reject-with icmp-host-prohibited
-A FORWARD -j REJECT --reject-with icmp-host-prohibited
COMMIT
--------------------------------------------------------------------------------
$ /etc/rc.d/init.d/iptables restart
방화벽 포트 확인 후에 vncserver 시작
$ iptables -nvL
$ netstat -tpln|grep "5900"
$ service vncserver stop
$ service vncserver start
또는
$ service vncserver restart

시스템 시작 시에 vncserver 구동을 위해 등록
$ chkconfig vncserver on


openSSL 설치
$ yum -y install openssl* (기설치된 상태)
yum install mod_ssl openssl (기설치된 상태)

self-signed certificate 생성

OpenSSL을 이용해 self-signed certificate를 생성한다. 위에서 쓴 글이지만 서비스를 할 예정이라면 verisign과 같은 업체에서 인증서를 사서 써야겠지만 개인 사이트라면 self-signed certificate 라면 충분하다고 한다. 다음과 같이 입력하거나 복사&붙여넣는다.


인증서 생성에 대한 보다 자세한 설명은 아래 링크를 참조한다.

http://dimdim.tistory.com/50


private key 생성

# openssl genrsa -out ca.key 1024


CSR(Certificate Signing Request) 생성

# openssl req -new -key ca.key -out ca.csr

:
[예제] : [자신의정보입력]

Country Name (2 letter code) [XX]:KR
State or Province Name (full name) []:Seoul
Locality Name (eg, city) [Default City]:Seocho-gu
Organization Name (eg, company) [Default Company Ltd]:Company Incorporate
Organizational Unit Name (eg, section) []:Technical Support Dept.
Common Name (eg, your name or your server's hostname) []:company.com
Email Address []:company@gmail.com

Please enter the following 'extra' attributes
to be sent with your certificate request
A challenge password []:
An optional company name []:
:

Self signed key 생성

# openssl x509 -req -days 365 -in ca.csr -signkey ca.key -out ca.crt


다음 위치에 files을 복사한다.

# cp ca.crt /etc/pki/tls/certs

# cp ca.key /etc/pki/tls/private/ca.key

# cp ca.csr /etc/pki/tls/private/ca.csr


SELinux 에 의해 Certificate files이 삭제될 수 있다.
이로 인해 삭제된 구문을 원복시키기 위해 다음 명령어를 쓴다.
삭제된 경우, 이 명령어를 통해 복원 된다. 

# restorecon -RvF /etc/pki

/etc/pki/* 하위의 모든 폴더나 파일에서 삭제된 구문을 복원한다.


# vi /etc/httpd/conf.d/ssl.conf

아파치의 ssl 설정을 변경하기 위해 편집기로 열어 아래와 같이 수정한다.


SSLCertificateFile /etc/pki/tls/certs/ca.crt

SSLCertificateKeyFile /etc/pki/tls/private/ca.key


# service httpd restart


3. SSL VirtualHost 추가

SSL은 443 포트를 사용하기 때문에 이를 위한 Virtualhost를 추가한다.


# vi /etc/httpd/conf/httpd.conf

httpd 설정 파일을 편집기로 열어 마지막 위치에 아래 내용을 입력한다. httpd.conf 파일 내에 예제로 적혀있는 내용이 있으니 복사&붙여넣기 하면 된다.


# SSL Virtual host add

NameVirtualHost *:443


# SSL Virtual host add
<VirtualHost *:443>
    SSLEngine on
    SSLCertificateFile /etc/pki/tls/certs/ca.crt
    SSLCertificateKeyFile /etc/pki/tls/private/ca.key
    ServerAdmin starkapin@tistory.com
    DocumentRoot /var/www/html
    ServerName ssl.starkapin.com
    ErrorLog logs/ssl_starkapin_com_error_log
    CustomLog logs/ssl_starkapin_com_error_log common
</VirtualHost>


# service httpd restart


4. 방화벽 설정

443 포트를 방화벽으로 허용시켜준다.


# vi /etc/sysconfig/iptables

편집기로 불러와 아래 내용을 추가한다.


-A INPUT -p tcp -m state --state NEW -m tcp --dport 443 -j ACCEPT


# service iptables restart


이제 웹으로 접속해서 확인 하면 인증서 경고가 발생하며 접속됨을 확인 할 수 있다.

https://127.0.0.1/


APM 설치
최신 php 버전이 보안관련하여, safe_mode 옵션항목 등이 삭제된 관계로
kcp에서 제공한 실행파일을 php에서 사용이 불가하여, php 5.3.10 설치수행이 필요

@ 설치된 버전 확인

# yum search php

# yum list installed | grep php

# php -v

@ 필수 설치 패키지 확인
# yum list libtool
# yum list libtool-ltdl
# yum list libtool-ltdl-devel


@권한 확인: 755이상으로 설정

# ls –al /app
# ls -al /app/ora11g/11g/network/admin/tnsnames.ora


@rpm으로 설치된 httpd를 확인 및 삭제

# rpm -qa | grep http
httpd-2.2.15-29.el6.centos.x86_64
httpd-tools-2.2.15-29.el6.centos.x86_64
jakarta-commons-httpclient-3.1-0.7.el6_3.x86_64
httpd-manual-2.2.15-29.el6.centos.noarch
# rpm -e --nodeps httpd-2.2.15-29.el6.centos.x86_64
# rpm -e --nodeps httpd-tools-2.2.15-29.el6.centos.x86_64


@ 패키지 제거 및 설치
# rpm -qa httpd php mysql

mysql-5.1.69-1.el6_4.x86_64
php-5.3.3-23.el6_4.x86_64
# yum remove -y httpd php mysql

:

Dependency Removed:
  akonadi.x86_64 0:1.2.1-2.el6                                                 
  kdepim.x86_64 6:4.3.4-6.el6                                                  
  kdepim-libs.x86_64 6:4.3.4-6.el6                                             
  kdepim-runtime.x86_64 0:4.3.4-5.el6                                          
  kdepim-runtime-libs.x86_64 0:4.3.4-5.el6                                     
  kdepimlibs-akonadi.x86_64 0:4.3.4-4.el6                                      
  mysql-server.x86_64 0:5.1.69-1.el6_4                                         

Complete!
# rm -fR php

# rm /usr/local/lib/php.ini


@ 서버운영에 필요한 소스 및 라이브러리 추가
설치된 것 외에 210개가 추가로 설치된다.
# yum -y install ORBit2 PyXML a2ps acpid alsa-lib amtu aspell at atk audiofile audit-libs-python autoconf autofs automake avahi avahi-glib bc bind bind-chroot bind-libs bind-utils cairo ccid compat-libstdc++-33 conman cpp cpuspeed crash createrepo crypto-utils cryptsetup-luks cups-libs cvs cyrus-sasl-md5 cyrus-sasl-plain db4-devel dbus-python device-mapper-multipath dhcp dhcp-devel dialog dmraid dos2unix dosfstools dump e2fsprogs-devel ed eject elfutils elfutils-libs enscript expat-devel expect expect-devel expectk fetchmail file finger flex fontconfig fontconfig-devel foomatic freetype freetype-devel ftp gcc gcc-c++ gd gd-devel gd-progs gdb gdbm-devel gettext gfs2-utils glib2-devel glibc-devel glibc-headers gmp-devel gnutls gpm gtk2 hal hdparm hesiod hicolor-icon-theme imake iptraf iptstate ipvsadm irqbalance jwhois kernel-devel kernel-headers keyutils-libs-devel kpartx krb5-devel krb5-workstation ksh lcms lftp libICE libSM libX11 libX11-devel libXau libXau-devel libXcursor libXdmcp libXdmcp-devel libXext libXfixes libXft libXi libXinerama libXpm libXpm-devel libXrandr libXrender libXt libXxf86vm libaio libaio-devel libart_lgpl libbonobo libc-client libcurl-devel libdaemon libevent libfontenc libgomp libgssglue libhugetlbfs libhugetlbfs-devel libidn-devel libjpeg libjpeg-devel libmng libnl libnl-devel libpcap libpng libpng-devel libselinux-devel libselinux-python libsepol-devel libsmi libstdc++-devel libsysfs libtiff libtool libtool-ltdl libwvstreams libxml2-devel libxml2-python libxslt libxslt-python lksctp-tools logwatch lrzsz lsof m2crypto mailcap mailx make man man-pages man-pages-ko mc mcstrans mdadm memtest86+ mesa-libGL mesa-libGL-devel mgetty microcode_ctl mkbootdisk mlocate mrtg mt-st mtools mtr mutt nc ncurses-devel net-snmp-libs netpbm nfs-utils nfs-utils-lib nmap nscd nss_db ntp ntsysv numactl oddjob openssh-clients openssl-devel pam-devel pam_krb5 pam_passwdqc pam_pkcs11 pango parted parted-devel patch pax pciutils pcsc-lite perl perl-Archive-Tar perl-BSD-Resource perl-Compress-Zlib perl-DBI perl-Digest-HMAC perl-Digest-SHA1 perl-HTML-Parser perl-HTML-Tagset perl-IO-Socket-INET6 perl-IO-Socket-SSL perl-IO-Zlib perl-Net-IP perl-Net-SSLeay perl-Newt perl-Socket6 perl-String-CRC32 perl-URI perl-libwww-perl pkgconfig pm-utils postgresql-libs prelink procmail psacct psutils pulseaudio-esound-compat pyOpenSSL pykickstart pyorbit pyparted python-pyblock pyxf86config quota rdate rdist readahead rmt rpcbind rpm-build rsh rsync rusers rwho samba samba-client samba-common samba-swat sendmail sendmail-cf setools setserial setuptool shared-mime-info sip sos spamassassin squashfs-tools strace stunnel symlinks sysfsutils syslinux sysstat system-config-date system-config-firewall talk tcl tcp_wrappers tcpdump tcsh telnet telnet-server time tk tmpwatch traceroute tree ttmkfdir unix2dos unixODBC unzip usbutils usermode vconfig vim-common vim-enhanced vsftpd wget wireless-tools words xfsprogs xfsprogs-devel xinetd xorg-x11-proto-devel yp-tools ypbind ypserv zip zlib-devel GConf2 ImageMagick ImageMagick-perl avahi-libs bwidget cloog-ppl crda cryptsetup-luks-libs cups db4-cxx deltarpm desktop-file-utils device-mapper-multipath-libs dmidecode dmraid-events docbook-dtds flac foomatic-db foomatic-db-filesystem foomatic-db-ppds ghostscript ghostscript-fonts gnome-doc-utils-stylesheets gnome-python2 gnome-python2-canvas gnome-user-docs gnome-vfs2 gpm-libs groff-perl gstreamer gstreamer-tools hal-info hal-libs html2ps hunspell iw jasper-libs kpathsea lcms-libs libIDL libX11-common libXcomposite libXdamage libXdamage-devel libXext-devel libXfixes-devel libXfont libXres libXtst libXxf86vm-devel libasyncns libcanberra libcanberra-gtk2 libcom_err-devel libcroco libdrm-devel libedit libglade2 libgnomecanvas libgsf libnetfilter_conntrack libnfnetlink libnotify libogg libpaper librsvg2 libsamplerate libsndfile libtalloc libtasn1 libtdb libthai libtirpc libusb1 libvorbis libwmf-lite libwnck libxcb libxcb-devel lm_sensors-libs mesa-dri-drivers mozilla-filesystem mpfr mrtg-libs netpbm-progs notification-daemon ntpdate openjpeg-libs pcsc-lite-libs perl-Compress-Raw-Zlib perl-Crypt-OpenSSL-Bignum perl-Crypt-OpenSSL-RSA perl-Crypt-OpenSSL-Random perl-Date-Manip perl-Digest-SHA perl-Encode-Detect perl-ExtUtils-MakeMaker perl-ExtUtils-ParseXS perl-IO-Compress-Base perl-IO-Compress-Zlib perl-Mail-DKIM perl-MailTools perl-Module-Pluggable perl-Net-DNS perl-Net-LibIDN perl-NetAddr-IP perl-Package-Constants perl-Pod-Escapes perl-Pod-Simple perl-SNMP_Session perl-Test-Harness perl-Time-HiRes perl-TimeDate perl-YAML-Syck perl-devel perl-libs perl-version pixman poppler poppler-data poppler-utils portreserve ppl psutils-perl pulseaudio pulseaudio-libs pycairo pygobject2 pygtk2 pygtk2-libglade python-decorator python-deltarpm python-slip python-slip-dbus rarian rarian-compat rtkit samba-winbind-clients setools-console setools-gui setools-libs setools-libs-tcl sgml-common sgpio sound-theme-freedesktop speex startup-notification system-config-date-docs system-config-firewall-tui tex-preview texinfo texinfo-tex texlive texlive-dvips texlive-latex texlive-texmf texlive-texmf-dvips texlive-texmf-errata texlive-texmf-errata-dvips texlive-texmf-errata-fonts texlive-texmf-errata-latex texlive-texmf-fonts texlive-texmf-latex texlive-utils tokyocabinet urlview urw-fonts usermode-gtk xcb-util xml-common xorg-x11-font-utils xulrunner xz xz-lzma-compat yelp lksctp-tools-devel apr-util apr-util-devel libtool-ltdl-devel libmcrypt libmcrypt-devel gmp mhash mhash-devel gdbm zlib curl g++ openssl bzip2-devel libc-client-devel bison system-config-securitylevel

@ cmake 설치
# cd /usr/local/src
http://www.cmake.org 에서 최신 버전을 확인하여 해당 버전으로 설치한다.
# wget http://www.cmake.org/files/v2.8/cmake-2.8.11.2.tar.gz (최신버전)
# tar zxvf cmake-2.8.11.2.tar.gz (최신버전)
# cd cmake-2.8.11.2 (최신버전)
# ./bootstrap
# make; make install

@ mysql 최신버전 설치
# cd /usr/local/src
http://www.mysql.com/downloads/mysql/ 에서 Source Code 중,
Generic Linux (Architecture Independent), Compressed TAR Archive 최신버전을 Download 수행한다.
# wget http://www.mysql.com/get/Downloads/MySQL-5.6/mysql-5.6.13.tar.gz/from/http://mirror.khlug.org/mysql/ (최신버전)

# tar zxvf mysql-5.6.13.tar.gz (최신버전) 

# cd mysql-5.6.13  (최신버전) 
# cmake -DCMAKE_INSTALL_PREFIX=/usr/local/mysql -DENABLED_LOCAL_INIFILE=1 -DWITH_INNOBASE_STORAGE_ENGINE=1 -DWITH_PARTITION_STORAGE_ENGINE=1 -DWITH_EXTRA_CHARSETS=all -DWITH_SSL=system -DWITH_ZLIB=system -DENABLED_LOCAL_INFILE=1 -DWITH_READLINE=1 -DWITH_VALGRIND=1 -DDEFAULT_CHARSET=utf8 -DDEFAULT_COLLATION=utf8_general_ci -DMYSQL_DATADIR=/usr/local/mysql/data

실행 중에 아래와 같은 오류가 발생하면,
:
CMake Error at configure.cmake:1071 (MESSAGE):
  Unable to find Valgrind header files
  valgrind/memcheck.h;valgrind/valgrind.h.  Make sure you have them in your
  include path.
Call Stack (most recent call first):
  CMakeLists.txt:314 (INCLUDE)

-- Configuring incomplete, errors occurred!
일부 패키지가 미설치된 상태이므로 다음과 같이 설치한다.
# yum install valgrind
yum install valgrind-devel
기존 소스를 모두 지우고, tar 실행부분부터 다시 수행한다.
# cd ..
# rm -fR mysql-5.6.13

wget 명령 다음, tar 부분부터 다시 수행...


# make; make install

# groupadd mysql
# useradd -M -o -r -d /usr/local/mysql -s /sbin/nologin -c "Mysql Server" -u 27 -g mysql mysql >/dev/null 2>&1 || :
# chown -R root:mysql /usr/local/mysql; chown -R mysql:mysql /usr/local/mysql/data
# cd /usr/local/mysql; ./scripts/mysql_install_db --user=mysql --datadir=/usr/local/mysql/data

@ 비밀번호 설정
# cp support-files/mysql.server /etc/init.d/mysqld
# cp support-files/my-huge.cnf /etc/my.cnf --> 메모리 1G 이상
# cp support-files/my-medium.cnf /etc/my.cnf
mysql-5.6.13 에는 support-files 아래에 실행에 필요한 cnf 파일이 미존재하여
첨부된 기존 버전의 my.cnf를 /etc/my.cnf로 저장한다. 

my.cnf

# vi /etc/init.d/mysqld ##### datadir 찾아서 datadir=/usr/local/mysql/data 라고 입력
# service mysqld start
# chkconfig --add mysqld
# chkconfig --level 35 mysqld on (런레벨 35일때 자동 실행 된다)
# chkconfig --list | grep mysqld
@ 리부팅시 서비스 실행하지 않으려면 - chkconfig mysqld off
# /usr/local/mysql/bin/mysqladmin -u root password
설치 작업이 끝났다면 익명접근권한을 삭제하자. ( mysql 콘솔에 그냥 접근을 못하게 해야 함.)
# /usr/local/mysql/bin/mysql -u root -p
# Enter password:
# mysql> USE mysql;
# mysql> delete from user where password = "";
# mysql> exit
# /usr/local/mysql/bin/mysqladmin -u root -p reload
# Enter password:

@ cronolog 설치(apache log 분할) 

# cd /usr/local/src
# wget http://www.youtu.kr/mirror/cronolog-1.6.2.tar.gz
# tar xvf cronolog-1.6.2.tar.gz
# cd cronolog-1.6.2
# ./configure
# make;make install 


Apache 설치

1. 라이브러리 설치
yum -y install gcc
yum -y install openssl-devel
yum -y install apr-devel
yum -y install apr-util-devel
yum -y install pcre-devel
yum -y install zlib-devel
 
 
2. 아파치 다운로드 & 컴파일 
# cd /usr/local/src 
# wget http://linux-files.com/httpd/httpd-2.4.6.tar.gz  (http://linux-files.com/httpd/ 에서 최신버전 검색하여 버전 수정 후에 수행)
# tar zxvf httpd-2.4.6.tar.gz
# cd httpd-2.4.6
 

./configure 옵션 설명

--prefix=/usr/local/apache : 아파치의디렉토리설정 

--enable-so : DSO 방식으로 설치 

--enable-ssl : SSL/TLS지원 (mod_ssl) 

--with-mpm=worker : 아파치프로세스가 사용할 멀티스레드방식으로 지정 

Worker, beos, prefork, mpm_os2, prechild, leader,threadpool 등으로 설정가능 

Worker는 멀티프로세싱 모듈, 멀티스레드, 멀티프로세스 지원 

--disable-access : 호스트기반의 접근제어 

--disable-auth : 사용자기반 접근제어 

--enable-auth-anon : 익명 사용자 액세스를 위한 옵션 

--enable-auth-dbm : 암호인증방식으로 DBM 데이터베이스의 인증방식을 지원 

--enable-auth-digest :암호인증방식으로 RFC2617에 따른 digest를 지원 

--disable-status : 아파치프로세스/스레드 모니터링을 지원하지 않도록 하는 옵션 

--disable-autoindex: 디렉토리리스팅을 지원 

--enable-speling : 보편적으로 알려진 URL가운데 URL스펠링을 고쳐주는 스펠링보정기능을 위한 옵션 

--with-port-PORT : 아파치에서 사용할 포트번호를 지정 

--enable-disk-cache : 디스크 캐싱 기능을 위한 모듈을 넣을 수 있다. 

--enable-auth-ldap : LDAP기반 인증을 지원하기 위한 옵션 

./configure 수행 시에 아래와 같은 오류가 발생하는 경우, 해당 httpd 버전에 필요한 lib가 없기 때문이다.
checking for chosen layout... Apache
checking for working mkdir -p... yes
checking for grep that handles long lines and -e... /bin/grep
checking for egrep... /bin/grep -E
checking build system type... x86_64-unknown-linux-gnu
checking host system type... x86_64-unknown-linux-gnu
checking target system type... x86_64-unknown-linux-gnu
configure: 
configure: Configuring Apache Portable Runtime library...
configure: 
configure: error: Bundled APR requested but not found at ./srclib/. Download and unpack the corresponding apr and apr-util packages to ./srclib/.

현재 설치된 버전을 확인
# yum list |grep apr
apr.x86_64                             1.3.9-5.el6_2                   @anaconda-CentOS-201303020151.x86_64/6.4
apr-devel.x86_64                       1.3.9-5.el6_2                   @base    
apr-util.x86_64                        1.3.9-3.el6_0.1                 @anaconda-CentOS-201303020151.x86_64/6.4
apr-util-devel.x86_64                  1.3.9-3.el6_0.1                 @base    
apr-util-ldap.x86_64                   1.3.9-3.el6_0.1                 @anaconda-CentOS-201303020151.x86_64/6.4
apr.i686                               1.3.9-5.el6_2                   base     
apr-devel.i686                         1.3.9-5.el6_2                   base     
apr-util.i686                          1.3.9-3.el6_0.1                 base     
apr-util-devel.i686                    1.3.9-3.el6_0.1                 base     
apr-util-mysql.x86_64                  1.3.9-3.el6_0.1                 base     
apr-util-odbc.x86_64                   1.3.9-3.el6_0.1                 base     
apr-util-pgsql.x86_64                  1.3.9-3.el6_0.1                 base     
apr-util-sqlite.x86_64                 1.3.9-3.el6_0.1                 base     
haproxy.x86_64                         1.4.22-5.el6_4                  updates  

해당 lib를 다운로드하여 해당 디렉토리에 압축해제를 수행하고 다시 configure를 수행한다.
1. For Apache 2.4.x - you need apr and apr-util 1.4.x or later
(means most probably you do not have them yet in you OS repos
and need manually download them form http://apr.apache.org/download.cgi)
2. Extract them to ./srclib/apr 
and ./srclib/apr-util directory respectively.
3. Download -deps files for your Apache build from
http://httpd.apache.org/download.cgi#apache24
(I used this one - http://www.sai.msu.su/apache//httpd/httpd-2.4.6-deps.tar.gz)
4. Extract -deps files to your ./srclib/apr directory
5. Use --with-included-apr switch with ./configure script

# ./configure --prefix=/usr/local/apache  --enable-mods-shared=most --enable-ssl --with-ssl=/usr/local/openssl --enable-modules=ssl --enable-rewrite --with-included-apr --with-included-apr-util --enable-deflate --enable-expires --enable-headers --enable-proxy --enable-mpms-shared=all
 
# make && make install
 
3. 데몬등록
# /usr/local/apache/bin/apachectl -l
Compiled in modules:
  core.c
  mod_so.c
  http_core.c
  event.c
# cp /usr/local/apache/bin/apachectl /etc/init.d/httpd
@ chkconfig를 이용해서 자동실행 등록해야 하지만 이전에 실행 스크립트 파일에 아래 내용 추가가 선행되어야 한다.
# vi /etc/init.d/httpd
-httpd 파일의 맨 끝에 아래의 내용... 
-----------------------------------------------  

# chkconfig: 2345 90 90
description: init file for Apache server daemon
processname: /usr/local/apache/bin/apachectl
config: /usr/local/apache/conf/httpd.conf
pidfile: /usr/local/apache/logs/httpd.pid 
-----------------------------------------------  
여기까지를 추가한다.

* chkconfig: 345 85 15

345는 부팅시 런레벨 3,4,5 에서 구동됨을 의미.

85는 데몬 실행 우선순위, 15는 데몬 종료 우선순위를 의미.

# chkconfig --add httpd

# chkconfig --list | grep httpd 
  
4. apache 설정 변경

# vi /usr/local/apache/conf/httpd.conf
주석을 해제하고 서버이름이나 IP주소를 설정합니다.

ServerName xxx.xxx.xxx.xxx (IP주소)
KeepAlive ON
서버관리자 메일주소 설정
ServerAdmin webmaster@localhost
인터넷주소 rewrite 모드 사용을 위한 설정
AllowOverride None  AllowOverride All


루트 디렉토리 설정에 대해 알맞게 수정

#DocumentRoot "/usr/local/apache/htdocs"

DocumentRoot "/home

#<Directory "/usr/local/apache/htdocs">

<Directory "/home">

웹 페이지 접속시 기본적으로 읽어 들일 파일명 설정 

DirectoryIndex index.html 를 찾아 DirectoryIndex index.html index.htm index.php index.php3 index.cgi index.jsp 로 수정
아래와 같이 추가 합니다.
AddType application/x-compress .Z
AddType application/x-gzip .gz .tgz
AddType application/x-httpd-php .htm .html .php .ph php3 .php4 .phtml .inc -->추가
AddType application/x-httpd-php-source .phps -->추가
주석제거 
# AddHandler cgi-script .cgi
몇가지 주석 및 제거 - 필요에 따라 더 적용해도 무방함
Include conf/extra/httpd-mpm.conf <-- 주석제거
Include conf/extra/httpd-userdir.conf <-- 주석제거
Include conf/extra/httpd-vhosts.conf <-- 주석제거
Include conf/extra/httpd-default.conf <-- 주석제거
<Directory />
Options FollowSymLinks

#AllowOverride None

AllowOverride All

Order deny,allow

#Deny from all <-- 주석처리
</Directory>


# vi /usr/local/apache/conf/extra/httpd-userdir.conf
Options MultiViews Indexes SymLinksIfOwnerMatch IncludesNoExec 를
Options MultiViews SymLinksIfOwnerMatch IncludesNoExec 로
Indexes 를 삭제 한다.
# vi /usr/local/apache/conf/extra/httpd-vhosts.conf
내용을 모두 삭제하고 구문만 적용후 저장 - 저장방법은 :wq 인 것은 아시죠...^^
NameVirtualHost *:80
<VirtualHost *:80>
DocumentRoot /usr/local/apache/htdocs/
ServerName *
</VirtualHost>


#NameVirtualHost *:80
<VirtualHost *:80>
    ServerAdmin webmaster@dummy-host2.example.com
    DocumentRoot /usr/local/apache/htdocs/
    ServerName www.도메인주소
    ErrorLog logs/도메인주소.error_log
    #CustomLog logs/dummy-host2.example.com-access_log common
</VirtualHost>

# /etc/init.d/httpd start 수행 시에 아래와 같은 오류가 발생하는 경우,
AH00526: Syntax error on line 10 of /usr/local/apache/conf/extra/httpd-userdir.conf:
Invalid command 'UserDir', perhaps misspelled or defined by a module not included in the server configuration
# vi /usr/local/apache/conf/httpd.conf 로 들어가서
LoadModule userdir_module /etc/httpd/modules/mod_userdir.so 부분의 주석을 제거

# /etc/init.d/httpd start 수행 시에 아래와 같은 오류가 발생하는 경우,
AH00534: httpd: Configuration error: No MPM loaded.
# vi /usr/local/apache/conf/httpd.conf 로 들어가서
LoadModule mpm_event_module modules/mod_mpm_event.so 부분의 주석을 제거
(특정 LoadModule에 대한 오류가 발생한 경우, 해당 부분의 주석을 제거하여 재실행)
 

# /etc/init.d/httpd start 를 실행했을 때,
httpd: Syntax error on line 144 of /usr/local/apache/conf/httpd.conf: Cannot load /usr/local/apache/modules/mod_mpm_event.so into server: /usr/local/apache/modules/mod_mpm_event.so: cannot open shared object file: No such file or directory
와 같은 오류가 발생하는 경우, 해당 라인으로 이동(:144)하여 주석처리 후 재실행 하되,
AH00557: httpd: apr_sockaddr_info_get() failed for 도메인명
AH00558: httpd: Could not reliably determine the server's fully qualified domain name, using 127.0.0.1. Set the 'ServerName' directive globally to suppress this message
와 같은 오류가 추가로 발생하는 경우,
# cd /etc
# cp hosts hosts.old 를 수행하여 백업하고,
# vi hosts 를 수행하여,
127.0.0.1   localhost.localdomain localhost 도메인명
서버에할당된주소 도메인주소
::1         localhost localhost.localdomain localhost6 localhost6.localdomain6
로 수정하고 저장한 후,
# /etc/init.d/httpd start 를 실행하면 정상 수행되어야 한다.


@ 접속이 안될경우 80포트 열어 주어야 한다.
# vi /etc/sysconfig/iptables
-A INPUT -m state --state NEW -m tcp -p tcp --dport 80 -j ACCEPT =>추가
# /etc/init.d/iptables restart 또는 service iptables restart
# service iptables restart 를 재수행해준다.

@ 기타 모듈 설치 (아래 PHP 설치 시에 라이브러리로 사용될 모듈)
# cd /usr/local/src
# mkdir etc
# cd etc
# wget
http://download.savannah.gnu.org/releases/freetype/freetype-2.4.8.tar.gz
# wget
http://www.peregrinehw.com/downloads/gd/gd-2.0.33.tar.gz
# wget
http://www.youtu.kr/mirror/jpegsrc.v6b.tar.gz
# wget
http://sourceforge.net/projects/libpng/files/libpng15/1.5.18/libpng-1.5.18.tar.gz
# wget
http://www.youtu.kr/mirror/imap-2004g.tar.bz2
# wget http://heanet.dl.sourceforge.net/mcrypt/libmcrypt-2.5.8.tar.gz
# wget
http://ftp.gnu.org/pub/gnu/libiconv/libiconv-1.14.tar.gz
# wget ftp://ftp.csx.cam.ac.uk/pub/software/programming/pcre/pcre-8.30.tar.gz 
# tar zxvf freetype-2.4.8.tar.gz; tar zxvf gd-2.0.33.tar.gz; tar zxvf jpegsrc.v6b.tar.gz; tar zxvf libpng-1.5.18.tar.gz; tar jxvf imap-2004g.tar.bz2; tar zxvf libmcrypt-2.5.8.tar.gz; tar zxvf libiconv-1.14.tar.gz; tar zxvf pcre-8.30.tar.gz;
# cd /usr/local/src/etc/jpeg-6b; mkdir -p /usr/local/libjpeg/bin; mkdir -p /usr/local/libjpeg/man/man1; make clean;make -j4; make install; cp -f libjpeg.a /usr/local/lib; cp -f *.h /usr/include
# cd /usr/local/src/etc/libpng-1.5.18
# cp scripts/makefile.linux Makefile
# make clean;make -j4;make install
# cd /usr/local/src/etc/freetype-2.4.8
# make clean;./configure --prefix=/usr/local/freetype;make -j4;make install
# cd /usr/local/src/etc/gd-2.0.33
# make clean;./configure --prefix=/usr/local/gd;make -j4;make install
# cd /usr/local/src/etc/imap-2004g
# make clean;make slx SPECIALS="SSLDIR=/usr SSLINCLUDE=/usr/include SSLLIB=/usr/lib"
# cd /usr/local/src/etc/imap-2004g/c-client
# cp -f c-client.a /usr/lib; cp -f rfc822.h mail.h linkage.h /usr/include
# cd /usr/local/src/etc/libmcrypt-2.5.8
# make clean;./configure --prefix=/usr/local;make -j4;make install
# cd /usr/local/src/etc/libiconv-1.14
# make clean;./configure --prefix=/usr/local;make -j4;make install
# ln -s /usr/local/lib/libiconv.so.2 /usr/lib/libiconv.so.2
# cd /usr/local/src/etc/pcre-8.30 
# make clean;./configure --prefix=/usr/local;make -j4;make install 

PHP 설치
 
1.php 다운로드 & 라이브러리 컴파일
yum -y install zlib curl
yum -y install openssl openssl-devel
yum -y install libtermcap-devel ncurses-devel libc-client-devel bzip2-devel
yum -y install bison
yum -y install libpng

yum install net-snmp net-snmp-devel
yum -y install libjpeg-devel libpng-devel freetype-devel gd-devel libtermcap-devel ncurses-devel libxml2-devel libc-client-devel bzip2-devel
rpm -qa gcc* cpp* compat-gcc* flex* openssl*
rpm -qa libjpeg* libpng* freetype* gd-*

cd /usr/local/src
wget http://graphics.cs.uni-sb.de/NMM/Download/external/jpegsrc.v6b.tar.gz
wget http://www.ijg.org/files/jpegsrc.v6b.tar.gz 
tar xvfz jpegsrc.v6b.tar.gz
cd jpeg-6b/
cp /usr/share/libtool/config/config.guess ./
cp /usr/share/libtool/config/config.sub ./  
mkdir /usr/local/jpeg  

mkdir /usr/local/jpeg/include  

mkdir /usr/local/jpeg/lib  

mkdir /usr/local/jpeg/bin  

mkdir /usr/local/jpeg/man  

mkdir -p /usr/local/man/man1
mkdir /usr/local/jpeg/man/man1
./configure --enable-shared --enable-static

./configure --prefix=/usr/local/jpeg --enable-shared --enable-static  

make && make install

make libdir=/usr/lib64  

make install  

에러 발생 원인 및 해결법

 config.guess와 config.sub 를 복사하지 않는 다면 configure 시에 아래와 같은 메세지가 나온다.

checking host system type... Invalid configuration `x86_64-unknown-linux-gnu': machine `x86_64-unknown' not recognized

  
 미리 mkdir 명령어로 디렉토리를 만들지 않는다면 아래와 같은 메세지가 나온다.

                /usr/bin/install -c -m 644 jconfig.h /usr/local/jpeg/include/jconfig.h
                /usr/bin/install: cannot create regular file `/usr/local/jpeg/include/jconfig.h': No such file or directory
                make: *** [install-headers] Error 1

 man 과 man1 디렉토리를 만들지 않는다면 아래와 같은 메세지가 나온다.

                /usr/bin/install -c -m 644 ./cjpeg.1 /usr/local/jpeg/man/man1/cjpeg.1
                /usr/bin/install: cannot create regular file `/usr/local/jpeg/man/man1/cjpeg.1': No such file or directory

 64bit arch를 사용한다면 make할때 libdir=/usr/lib64 옵션을 주어야 한다.
 

cd /usr/local/src
wet http://cdnetworks-kr-1.dl.sourceforge.net/project/mcrypt/Libmcrypt/2.5.8/libmcrypt-2.5.8.tar.gz
tar xvfz libmcrypt-2.5.8.tar.gz
cd libmcrypt-2.5.8
./configure
make && make install

# cd /usr/local/src
# wget http://kr2.php.net/get/php-5.3.10.tar.gz/from/kr.php.net/mirror
# wget http://museum.php.net/php5/php-5.3.10.tar.gz 
# tar zxvf php-5.3.10.tar.gz
# cd php-5.3.10
# make clean
./configure --prefix=/usr/local/php --with-mysql=/usr/local/mysql --with-apxs2=/usr/local/apache/bin/apxs --with-config-file-path=/usr/local/lib --with-gd --with-freetype-dir=/usr/local/freetype --with-zlib --enable-sockets --enable-gd-native-ttf --with-png-dir=/usr/local/lib --with-jpeg-dir=/usr/local/lib --enable-sigchild --enable-magic-quotes --with-gettext --enable-mbstring --enable-inline-optimization --enable-bcmath --enable-shmop --enable-calendar --enable-ftp --with-gdbm --with-iconv=/usr/local --enable-mbregex --with-imap --with-imap-ssl --with-openssl --with-curl --enable-soap --disable-debug --with-mcrypt=/usr/local/libmcrypt --with-kerberos --with-mysqli=/usr/local/mysql/bin/mysql_config --enable-mod-charset --enable-safe-mode --enable-sysvmsg --enable-sysvsem --enable-sysvshm --with-snmp --with-zlib-dir --enable-exif --with-xpm-dir --with-libxml-dir --with-pcre-dir --enable-sqlite-utf8 --with-regex=php --with-bz2
...
creating main/internal_functions_cli.c
+--------------------------------------------------------------------+
| License:                                                           |
| This software is subject to the PHP License, available in this     |
| distribution in the file LICENSE.  By continuing this installation |
| process, you are bound by the terms of this license agreement.     |
| If you do not agree with the terms of this license, you must abort |
| the installation process at this point.                            |
+--------------------------------------------------------------------+
Thank you for using PHP.
[root@ns php-5.3.10]# 

위와 같이 표시되어야 정상수행된 것입니다. 확인하시기 바랍니다. 

# make -j4; make install 

# cp php.ini-production /usr/local/lib/php.ini --> 5.3.0 이후 버전 


------------------------------------------------------------------------------------------
컴파일 오류시 대처
컴파일 오류는 해당 라이브러리 미설치 또는 configure 옵션설정 오류가 대부분입니다.
반드시, configure의 옵션설정부분의 라이브러리 설치를 확인하고, 옵션 오류가 없는 지 먼저 확인해야 합니다.

1. configure: error: xml2-config not found. Please check your libxml2 installation.
# yum install libxml2-devel


2. configure: error: Please reinstall the BZip2 distribution
해결책 :
[root@localhost local]# wget ftp://sources.redhat.com/pub/bzip2/v102/bzip2-1.0.2.tar.gz
Bzip2팩키지는 configure script가 없습니다. option을 한줄로 써서 컴파일 하고 설치합니다.
# cd bzip2-1.0.2
# make PREFIX=/tools install
# make clean
# cd ../php-5.2.11


3. configure: error: libXpm.(a|so) not found
# yum install gtk+ gtk+-devel

# yum install libXpm-devel

(# yum install xorg-x11-devel)

# sudo ln -s /usr/lib/x86_64-linux-gnu/libXpm.a /usr/lib/libXpm.a

# sudo ln -s /usr/lib/x86_64-linux-gnu/libXpm.so /usr/lib/libXpm.so

# sudo ln -s /usr/lib64/libXpm.so /usr/lib/libXpm.so

configure의 --with-libdir=/usr/lib64 를 --with-libdir=lib64 로 수정하고, configure 재수행!


4. configure: error: mcrypt.h not found. Please reinstall libmcrypt.  
# cd ..
# wget http://ftp.linux.co.kr/pub/etc/libmcrypt-2.5.7.tar.gz
# tar zxvfp libmcrypt-2.5.7.tar.gz
# cd libmcrypt-2.5.7
# ./configure && make && make install
# cd ../php-5.2.11


5. /usr/bin/ld: cannot find -lltdl
collect2: ld returned 1 exit status
make: *** [libphp5.la] Error 1 
# cd ..
# wget http://ftp.gnu.org/gnu/libtool/libtool-2.2.6a.tar.gz
# cd libtool-2.2.6
# ./configure
# make
# make install
# cd ../php-5.2.11


6. overflow2
~/php-5.3.4/ext/gd/gd.c (php를 받아서 압축을 푼 경로)


/*
        if (overflow2(font->nchars, font->h)) {
                php_error_docref(NULL TSRMLS_CC, E_WARNING, "Error reading font, invalid font header");
                efree(font);
                php_stream_close(stream);
                RETURN_FALSE;
        }
        if (overflow2(font->nchars * font->h, font->w )) {
                php_error_docref(NULL TSRMLS_CC, E_WARNING, "Error reading font, invalid font header");
                efree(font);
                php_stream_close(stream);
                RETURN_FALSE;
        }
*/ 해당 부분을 주석처리

[출처] [PHP] 컴파일시 나오는 에러대처|작성자 참좋은날

7. configure: error: Please reinstall the iconv library.
--with-iconv=/usr/local 를 --with-iconv 로 대체

8. checking for specified location of the MySQL UNIX socket... no
configure: error: Cannot find libmysqlclient_r under /usr/local/mysql.
Note that the MySQL client library is not bundled anymore!

When PHP is configured using --with-mysql=/usr/local/mysql and --with-libdir=lib64, it should search for /usr/local/mysql/lib64, since there is no such directory there encountered an error in PHP compile.

Since MYSQL is compiled from source, there will not be a 'lib64', the following steps will solve this problem.

[root@vps ~]# cd /usr/local/mysql  #Change directory to mysql's home directory
[root@vps mysql]# ln -s lib lib64    #Create a link for lib to lib64
를 수행하고, configure 재수행!
------------------------------------------------------------------------------------------

# vi /root/.bash_profile
PATH=$PATH:$HOME/bin 를
PATH=$PATH:$HOME/bin:/usr/local/mysql/bin:/usr/local/apache/bin:/usr/local/php/bin 로 수정

@ php.ini 설정
# vi /usr/local/lib/php.ini
post_max_size = 100M (Default: 8M)
file_uploads = On
upload_max_filesize = 100M (Default: 2M)
allow_url_fopen = Off (Default: On)
allow_url_include = Off
short_open_tag = On (Default: Off)
disable_functions = exec,passthru,proc_open,popen,curl_exec,curl_multi_exec,parse_ini_file,show_source
(Default: disable_functions =)

# ntsysv <--- 서비스 상태확인

# reboot <-- 설정을 마치면 한번쯤 리부팅 해 주세요...^^
 
 
서비스 시작
# service mysqld start
# service httpd start


새로운 도메인을 추가하는 경우, 아래의 처리들을 다시한번 확인해본다.
--------------------------------------------------------------------------------
[root@ns user]# vi /etc/resolv.conf
[root@ns user]# vi /etc/hosts <--- 신규 추가 시에 추가 필요
[root@ns user]# vi /etc/named.conf <--- 신규 추가 시에 추가 필요
[root@ns user]# vi /var/named/chroot/var/named/도메인주소.zone <--- 신규 추가 시에 생성 필요
[root@ns user]# ln -s /var/named/chroot/var/named/도메인주소.zone /var/named/도메인주소.zone
[root@ns user]# vi /usr/local/apache/conf/httpd.conf <--- 신규 추가 시에 추가 필요

[root@ns user]# /etc/rc.d/init.d/named reload
[root@ns user]# service named restart  (# chkconfig --level 35 named on (부팅 시에 런레벨 35일때 자동 실행))
[root@ns user]# service httpd restart

이제, 도메인을 등록한 사이트의 네임 호스트 관리에서 네임 호스트 및 IP주소를 추가하고,
네임서버를 네임 호스트 관리에서 입력한 네임 호스트로 입력하여 변경을 수행(보통, 등록한 사이트의 네임서버로 초기설정된 상태)

등록을 완료한 후에 ISP의 네임서버에 등록 및 변경이 수행되기까지는 약간의 시간이 필요하다.
잠시 후에 아래의 명령으로 정상 등록 및 변경여부를 확인한다.

[root@ns user]# nslookup 도메인주소
[root@ns user]# dig 도메인주소

시스템 > 관리 > 사용자 및 그룹에서 사용자를 추가 후에 권한을 변경한다. 

[root@ns user]# chmod 711 /home/사용자
[root@ns user]# chmod 755 /home/사용자/www
[root@ns user]# chgrp -R 사용자 /home/사용자
[root@ns user]# chown -R 사용자 /home/사용자


기타 Apache 계정별 사용 설정
vi /usr/local/apache/conf/httpd.conf
 
Include conf/extra/httpd-userdir.conf
LoadModule userdir_module modules/mod_userdir.so
LoadModule authn_core_module modules/mod_authn_core.so
LoadModule authz_host_module modules/mod_authz_host.so
주석 제거
 
/home/계정디렉토리 권한 711
/home/계정/public_html 권한 755 필요


참고 URL 
http://vogel.tistory.com/143


ZendGuard 설치


* ZendOptimizer는 PHP 5.2까지만 지원됨으로 PHP5.3을 설치 하는 경우 ZendGuard를 설치한다.


step 1) ZendGuard 소스를 /usr/local/에 다운 받는다.
wget http://downloads.zend.com/guard/5.5.0/ZendGuardLoader-php-5.3-linux-glibc23-i386.tar.gz

# uname -a

Linux mgribbon.net 2.6.32-358.18.1.el6.x86_64 #1 SMP Wed Aug 28 17:19:38 UTC 2013 x86_64 x86_64 x86_64 GNU/Linux

# cat /etc/issue

CentOS release 6.4 (Final)

Kernel \r on an \m

위와 같이 64-bit가 설치되었음을 확인한다.

wget http://downloads.zend.com/guard/5.5.0/ZendGuardLoader-php-5.3-linux-glibc23-x86_64.tar.gz

 
step 2) 소스파일의 압축을 푼다

# tar zxvf ZendGuardLoader-php-5.3-linux-glibc23-x86_64.tar.gz


step 3) Zend 모듈을 php 모듈에 복사한다.

cp ZendGuardLoader-php-5.3-linux-glibc23-x86_64/php-5.3.x/ZendGuardLoader.so /usr/lib64/php/modules


step 4)  /usr/local/lib/php.ini 파일에 Zend 설정을 추가한다.

vi /usr/local/lib/php.ini

..............
[Zend]
zend_extension=/usr/lib64/php/modules/ZendGuardLoader.so


설치 후에는 웹서버를 리스타트 수행한다.

# /etc/init.d/httpd restart 


 php pdo-mysql 확장 모듈 설치


1.pdo_mysql download 

wget http://pecl.php.net/get/PDO_MYSQL-1.0.2.tgz


2.설치
적당한 위치에 다운로드 받은 파일을 압축해제 후 압축해제한 디렉토리로 이동 
# tar -xzvf PDO_MYSQL-1.0.2.tgz
# cd
PDO_MYSQL-1.0.2

# /usr/local/php/bin/phpize

# ./configure --with-php-config=/usr/local/php/bin/php-config --with-pdo-mysql=/usr/local/mysql
# make

# make install 

Installing shared extensions:     /usr/local/php/lib/php/extensions/no-debug-zts-20090626/


3.적용

php.ini 파일은 대부분 /etc 또는 apache/conf 디렉토리에 있음.

php.ini 파일에 추가
# vi /usr/local/lib/php.ini

extension=/usr/local/php/lib/php/extensions/no-debug-zts-20090626/pdo_mysql.so


추가 후 apache restart 하면 적용완료 됨!! 

# service httpd restart  


'Linux > CentOS' 카테고리의 다른 글

PHPIZE를 이용한 openSSL PHP 확장 모듈 설치  (0) 2013.09.16
집 컴퓨터를 웹서버로 만들기  (0) 2013.09.16
리눅스 yum 명령어  (0) 2012.10.10
BackupPC for CentOS  (0) 2012.10.09
아파치 모듈 mod_rewrite 설정  (0) 2012.09.13
Posted by iWithJoy