우분투 Netplan
우분투 18.04 설치하고 사용하고 계신 분들은 아시겠지만, 이전 LTS 버전과 가장 큰 차이점 중에서 하나가 바로 네트워크 설정 방법 변경된 것일 겁니다.
사실 Netplan은 우분투 18.04 이전 버전인 17.10 버전부터 네트워크 설정을 관리하기 위해서 사용되었습니다. Netplan은 기존의 우분투 네트워크 인터페이스를 관리하기 위해서 사용되는 파일들(/etc/network/interfaces)을 대체하기 위한 툴입니다. 우분투 18.04 LTS 버전 부터는 기존의 설정 파일이 아닌, /etc/netplan/*.yaml 를 사용해 주셔야합니다.
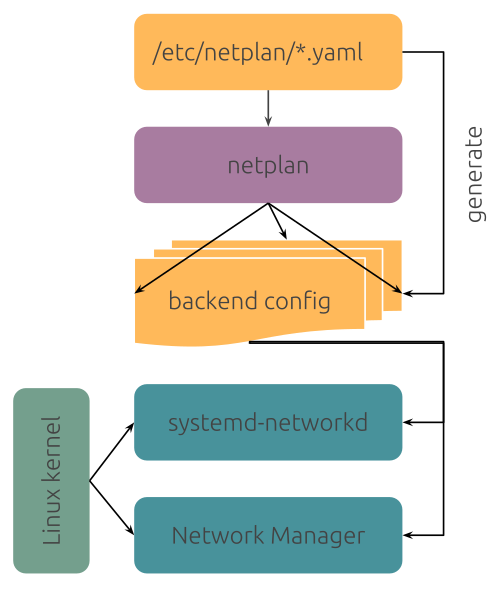
새로운 인터페이스 설정파일들은 /etc/netplan 디렉터리에 존재하며, 크게 NetworkManager 와 networkd 으로 renderer 값을 갖습니다.
- NetworkManager : 데스크탑 컴퓨터에서 사용됩니다. 이 값이 renderer로 사용되었을 경우 NetworkManager GUI를 통해서 네트워크 인터페이스가 관리되게 됩니다. 직접 Netplan 설정 파일을 통해 네트워크 설정을 하는것이 아니고 NetworkManager의 GUI를 통해서 설정되게 됩니다.
- networkd : 주로 서버에서 사용되는 renderer입니다. 이 글에서는 networkd의 renderer 값으로 설정 방법을 설명드리도록 하겠습니다.
Netplan 설정 파일 구조
설정 파일의 최상위 노드 정보는 network 입니다. network는 “version: 2” (Curtin에서 사용되는 YAML), 그리고 renderer 등이 정의 됩니다. 그리고 renderer 값에 따라 “ethernets:”, “wifis:”, “bridges:” 와 같은 디바이스 정의 그룹이 추가 정의되게 됩니다. 각각의 디바이스 블럭은 map 형태로 세부적인 형태로 정의가 이뤄지게 됩니다. 보다 자세한 내용은 아래의 설정 파일을 통해서 설명드리도록 하겠습니다.
우분투 18.04 네트워크 설정
설정 파일
만약 우분투 18.04 데스크탑 버전을 설치하신 경우, /etc/netplan 디렉터리의 설정파일을 확인하시면 아래와 같은 내용이 있습니다.
# Let NetworkManager manage all devices on this system network: version: 2 renderer: NetworkManager
NetworkManager을 renderer으로 사용한다는 내용으로, NetworkManager의 GUI를 이용하여 네트워크 설정이 이뤄지게 됩니다.
이더넷 DHCP 설정
아래의 설정 내용은 이더넷 enp6s0 인터페이스를 DHCP 방식으로 설정하는 내용입니다.
network:
version: 2
renderer: networkd
ethernets: enp3s0:
dhcp4: yes
dhcp6: yes
설정 내용을 작성 후, 아래의 명령어를 실행하면 설정 내용이 적용되게 됩니다.
$ sudo netplan apply
이더넷 고정 IP 설정
아래의 설정 내용은 이더넷 enp6s0 인터페이스를 고정 IP 방식으로 설정하는 내용입니다.
network:
version: 2
renderer: networkd
ethernets:
enp3s0:
addresses:
- 192.168.11.111/24
gateway4: 192.168.11.1
nameservers:
# addresses: [168.126.63.1,8.8.8.8]
addresses:
- 8.8.8.8
search:
- 8.8.4.4
위의 내용으로 설정 후에 다음 명령어를 실행하면, 네트워크 설정이 적용되게 됩니다.
$ sudo netplan apply
무선랜 설정
무선랜 인터페스 wlp2s0 에 무선랜을 설정하는 예제 내용입니다.
network:
version: 2
renderer: networkd
wifis:
wlp2s0:
dhcp4: yes
access-points:
"network_ssid_name":
password: "**********"
주소는 DHCP 방식으로 할당받는 예제이며, AP(Access Point) 정보를 SSID 정보와 패스워드를 위와 같이 입력하면 됩니다.
그리고 아래의 명령어를 실행하면 설정이 적용되게 됩니다.
$ sudo netplan apply
출처: hiseon.me/linux/ubuntu/ubuntu-18-04-netplan/
리눅스 WiFi 연결 명령어

Network Manager 정지
우분투 리눅스 등의 데스크탑 환경에서는 Network Manager 데몬이 네트워크를 관리하는데 사용됩니다. Network Manager가 실행중일 경우 이 데몬을 아래의 명령어로 먼저 정지해 주시기 바랍니다.
$ sudo /etc/init.d/network-manager stop
최신 우분투 버전에서 사용되는 netplan 과 관련해서는 아래의 글을 참고해 주시기 바랍니다.
리눅스 WiFi 연결 명령어
무선랜 인터페이스 확인
다음의 명령어로 인터페이스 이름을 확인합니다.
$ iw dev

명령어 실행 결과, 무선랜 카드 인터페이스 이름은 wlxe84e06710cec 으로 확인되고 있습니다. 앞으로 이 인터페이스 이름을 이용하여 설정에 사용되게 됩니다.
무선랜 인터페이스 활성화
그리고 아래의 명령어로 인터페이스를 확인 합니다.
$ sudo ip link show wlxe84e06710cec
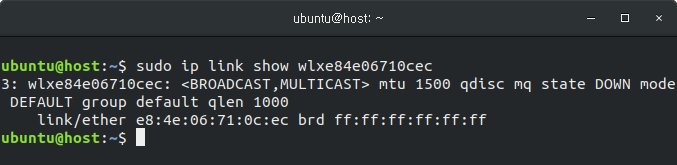
현재 무선랜 카드가 활성화 되어있지 않으므로, 다음 명령어를 사용하여 무선랜 카드를 활성화 합니다.
$ sudo ip link set wlxe84e06710cec up

그리고 다시 무선랜 카드 정보를 확인합니다. 처음과 다르게 활성화 된 무선랜 카드 정보를 확인 할 수 있습니다.
$ sudo ip link show wlxe84e06710cec

연결 상태 확인
다음 명령어를 사용하여, 현재 무선랜 카드의 연결 상태를 확인 합니다.
$ iw wlxe84e06710cec link

현재 WiFi에 연결되어 있지 않은 걸 알 수 있습니다.
WiF 스캔
다음 명령어를 사용하여 WiFi 정보를 스캔합니다. 스캔 후 나타나는 WiFi 중에서 비밀번호가 없는 WiFi 와 WPA/WPA2 암호화 방식을 사용하는 WiFi에 대해서 나눠서 설명드리도록 하겠습니다.
공개된 WiFi 일 경우
공개된 WiFi 일 경우 아래와 같은 명령어를 사용하여, SSID를 확인 한 다음 바로 WiFi에 연결 할 수 있습니다.
아래의 명령어는 iptime 이라는 WiFi에 접속하는 명령어 입니다. 그 다음 연결접속 정보를 확인 후 IP를 할당 받으면 됩니다.
$ iw wlxe84e06710cec scan $ sudo iw dev wlxe84e06710cec connect iptime

비공개된 WiFi 일 경우 (WPA/WPA2)
WPA/WPA2 암호화 방식을 사용하는 WiFi 정보입니다. 네트워크를 스캔하면 다음과 비슷한 결과가 나타납니다.
$ iw wlxe84e06710cec scan // 생략 BSS 34:cc:28:05:f0:58(on wlxe84e06710cec) TSF: 175628935496 usec (2d, 00:47:08) freq: 2432 beacon interval: 100 TUs capability: ESS Privacy ShortSlotTime (0x0411) signal: -69.00 dBm last seen: 800 ms ago Information elements from Probe Response frame: SSID: ktEgg_F058 WPA: * Version: 1 * Group cipher: TKIP * Pairwise ciphers: TKIP CCMP * Authentication suites: PSK RSN: * Version: 1 * Group cipher: TKIP * Pairwise ciphers: TKIP CCMP * Authentication suites: PSK * Capabilities: 1-PTKSA-RC 1-GTKSA-RC (0x0000) // 생략
위의 스캔된 정보에서 가장 중요한 내용이 SSID 와 암호화 프로토콜입니다. RSN 방식이 WPA2 를 나타냅니다. WiFi의 SSID 이름이 ktEgg_F058 일 경우 설정 후 접속하는 방법입니다.
아래의 명령어를 실행 후, WiFi 패스워드를 입력하면 설정 파일이 생성되게 됩니다.
$ sudo wpa_passphrase ktEgg_F058 > wpa_supplicant.conf
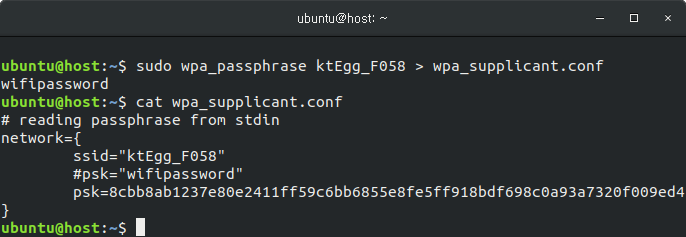
이 설정 파일을 이용하여 다음 명령어를 이용하여 WiFi 에 접속하면 됩니다.
$ sudo wpa_supplicant -B -i wlxe84e06710cec -c wpa_supplicant.conf

위의 명령어에서 사용된 옵션의 의미는 다음과 같습니다.
- -B : 백그리운드 실행
- -i wlxe84e06710cec : 무선랜 인터페이스 이름
- -c wpa_supplicant.conf : WiFi 설정 파일 경로
WiFi 연결 정보 확인
WiFi 에 접속 후 연결 정보를 확인 합니다.
$ sudo iw wlxe84e06710cec link
명령어 실행 결과 SSID 가 출력되며, 연결 정보가 나타나는 것을 확인 할 수 있습니다.

DHCP 주소 할당
성공적으로 WiFi에 접속되게 되면, 아래의 명령어로 IP 주소를 할당 받습니다.
$ sudo dhclient wlxe84e06710cec

위의 명령어 실행 결과, 에러 없이 IP 주소가 할당되었을 경우 WiFi 연결이 성공적으로 이뤄진 것입니다.
출처: hiseon.me/network/linux-wifi-command-line/
VNC를 이용한 우분투 원격접속하기
서버로 사용하기 위해서느 원격 접속이 필수인데, 지난 번 포스팅처럼 xrdp를 이용하면 Windows에서는 접속이 가능하지만 스마트폰 같은 다른 운영체제에서는 프로토콜 에러라는 메세지와 함께 접속이 안되는 문제가 있다. 그래서 rdp가 아닌 vnc를 이용한 원격접속 방법을 시도했다. rdp를 이용하면 로컬에서는 접속이 끊기고 원격지에서만 PC를 제어하지만 VNC는 로컬 시스템에 사용자가 로그인되어 있어야하고, 같은 화면을 보면서 PC를 제어하게 된다. 스마트폰 초창기에 유행한 크레이지 리모트나, 팀뷰어를 생각하면 된다.
우분투 최신 LTS 버전인 18.04 기준


Windows에서 원격 데스크톱 허용하듯이 이렇게만 설정해주면 리눅스끼리의 원격 접속은 문제없지만, 다른 운영체제에서 접속하는데는 암호화 관련 문제가 있다. 그래서 관련 설정을 꺼주어야 한다. 아래 명령어로 dconf 에디터를 설치해준다.
apt install dconf-editor

dconf-editor 실행 후 /org/gnome/desktop/remote-access 항목으로 들어가서 require-encryption 옵션을 꺼준다.
Play 스토어에서 VNC로 검색을 하고 제일 위에 있는 앱을 설치해봤다. VNC는 기본포트로 5900을 사용하는데, 암호화 기능도 끈 상태이기 때문에 다른 포트로 바꿔서 사용하는게 좋을 것 같다.
출처: https://junhyeok.tistory.com/690 [Half Time]
우분투 WOL 설정하기
그 동안 우분투에서도 잘 써왔다고 생각했던 WOL(Wake On Lan) 기능이 얼마전부터 잘 작동되지 않는다. 그래서 이번에도 검색을 해보니 메인보드 바이오스의 설정 외에도 운영체제에서 랜카드 설정이 필요하다고 한다. Windows나 우분투 16.04 PC를 사용할 때는 별도 설정이 없어도 대부분 잘되었기 때문에 신경쓰지 않던 부분인데 아마 우분투 18.04를 새로 설치하면서부터 뭔가 변경되었나보다.
1.ethtool 설치 : ethtool이라는 명령어를 통해서 PC가 꺼졌을때 랜카드가 대기하도록 해야한다.
sudo apt install ethtool 를 입력해서 ethtool을 먼저 설치한다.

2. ifconfig를 통해서 랜카드 정보를 확인한다. enp6s0라고 쓰여있는 부분을 기억해둔다.
사용자에 따라 약간씩 다를 수 있다.
sudo apt install net-tools 를 입력해서 설치 후에 ifconfig 사용이 가능하다.


ethtool 명령으로 랜카드의 상태를 확인해본다. Wake-on: g 라고 되어있으면 wol 기능이 활성화된 것이다. d는 비활성화(disabled)를 의미한다. 스크린샷은 활성화 상태로 만든 후에 찍은 것이라 g로 나와있다.
sudo nano /etc/rc.local
나노 에디터를 이용해서 /etc 디렉토리에 rc.local 이라는 파일을 만들고 아래 내용을 입력한다. rc.local은 Windows의 시작프로그램과 같은 역할이라고 보면 된다.
#!/bin/bash
ethtool -s enp6s0 wol g
exit 0
나노 에디터는 Ctrl + O로 저장, Ctrl + X로 종료해준다.
sudo chmod +x /etc/rc.local
좀전에 만든 rc.local 파일을 chmod +x 명령어로 실행파일로 만들어준다.
sudo /etc/rc.local
실행 후,
sudo ethtool enp6s0
명령으로 Wake-on: g 로 되어 있는지 확인한다.
출처: https://junhyeok.tistory.com/704 [Half Time]
우분투 VNC server 설치
How To Install VNC Server on Ubuntu 20.04
Introduction
Virtual Network Computing, or VNC, is a connection system that allows you to use your keyboard and mouse to interact with a graphical desktop environment on a remote server. It makes managing files, software, and settings on a remote server easier for users who are not yet comfortable with the command line.
In this guide, you’ll set up a VNC server with TightVNC on an Ubuntu 20.04 server and connect to it securely through an SSH tunnel. Then, you’ll use a VNC client program on your local machine to interact with your server through a graphical desktop environment.
Prerequisites
To complete this tutorial, you’ll need:
- One Ubuntu 20.04 server with a non-root administrative user and a firewall configured with UFW. To set this up, follow our initial server setup guide for Ubuntu 20.04.
- A local computer with a VNC client installed. The VNC client you use must support connections over SSH tunnels:
Step 1 — Installing the Desktop Environment and VNC Server
By default, an Ubuntu 20.04 server does not come with a graphical desktop environment or a VNC server installed, so you’ll begin by installing those.
You have many options when it comes to which VNC server and desktop environment you choose. In this tutorial, you will install packages for the latest Xfce desktop environment and the TightVNC package available from the official Ubuntu repository. Both Xfce and TightVNC are known for being lightweight and fast, which will help ensure that the VNC connection will be smooth and stable even on slower internet connections.
After connecting to your server with SSH, update your list of packages:
- sudo apt update
Now install Xfce along with the xfce4-goodies package, which contains a few enhancements for the desktop environment:
- sudo apt install xfce4 xfce4-goodies
During installation, you may be prompted to choose a default display manager for Xfce. A display manager is a program that allows you to select and log in to a desktop environment through a graphical interface. You’ll only be using Xfce when you connect with a VNC client, and in these Xfce sessions you’ll already be logged in as your non-root Ubuntu user. So for the purposes of this tutorial, your choice of display manager isn’t pertinent. Select either one and press ENTER.
Once that installation completes, install the TightVNC server:
- sudo apt install tightvncserver
Next, run the vncserver command to set a VNC access password, create the initial configuration files, and start a VNC server instance:
- vncserver
You’ll be prompted to enter and verify a password to access your machine remotely:
Output
You will require a password to access your desktops. Password: Verify:
The password must be between six and eight characters long. Passwords more than 8 characters will be truncated automatically.
Once you verify the password, you’ll have the option to create a view-only password. Users who log in with the view-only password will not be able to control the VNC instance with their mouse or keyboard. This is a helpful option if you want to demonstrate something to other people using your VNC server, but this isn’t required.
The process then creates the necessary default configuration files and connection information for the server. Additionally, it launches a default server instance on port 5901. This port is called a display port, and is referred to by VNC as :1. VNC can launch multiple instances on other display ports, with :2 referring to port 5902, :3 referring to 5903, and so on:
Output
Note that if you ever want to change your password or add a view-only password, you can do so with the vncpasswd command:
- vncpasswd
At this point, the VNC server is installed and running. Now let’s configure it to launch Xfce and give us access to the server through a graphical interface.
Step 2 — Configuring the VNC Server
The VNC server needs to know which commands to execute when it starts up. Specifically, VNC needs to know which graphical desktop environment it should connect to.
The commands that the VNC server runs at startup are located in a configuration file called xstartup in the .vnc folder under your home directory. The startup script was created when you ran the vncserver command in the previous step, but you’ll create your own to launch the Xfce desktop.
Because you are going to be changing how the VNC server is configured, first stop the VNC server instance that is running on port 5901 with the following command:
- vncserver -kill :1
The output will look like this, although you’ll see a different PID:
Output
Killing Xtightvnc process ID 17648
Before you modify the xstartup file, back up the original:
- mv ~/.vnc/xstartup ~/.vnc/xstartup.bak
Copy
Now create a new xstartup file and open it in a text editor, such as nano:
- nano ~/.vnc/xstartup
Copy
Then add the following lines to the file:
~/.vnc/xstartup
#!/bin/bash
xrdb $HOME/.Xresources
startxfce4 &
Copy
The first line is a shebang. In executable plain-text files on *nix platforms, a shebang tells the system what interpreter to pass that file to for execution. In this case, you’re passing the file to the Bash interpreter. This will allow each successive line to be executed as commands, in order.
The first command in the file, xrdb $HOME/.Xresources, tells VNC’s GUI framework to read the server user’s .Xresources file. .Xresources is where a user can make changes to certain settings of the graphical desktop, like terminal colors, cursor themes, and font rendering. The second command tells the server to launch Xfce. Whenever you start or restart the VNC server, these commands will execute automatically.
Save and close the file after adding these lines. If you used nano, do so by pressing CTRL + X, Y, then ENTER.
To ensure that the VNC server will be able to use this new startup file properly, you’ll need to make it executable:
- chmod +x ~/.vnc/xstartup
Copy
Then restart the VNC server:
- vncserver -localhost
Copy
Notice that this time the command includes the -localhost option, which binds the VNC server to your server’s loopback interface. This will cause VNC to only allow connections that originate from the server on which it’s installed.
In the next step, you’ll establish an SSH tunnel between your local machine and your server, essentially tricking VNC into thinking that the connection from your local machine originated on your server. This strategy will add an extra layer of security around VNC, as the only users who will be able to access it are those that already have SSH access to your server.
You’ll see output similar to this:
Output
With the configuration in place, you’re ready to connect to the VNC server from your local machine.
Step 3 — Connecting to the VNC Desktop Securely
VNC itself doesn’t use secure protocols when connecting. To securely connect to your server, you’ll establish an SSH tunnel and then tell your VNC client to connect using that tunnel rather than making a direct connection.
Create an SSH connection on your local computer that securely forwards to the localhost connection for VNC. You can do this via the terminal on Linux or macOS with the following ssh command:
- ssh -L 59000:localhost:5901 -C -N -l sammy your_server_ip
Copy
Here’s what this ssh command’s options mean:
- -L 59000:localhost:5901: The -L switch specifies that the given port on the local computer (59000) is to be forwarded to the given host and port on the destination server (localhost:5901, meaning port 5901 on the destination server, defined as your_server_ip). Note that the local port you specify is somewhat arbitrary; as long as the port isn’t already bound to another service, you can use it as the forwarding port for your tunnel.
- -C: This flag enables compression which can help minimize resource consumption and speed things up.
- -N: This option tells ssh that you don’t want to execute any remote commands. This setting is useful when you just want to forward ports.
- -l sammy your_server_ip: The -l switch let’s you specify the user you want to log in as once you connect to the server. Make sure to replace sammy and your_server_ip with the name of your non-root user and your server’s IP address.
Note: This command establishes an SSH tunnel that forwards information from port 5901 on your VNC server to port 59000 on your local machine via port 22 on each machine, the default port for SSH. Assuming you followed the prerequisite Initial Server Setup guide for Ubuntu 20.04, you will have added a UFW rule to allow connections to your server over OpenSSH.
This is more secure than simply opening up your server’s firewall to allow connections to port 5901, as that would allow anyone to access your server over VNC. By connecting over an SSH tunnel, you’re limiting VNC access to machines that already have SSH access to the server.
If you are using PuTTY to connect to your server, you can create an SSH tunnel by right-clicking on the top bar of the terminal window, and then clicking the Change Settings… option:
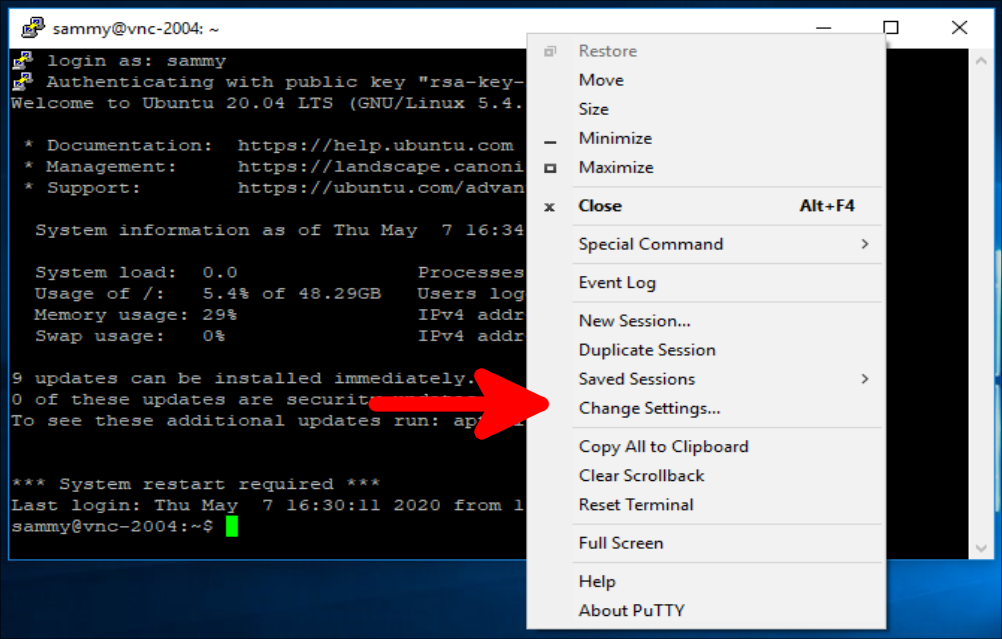
Find the Connection branch in the tree menu on the left-hand side of the PuTTY Reconfiguration window. Expand the SSH branch and click on Tunnels. On the Options controlling SSH port forwarding screen, enter 59000 as the Source Port and localhost:5901 as the Destination, like this:
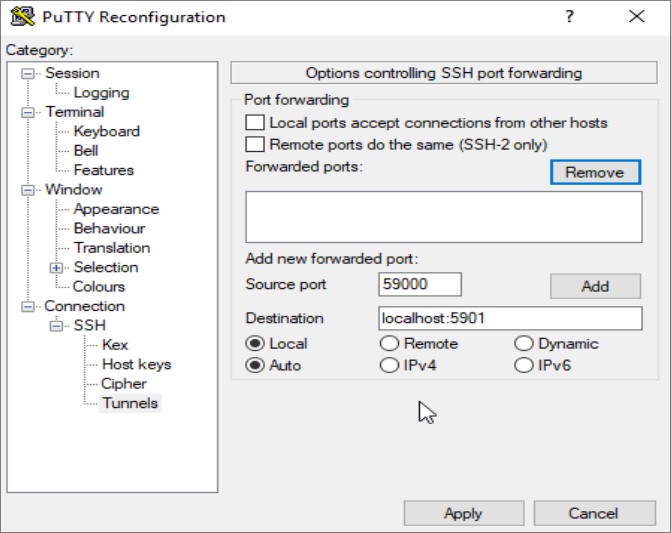
Then click the Add button, and then the Apply button to implement the tunnel.
Once the tunnel is running, use a VNC client to connect to localhost:59000. You’ll be prompted to authenticate using the password you set in Step 1.
Once you are connected, you’ll see the default Xfce desktop. It should look something like this:

You can access files in your home directory with the file manager or from the command line, as seen here:

Press CTRL+C in your local terminal to stop the SSH tunnel and return to your prompt. This will disconnect your VNC session as well.
Now you can configure your VNC server to run as a systemd service.
Step 4 — Running VNC as a System Service
By setting up the VNC server to run as a systemd service you can start, stop, and restart it as needed, like any other service. You can also use systemd’s management commands to ensure that VNC starts when your server boots up.
First, create a new unit file called /etc/systemd/system/vncserver@.service:
- sudo nano /etc/systemd/system/vncserver@.service
The @ symbol at the end of the name will let us pass in an argument you can use in the service configuration. You’ll use this to specify the VNC display port you want to use when you manage the service.
Add the following lines to the file. Be sure to change the value of User, Group, WorkingDirectory, and the username in the value of PIDFILE to match your username:
/etc/systemd/system/vncserver@.service
-----------------------------------------------------------------------------------
[Unit]
Description=Start TightVNC server at startup
After=syslog.target network.target
[Service]
Type=forking
User=sammy
Group=sammy
WorkingDirectory=/home/sammy
PIDFile=/home/sammy/.vnc/%H:%i.pid
ExecStartPre=-/usr/bin/vncserver -kill :%i > /dev/null 2>&1
ExecStart=/usr/bin/vncserver -depth 24 -geometry 1280x800 -localhost :%i
ExecStop=/usr/bin/vncserver -kill :%i
[Install]
WantedBy=multi-user.target
-----------------------------------------------------------------------------------
The ExecStartPre command stops VNC if it’s already running. The ExecStart command starts VNC and sets the color depth to 24-bit color with a resolution of 1280x800. You can modify these startup options as well to meet your needs. Also, note that the ExecStart command again includes the -localhost option.
Save and close the file.
Next, make the system aware of the new unit file:
- sudo systemctl daemon-reload
Enable the unit file:
- sudo systemctl enable vncserver@1.service
The 1 following the @ sign signifies which display number the service should appear over, in this case the default :1 as was discussed in Step 2.
Stop the current instance of the VNC server if it’s still running:
- vncserver -kill :1
Then start it as you would start any other systemd service:
- sudo systemctl start vncserver@1
You can verify that it started with this command:
- sudo systemctl status vncserver@1
If it started correctly, the output should look like this:
Output
Your VNC server is now ready to use whenever your server boots up, and you can manage it with systemctl commands like any other systemd service.
However, there won’t be any difference on the client side. To reconnect, start your SSH tunnel again:
- ssh -L 59000:localhost:5901 -C -N -l sammy your_server_ip
Copy
Then make a new connection using your VNC client software to localhost:59000 to connect to your server.
Conclusion
You now have a secured VNC server up and running on your Ubuntu 20.04 server. Now you’ll be able to manage your files, software, and settings with a user-friendly graphical interface, and you’ll be able to run graphical software like web browsers remotely.
출처: tecadmin.net/install-vnc-server-on-ubuntu-20-04/www.digitalocean.com/community/tutorials/how-to-install-and-configure-vnc-on-ubuntu-20-04
아래는 참고내용 ----------
vnc 리스트 보기
$ vncserver -list
vnc 지우기
특정 번호로 지우기
여기서 1은 5901 포트의 맨뒤 1
$ vncserver -kill :1
전체 지우기
$ vncserver -kill :*
connection refused
vnc viewer를 통해서 접속하려는데 connection refused 가 뜸...
netstat -tnlp를 통해서 확인 결과
::1:5901 식으로 이상하게 표시되어있음

vncserver 명령어 실행 시 추가 조건 추가
$ vncserver -localhost no

아니면 /etc/vnc.conf 변경
$ vim /etc/vnc.conf
파일 중간에 $localhost = "no"; 추가
|
1 2 3 4 5 6 7 8 9 10 11 |
# $localhost should the TigerVNC server only listen on localhost for # incoming VNC connections. # # Example: $localhost = "yes"; # Example: $localhost = "no"; # # Default: $localhost = "yes"; # if $SecurityTypes does not contain any TLS* # # or X509* security types or the $SecurityTypes # # does contain at least on *None security type. # Default: $localhost = "no"; # Otherwise $localhost = "no"; |
cs |
1. Tiger VNC Server 설치
$ sudo apt-get install tigervnc-standalone-server tigervnc-xorg-extension
2. 비밀번호 설정
$ vncpasswd

3. xstartup 작성
"~/.vnc/xstartup" 파일을 열어 아래와 같이 작성한다.
|
#!/bin/sh # Start Gnome 3 Desktop [ -x /etc/vnc/xstartup ] && exec /etc/vnc/xstartup [ -r $HOME/.Xresources ] && xrdb $HOME/.Xresources vncconfig -iconic & dbus-launch --exit-with-session gnome-session & |

xstartup 파일 예제 (캡쳐)
4. 서버 실행
$ vncserver -localhost no
잘 수행되고 있는지는 "vncserver -list" 명령으로 확인할 수 있습니다.-localhost 옵션에 no를 주지 않으면 default 설정에 의해 localhost 에 의한 접근만 허용됩니다.
따라서 외부 접속을 허용하려면 해당 옵션을 주어야 합니다.

vncserver -list 명령 결과 확인 (정상적으로 생성된 Session List가 표시됨)
5. 접속 잘 되는지 확인
https://www.realvnc.com/en/connect/download/viewer/linux/
RealVNC의 Stand-alone 실행 파일로 테스트 해보았습니다.
(해당 vncviewer는 기업에서 사용할 경우 돈을 내야 합니다. 유의하시기 바랍니다.)
Download 후 chmod +x <실행파일> 로 실행 권한 부여 후 실행합니다.
IP는 가급적 localhost나 127.0.0.1 대신 공인 IP를 활용하여 외부 접속이 잘 되는지 확인하시기 바랍니다.
※ 위에서 X DISPLAY 가 :2 일 경우 5902 포트입니다.
출처: https://z-wony.tistory.com/19 [끄적끄적 프로그래밍]
'Linux > Ubuntu' 카테고리의 다른 글
| Ubuntu 웹서버 구축 (0) | 2021.03.21 |
|---|---|
| Ubuntu VNC 설치 (0) | 2021.03.20 |
| Ubuntu 20.04 LTS Server 버전 설치 (0) | 2021.03.16 |
