결국, 업데이트 및 안정적인 애플리케이션 사용을 위해 소스 컴파일을 권장한다. 소스 컴파일을 사용하여 설치하면 업데이트도 간편하고, 업데이트 후 오류 발생도 거의 없다.
[root@localhost ~]# vi /etc/selinux/config
# This file controls the state of SELinux on the system.
# SELINUX= can take one of these three values:
# enforcing - SELinux security policy is enforced.
# permissive - SELinux prints warnings instead of enforcing.
# disabled - SELinux is fully disabled.
SELINUX=disabled
# SELINUXTYPE= type of policy in use. Possible values are:
# targeted - Only targeted network daemons are protected.
# strict - Full SELinux protection.
SELINUXTYPE=targeted
[root@localhost ~]# reboot
만약 재부팅을 하지 않고 진행하려면 쉘상에서 setenforce 0을 입력하면 된다.
[root@localhost ~]# setenforce 0
[root@localhost ~]# setenforce
usage: setenforce [ Enforcing | Permissive | 1 | 0 ]
useradd 명령으로 test 사용자를 추가하면 /home/test 디렉토리가 생성된다.
하지만 selinux가 적용된 시스템에서는 /home/test 디렉토리의 보안문맥이 user_home_t 로 구성되는데, 디렉토리 권한이 755로 되어 있어도 기본 보안문맥으로는 웹(80포트)에서 접근이 불가능하다.
그러므로 사용자 디렉토리에 대한 보안문맥을 chcon 명령어로 아래와 같이 변경해 주어야 한다.
# chcon -R -t httpd_sys_content_t /home/test
이렇게 보안문맥을 지정해 주면 /home/test 디렉토리 아래에 생성되는 모든 파일들은 이제부터 httpd_sys_content_t 문맥의 영향을 받아 모두 httpd_sys_content_t 보안문맥으로 생성된다.
이제 "mkdir /home/test/public_html" 명령으로 디렉토리를 생성하면 위의 httpd_sys_content_t 문맥을 가지는 디렉토리가 생성되고 웹 80포트에서 접속이 가능하게 되는 것이다.
[root@localhost ~]# useradd test
[root@localhost ~]# touch ~test/test.txt
[root@localhost ~]# ls -lZ ~test/
-rw-r--r-- root root user_u:object_r:user_home_t test.txt
[root@localhost ~]# chcon -R -t httpd_sys_content_t /home/test
[root@localhost ~]# ls -lZ ~test/
-rw-r--r-- root root user_u:object_r:httpd_sys_content_t test.txt
[root@localhost ~]#
===
[root@localhost ~]# su - test
[test@localhost ~]$ ls -lZ
-rw-r--r-- root root user_u:object_r:httpd_sys_content_t test.txt
[test@localhost ~]$ touch selinux.txt
[test@localhost ~]$ ls -lZ
-rw-rw-r-- test test user_u:object_r:httpd_sys_content_t selinux.txt
-rw-r--r-- root root user_u:object_r:httpd_sys_content_t test.txt
[test@localhost ~]$
[* 참고 *]
만약 다른곳의 파일을 /home/test 디렉토리 아래로 복사 또는 이동할때에는 어떻게 될까?
cp 명령에 의한 복사시에는 기존 파일 자신의 보안문맥과 함께 httpd_sys_content_t 문맥을 추가적으로 붙여서 복사된다.
[root@localhost ~]# touch root.txt
[root@localhost ~]# ls -lZ root.txt
-rw-r--r-- root root user_u:object_r:user_home_t root.txt
[root@localhost ~]# cp root.txt /home/test
[root@localhost ~]# ls -lZ /home/test/
-rw-r--r-- root root user_u:object_r:httpd_sys_content_t root.txt
-rw-rw-r-- test test user_u:object_r:httpd_sys_content_t selinux.txt
-rw-r--r-- root root user_u:object_r:httpd_sys_content_t test.txt
[root@localhost ~]#
mv 명령에 의한 이동시에는 기존 파일 자신의 보안문맥만 유지하고 파일이 이동된다. 즉 httpd_sys_content_t 보안문맥이 추가되지 않는다는 것이다.
[root@localhost ~]# touch mv.txt
[root@localhost ~]# ls -lZ mv.txt
-rw-r--r-- root root user_u:object_r:user_home_t mv.txt
[root@localhost ~]# mv mv.txt /home/test/
[root@localhost ~]# ls -lZ /home/test/
-rw-r--r-- root root user_u:object_r:user_home_t mv.txt
-rw-r--r-- root root user_u:object_r:httpd_sys_content_t root.txt
-rw-rw-r-- test test user_u:object_r:httpd_sys_content_t selinux.txt
-rw-r--r-- root root user_u:object_r:httpd_sys_content_t test.txt
[root@localhost ~]#
그러면 ftp에서는 어떻게 할까?
* ftp 홈에대한 권한적용을 풀어주기 위해 아래와 같이 입력한다.
-P옵션은 재부팅후에도 적용되는 옵션으로 selinux 환경설정이 저장된다는 의미다.
# setsebool -P ftp_home_dir 1
* ftp에 대해 selinux 파일보안 정책을 사용하지 않도록 하려면 아래와 같이 입력한다.
# setsebool -P ftpd_disable_trans 1
=======================
* gcc 컴파일러 설치 확인
*
소스 컴파일시 필요한 gcc 관련 패키지들은 yum을 사용하여 원격 설치할 수 있다.
# yum
install yum-fastestmirror -y
# yum install gcc gcc-c++
make automake autoconf -y
추가적인 yum 명령어 사용법은 아래 링크를 참고한다.
http://www.lug.or.kr/home/bbs/board.php?bo_table=centos_book&wr_id=93&page=2#bbs
좀더 자세한 내용은 맨페이지를 참고한다.
# man
yum
=======================
* yum을 사용하여 개발 패키지 그룹들을 설치해
둔다. *
rpmforge.net 저장소 사용하기 :
(옵션임 :
CentOS에서 제공하지 않는 패키지들도 rpm으로 제공한다.)
RHEL5 / CentOS-5
i386용 다운로드 : http://packages.sw.be/rpmforge-release/rpmforge-release-0.3.6-1.el5.rf.i386.rpm
x86_64용 다운로드 :
http://packages.sw.be/rpmforge-release/rpmforge-release-0.3.6-1.el5.rf.x86_64.rpm
# lftpget http://packages.sw.be/rpmforge-release/rpmforge-release-0.3.6-1.el5.rf.i386.rpm
# rpm -ivh
rpmforge-release-0.3.6-1.el5.rf.i386.rpm
개발관련 패키지 그룹
설치하기
# yum groupinstall "Development Libraries"
# yum
groupinstall "Development Tools"
# yum groupinstall "Legacy Software
Development"
=======================
1. MYSQL
설치
http://dev.mysql.com/get/Downloads/MySQL-5.0/mysql-5.0.67.tar.gz/from/http://mysql.byungsoo.net/
mysql 설치경로 : /usr/local/server/mysql
mysql 유저 생성
# useradd -M -s /bin/false mysql
*아래 컴파일에서 --with-readline 옵션이 있어야만 ssh 원격접속(putty, utf-8) 콘솔에서 한글 입력이 가능하다.
*아래 옵션에서 -enable-thread-safe-client 옵션은 아파치(httpd)를 쓰레드로 운영(--with-mpm=worker)할때 필요한 옵션)
# ./configure --prefix=/usr/local/server/mysql --with-charset=utf8 --with-extra-charsets=all --enable-thread-safe-client --with-readline
# make
# make install
컴파일 시작하기 : mysql 환경설정, 파일 복사, 시작스크립트 복사
[root@localhost ~]# yum install re2c #rpmforge.org에서 제공하는 패키지이다. 설치하지 않아도 무관함.
[root@localhost ~]# mkdir /usr/local/server
[root@localhost ~]# useradd -M -s /bin/false mysql
[root@localhost ~]# mkdir /usr/local/src/APM
[root@localhost ~]# cd /usr/local/src/APM/
[root@localhost APM]# wget http://dev.mysql.com/get/Downloads/MySQL-5.0/mysql-5.0.67.tar.gz/from/http://mysql.byungsoo.net/
[root@localhost APM]# tar xzf mysql-5.0.67.tar.gz
[root@localhost APM]# cd mysql-5.0.67
[root@localhost mysql-5.0.67]# pwd
/usr/local/src/APM/mysql-5.0.67
[root@localhost mysql-5.0.67]# ./configure --prefix=/usr/local/server/mysql --with-charset=utf8 --with-extra-charsets=all --with-readline
[root@localhost mysql-5.0.67]# make
[root@localhost mysql-5.0.67]# make install
[root@localhost mysql-5.0.67]# cp support-files/my-huge.cnf /etc/my.cnf
[root@localhost mysql-5.0.67]# cp support-files/mysql.server /etc/init.d/mysqld
[root@localhost mysql-5.0.67]# chmod 755 /etc/init.d/mysqld
[root@localhost mysql-5.0.67]# chkconfig --add mysqld
[root@localhost mysql-5.0.67]# chkconfig --list mysqld
mysqld 0:해제 1:해제 2:활성 3:활성 4:활성 5:활성 6:해제
[root@localhost mysql-5.0.67]# chkconfig --level 24 mysqld off
[root@localhost mysql-5.0.67]# chkconfig --list mysqld
mysqld 0:해제 1:해제 2:해제 3:활성 4:해제 5:활성 6:해제
[root@localhost mysql-5.0.67]#
mysql 데이터베이스 초기화 및 디렉토리 퍼미션 설정
[root@localhost mysql-5.0.67]# cd /usr/local/server/mysql/
[root@localhost mysql]# chown -R mysql .
[root@localhost mysql]# chgrp -R mysql .
[root@localhost mysql]# bin/mysql_install_db --user=mysql
[root@localhost mysql]# chown -R root .
[root@localhost mysql]# chown -R mysql var
[root@localhost mysql]# /etc/init.d/mysqld start
Starting MySQL [ OK ]
[root@localhost mysql]#
mysql을 설치한 다음 mysql를 관리하는 root의 패스워드는 기본적으로 설정되어 있지 않기 때문에 패스워드 없이 누구나 접근이 가능하다. 이를 막기 위해 root@localhost의 패스워드를 설정한다.
[root@localhost mysql]# /usr/local/server/mysql/bin/mysql -u root
Welcome to the MySQL monitor. Commands end with ; or \g.
Your MySQL connection id is 1
Server version: 5.0.67-log Source distribution
Type 'help;' or '\h' for help. Type '\c' to clear the buffer.
mysql> SET PASSWORD FOR 'root'@'localhost' = PASSWORD('newpwd');
Query OK, 0 rows affected (0.00 sec)
mysql> quit
Bye
[root@localhost mysql]#
2. 아파치 설치
httpd 버전 : httpd-2.2.9.tar.bz2
http://ftp.kaist.ac.kr/pub/Apache/httpd/httpd-2.2.9.tar.bz2
httpd
설치경로 : /usr/local/server/httpd
* 아파치를 디폴트로 설치하면 프로세스 기반의
prefork 방식으로 설치된다. 만약 쓰레드 기반으로 설치하고자 한다면 --with-mpm=worker 옵션을 추가적으로 사용하면
된다.
./configure --prefix=/usr/local/server/httpd --enable-so
--enable-mods-shared=all --enable-ssl --with-ssl
make
make
install
아파치 시작 스크립트 복사 및
수정
[root@localhost APM]#
pwd
/usr/local/src/APM
[root@localhost APM]# lftpget
http://ftp.kaist.ac.kr/pub/Apache/httpd/httpd-2.2.9.tar.bz2
[root@localhost
APM]# tar xjf httpd-2.2.9.tar.bz2
[root@localhost APM]# cd
httpd-2.2.9
[root@localhost httpd-2.2.9]#
pwd
/usr/local/src/APM/httpd-2.2.9
[root@localhost httpd-2.2.9]#
./configure --prefix=/usr/local/server/httpd --enable-so
--enable-mods-shared=all --enable-ssl --with-ssl
[root@localhost
httpd-2.2.9]# make
[root@localhost httpd-2.2.9]# make
install
[root@localhost httpd-2.2.9]# cp
/usr/local/server/httpd/bin/apachectl /etc/init.d/httpd
[root@localhost
httpd-2.2.9]# vi
/etc/init.d/httpd
#!/bin/sh
# Comments to support chkconfig on CentOS Linux, http://www.lug.or.kr
# chkconfig: 35 90 90
# description: A very fast and reliable WebServer engine.
[root@localhost
httpd-2.2.9]# chmod 755 /etc/init.d/httpd
[root@localhost
httpd-2.2.9]# chkconfig --add httpd
[root@localhost httpd-2.2.9]# chkconfig
--list httpd
httpd 0:해제 1:해제 2:해제 3:활성 4:해제 5:활성
6:해제
[root@localhost httpd-2.2.9]#
3. PHP
설치
php 버전 :
php-5.2.6.tar.bz2
http://www.php.net/get/php-5.2.6.tar.bz2/from/this/mirror
php
설치경로 : /usr/local/server/php
configure시 에러메세지 확인 후
libc-client와 libc-client-devel 패키지를 인스톨해 주었다.
그리고 net-snmp-devel 패키지도 설치해
주었다.
GUI를 설치하지 않은 서버용이라면 --with-xpm-dir 옵션은
사용하지 않는다.
아래의 configure 옵션 모두 복사 후 쉘에
붙여넣기 한다.
(\ 문자는 다음줄에 옵션을 계속 연결해서 쓰겠다는 의미)
#
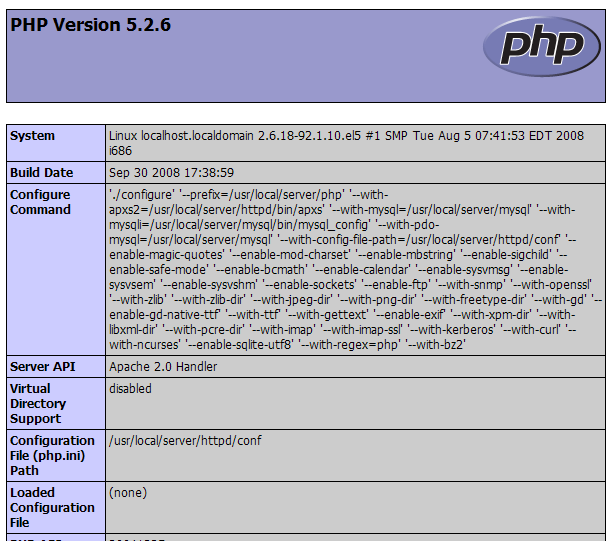
./configure \
--prefix=/usr/local/server/php \
--with-apxs2=/usr/local/server/httpd/bin/apxs \
--with-mysql=/usr/local/server/mysql \
--with-mysqli=/usr/local/server/mysql/bin/mysql_config \
--with-pdo-mysql=/usr/local/server/mysql \
--with-config-file-path=/usr/local/server/httpd/conf \
--enable-magic-quotes \
--enable-mod-charset \
--enable-mbstring \
--enable-sigchild \
--enable-safe-mode \
--enable-bcmath \
--enable-calendar \
--enable-sysvmsg \
--enable-sysvsem \
--enable-sysvshm \
--enable-sockets \
--enable-ftp \
--with-snmp
\
--with-openssl \
--with-zlib \
--with-zlib-dir \
--with-jpeg-dir \
--with-png-dir \
--with-freetype-dir \
--with-gd \
--enable-gd-native-ttf \
--with-ttf \
--with-gettext
\
--enable-exif \
--with-xpm-dir \
--with-libxml-dir \
--with-pcre-dir \
--with-imap \
--with-imap-ssl \
--with-kerberos \
--with-curl \
--with-ncurses \
--enable-sqlite-utf8 \
--with-regex=php \
--with-bz2
\
--with-mcrypt
한줄로 쓰면 아래와 같다.
# ./configure
--prefix=/usr/local/server/php --with-apxs2=/usr/local/server/httpd/bin/apxs
--with-mysql=/usr/local/server/mysql
--with-mysqli=/usr/local/server/mysql/bin/mysql_config
--with-pdo-mysql=/usr/local/server/mysql
--with-config-file-path=/usr/local/server/httpd/conf --enable-magic-quotes
--enable-mod-charset --enable-mbstring --enable-sigchild --enable-safe-mode
--enable-bcmath --enable-calendar --enable-sysvmsg --enable-sysvsem
--enable-sysvshm --enable-sockets --enable-ftp --with-snmp --with-openssl
--with-zlib --with-zlib-dir --with-jpeg-dir --with-png-dir --with-freetype-dir
--with-gd --enable-gd-native-ttf --with-ttf --with-gettext --enable-exif
--with-xpm-dir --with-libxml-dir --with-pcre-dir --with-imap --with-imap-ssl
--with-kerberos --with-curl --with-ncurses --enable-sqlite-utf8 --with-regex=php
--with-bz2 --with-mcrypt
# yum install libjpeg-devel libpng-devel libXpm-devel freetype-devel gd-devel libc-client libc-client-devel net-snmp-devel libmcrypt libmcrypt-devel -y
[주의 사항]
./configure 할때 아래와 같은 에러가 나타난다면?
configure: error: Cannot find libmysqlclient_r under /usr/local/mysql.
Note that the MySQL client library is not bundled anymore!
이 문장의 의미는 아파치를 쓰레드 기반(--with-mpm=worker)으로 설치했지만, mysql은 쓰레드기반으로 설치되지 않아 libmysqlclient_r 라이브러리가 없다는 뜻이다. 그러므로 mysql 설치시에 libmysqlclient_r 라이브러리를 생성하도록 ./configure 옵션에 --enable-thread-safe-client 옵션을 추가하여 mysql을 설치해 주어야 한다.
컴파일 문제없이 잘됩니다.
[root@localhost APM]#
pwd
/usr/local/src/APM
[root@localhost APM]# yum install
libjpeg-devel libpng-devel libXpm-devel freetype-devel gd-devel libc-client libc-client-devel net-snmp-devel libmcrypt
libmcrypt-devel -y
[root@localhost APM]# wget
http://www.php.net/get/php-5.2.6.tar.bz2/from/this/mirror
[root@localhost
APM]# tar xjf php-5.2.6.tar.bz2
[root@localhost APM]# cd
php-5.2.6
[root@localhost php-5.2.6]# ./configure
--prefix=/usr/local/server/php --with-apxs2=/usr/local/server/httpd/bin/apxs
--with-mysql=/usr/local/server/mysql
--with-mysqli=/usr/local/server/mysql/bin/mysql_config
--with-pdo-mysql=/usr/local/server/mysql
--with-config-file-path=/usr/local/server/httpd/conf --enable-magic-quotes
--enable-mod-charset --enable-mbstring --enable-sigchild --enable-safe-mode
--enable-bcmath --enable-calendar --enable-sysvmsg --enable-sysvsem
--enable-sysvshm --enable-sockets --enable-ftp --with-snmp --with-openssl
--with-zlib --with-zlib-dir --with-jpeg-dir --with-png-dir --with-freetype-dir
--with-gd --enable-gd-native-ttf --with-ttf --with-gettext --enable-exif
--with-xpm-dir --with-libxml-dir --with-pcre-dir --with-imap --with-imap-ssl
--with-kerberos --with-curl --with-ncurses --enable-sqlite-utf8 --with-regex=php
--with-bz2 --with-mcrypt
creating cache ./config.cache
checking for
Cygwin environment... no
checking for mingw32 environment... no
..... 중간생략
...
creating main/internal_functions.c
creating
main/internal_functions_cli.c
+--------------------------------------------------------------------+
|
License: |
| This
software is subject to the PHP License, available in this |
|
distribution in the file LICENSE. By continuing this installation |
|
process, you are bound by the terms of this license agreement. |
| If you
do not agree with the terms of this license, you must abort |
| the
installation process at this point.
|
+--------------------------------------------------------------------+
Thank you for using PHP.
[root@localhost php-5.2.6]#

[root@localhost php-5.2.6]# make install
4. php 설치 후 php.ini 복사하기
/usr/local/src/APM/php-5.2.6
[root@localhost php-5.2.6]# cp php.ini-dist /usr/local/server/httpd/conf/php.ini
5. 아파치 httpd.conf 에 php 확장자를 php 스크립트로 인식하도록 하기
[root@localhost conf]# vi httpd.conf
<IfModule dir_module>
DirectoryIndex index.php index.html
</IfModule>
<IfModule mime_module>
...생략...
#AddType text/html .shtml
#AddOutputFilter INCLUDES .shtml
AddHandler php5-script .phtml .php .inc .ini .html
AddType application/x-httpd-php-source .phps .incs .inis
</IfModule>
6. phpinfo()함수 호출을 위한 페이지 작성
설치후 아파치의 기본 페이지 디렉토리가 /usr/local/server/httpd/htdocs 이므로 이 디렉토리 아래에 php.php
파일을 작성한다.
[root@localhost conf]# vi
/usr/local/server/httpd/htdocs/php.php
<?php phpinfo(); ?>
7. php.php 파일에 접속
* 쉘상에서 php와 mysql 명령을 경로를 적어주지 않고 php, mysql만 입력하여 사용하고자 한다면 PATH 변수에 실행
바이너리 파일의 경로를 추가해 주면 된다.
[root@localhost ~]# vi .bash_profile
#
.bash_profile
# Get the aliases and functions
if [ -f ~/.bashrc ]; then
.
~/.bashrc
fi
# User specific environment and startup programs
PATH=$PATH:$HOME/bin:/usr/local/server/php/bin:/usr/local/server/mysql/bin
export PATH
unset USERNAME
[root@localhost ~]# source .bash_profile
[root@localhost ~]# which
php
/usr/local/server/php/bin/php
[root@localhost ~]# which
mysql
/usr/local/server/mysql/bin/mysql
[root@localhost ~]#
http://192.168.1.99/php.php
== 문서 추가
==
[CentOS 5.2 zbxe 설치를 위한 APM 설정 설명서]
일반적으로
웹페이지를 운영할때 아파치 자체 디렉토리에서 운영하지 않는다.
즉, 계정 디렉토리에서 운영한다. 계정 디렉토리에서 운영해야 추후 ftp가
가능한 편집기를 이용해서 php소스 수정하기가 편리하다.
아래는 노트북에 설치된 CentOS 5.2에서 제 개인 계정인 multi
유저계정에서 방금 설정한 내용이다.
1. zbxe 다운로드(svn 이용)
* 각 계정은 기본 생성시 700 퍼미션으로 생성되므로 other가 읽을 수 있도록 701퍼미션을 부여하고, 생성하는
public_html 디렉토리 역시 701 퍼미션을 부여한다.
제로보드 XE 설치시 php 상에서 디렉토리를 생성하도록 하고 있으므로
zbxe 디렉토리는 707로 퍼미션을 부여한다.
/home/multi
[multi@localhost multi]# chmod 701 ~multi
[multi@localhost multi]# ls -l /home
합계 12
drwx-----x 22 multi multi 4096 1월 23 16:18 multi
drwx------ 8 test test 4096 1월 12 17:21 test
[multi@localhost multi]# mkdir public_html
[multi@localhost multi]# chmod 701 public_html/
[multi@localhost multi]# ls -al | grep public_html
drwx-----x 4 multi multi 4096 1월 23 16:49 public_html
[multi@localhost multi]# cd public_html/
[multi@localhost public_html]# svn checkout http://svn.zeroboard.com/zeroboard_xe/trunk zbxe
...생략...
A zbxe/classes/handler
A zbxe/classes/handler/Handler.class.php
A zbxe/index.php
체크아웃된 리비전 21.
[multi@localhost public_html]# chmod 707 zbxe
[multi@localhost public_html]$ ls -al | grep zbxe
drwx---rwx 11 multi multi 4096 1월 23 16:28 zbxe
[multi@localhost public_html]#
2. 아파치 설정
multi 계정아래의 public_html
디렉토리를 사용하며, 아래와 같이 아파치 설정파일인 httpd.conf 파일에서 # 주석을 해제해 준다. 그리고 버추얼호스트부분인
httpd-vhosts.conf 파일을 아래와 같이 추가해 준다.
[multi@localhost public_html]$ su -
암호:
[root@localhost ~]# cd
/usr/local/server/httpd/conf/
[root@localhost conf]# vi httpd.conf
#
Supplemental configuration
#
# The configuration files in the conf/extra/
directory can be
# included to add extra features or to modify the default
configuration of
# the server, or you may simply copy their contents here and
change as
# necessary.
# Server-pool management (MPM specific)
Include
conf/extra/httpd-mpm.conf
# Multi-language error messages
Include
conf/extra/httpd-multilang-errordoc.conf
# Fancy directory listings
Include conf/extra/httpd-autoindex.conf
# Language settings
Include conf/extra/httpd-languages.conf
# User home directories
Include conf/extra/httpd-userdir.conf
# Real-time info on requests and configuration
#Include
conf/extra/httpd-info.conf
# Virtual hosts
Include conf/extra/httpd-vhosts.conf
# Local access to the Apache HTTP Server Manual
#Include
conf/extra/httpd-manual.conf
# Distributed authoring and versioning (WebDAV)
#Include
conf/extra/httpd-dav.conf
# Various default settings
Include
conf/extra/httpd-default.conf
[root@localhost conf]# vi
extra/httpd-vhosts.conf
[root@localhost conf]# vi
/usr/local/server/httpd/conf/extra/httpd-vhosts.conf
#
# Virtual
Hosts
#
# If you want to maintain multiple domains/hostnames on your
#
machine you can setup VirtualHost containers for them. Most configurations
#
use only name-based virtual hosts so the server doesn't need to worry about
#
IP addresses. This is indicated by the asterisks in the directives
below.
#
# Please see the documentation at
# <URL:http://httpd.apache.org/docs/2.2/vhosts/>
# for
further details before you try to setup virtual hosts.
#
# You may use the
command line option '-S' to verify your virtual host
# configuration.
#
# Use name-based virtual hosting.
#
NameVirtualHost *:80
<VirtualHost *:80>
ServerAdmin webmaster@dummy-host2.example.com
DocumentRoot "/home/multi/public_html"
ServerName
192.168.1.99
# ErrorLog "logs/dummy-host2.example.com-error_log"
#
CustomLog "logs/dummy-host2.example.com-access_log
common"
</VirtualHost>
[root@localhost
conf]#
3. mysql 디비 생성 (디비명 zbxe)
[root@localhost conf]# /usr/local/server/mysql/bin/mysql -u root -p
Enter
password:
Welcome to the MySQL monitor. Commands end with ; or \g.
Your
MySQL connection id is 67
Server version: 5.0.67-log Source distribution
Type 'help;' or '\h' for help. Type '\c' to clear the buffer.
mysql> create database zbxe;
Query OK, 1 row affected (0.05 sec)
mysql> quit
Bye
[root@localhost conf]#
4. 아파치 재시작
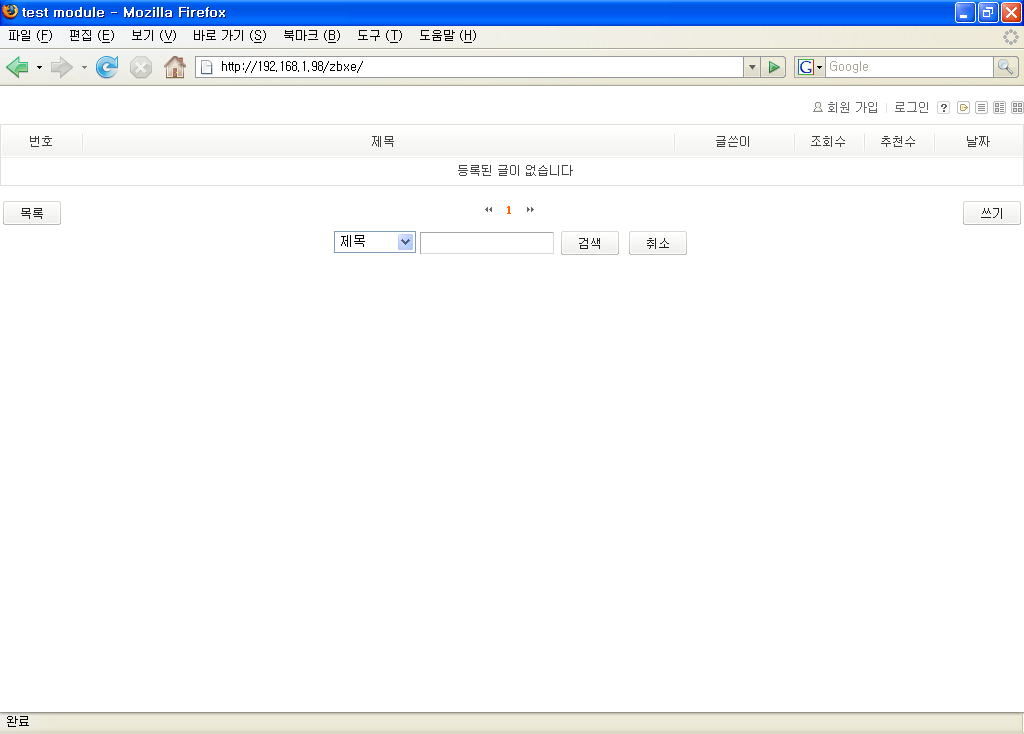
5. http://192.168.1.99/zbxe 로 접속해서
설치한다.
ps.
아파치에서 일반적으로 디렉토리에 관한 권한 설정은
conf/extra/httpd-userdir.conf 에서 관리하도록 되어 있는데, 여기에 보면 각 계정의 public_html 디렉토리에 대한
권한 설정이 기본적으로 만들어져 있기 때문에 각 계정아래에 public_html 디렉토리만 만들어 주면 되며, httpd.conf 파일에서
Include conf/extra/httpd-userdir.conf 주석을 해제해 주었다.
[root@localhost conf]# cat
/usr/local/server/httpd/conf/extra/httpd-userdir.conf
# Settings for user
home directories
#
# Required module: mod_userdir
#
# UserDir: The name of the directory that is appended onto a user's
home
# directory if a ~user request is received. Note that you must also
set
# the default access control for these directories, as in the example
below.
#
UserDir public_html
#
# Control access to UserDir directories. The following is an
example
# for a site where these directories are restricted to
read-only.
#
<Directory
"/home/*/public_html">
AllowOverride FileInfo AuthConfig Limit
Indexes
Options MultiViews Indexes SymLinksIfOwnerMatch
IncludesNoExec
<Limit GET POST OPTIONS>
Order
allow,deny
Allow from all
</Limit>
<LimitExcept GET POST OPTIONS>
Order deny,allow
Deny
from all
</LimitExcept>
</Directory>
[root@localhost conf]#
그리고 왠만하면 httpd.conf 파일의 제일 하단에 기본 캐릭터셋을 UTF-8로 설정해 두자.
이렇게 설정해 두면
meta 태그를 적지 않아도 텍스트파일의 경우 UTF-8로 읽혀진다.
물론 UTF-8로된 저장된 텍스트 파일을 업로드 해야한다.(대부분의
윈도우의 텍스트 에디터들은 UTF-8 저장을 지원한다.)
AddDefaultCharset
UTF-8
아래 그누보드 내용들은 APM을 rpm 파일로 설치하고 테스팅한 것이지만, APM 소스 설치시의 mysql 설정과
동일함.
install/install_db.php 파일의 mysql_query문 앞쪽에 아래와 같이
mysql_query를 utf8 로 설정하는 구문을 추가한다. @mysql_query("set names utf8");
[187번 줄]
//
테이블 생성 ------------------------------------
$file = implode("",
file("./sql_gnuboard4.sql"));
eval("\$file = \"$file\";");
$f = explode(";", $file);
for ($i=0; $i<count($f); $i++) {
if
(trim($f[$i]) == "") continue;
@mysql_query("set
names utf8");
mysql_query($f[$i]) or
die(mysql_error());
}
// 테이블 생성
------------------------------------
[312번 줄]
@mysql_query("set names
utf8");
@mysql_query($sql);
참고로 mysql의 기본 캐릭터셋이 utf8이
아닌(컴파일시 utf8을 지정하지 않은) rpm 파일을 설치했다면 /etc/my.cnf에 각 항목별 캐릭터셋을 지정, 저장하고 mysqld를
재시작한다.
(아래의 붉은색 부분 추가)
[root@localhost ~]# vi /etc/my.cnf
[mysqld]
user=mysql
# Default to using old password
format for compatibility with mysql 3.x
# clients (those using the
mysqlclient10 compatibility package).
old_passwords=1
init_connect=SET collation_connection =
utf8_general_ci
init_connect=SET NAMES
utf8
default-character-set=utf8
character-set-server=utf8
collation-server=utf8_general_ci
[client]
default-character-set=utf8
[mysql]
default-character-set=utf8
[root@localhost
~]# /etc/init.d/mysqld restart
Shutting down
MySQL. [ OK ]
Starting
MySQL. [ OK ]
[root@localhost
conf]# mysql -u root -p mysql
Enter
password:
Welcome to the MySQL monitor. Commands end with ; or \g.
Your
MySQL connection id is 1
Server version: 5.0.67-log Source distribution
Type 'help;' or '\h' for help. Type '\c' to clear the buffer.
mysql> show variables like
'c%';
+--------------------------+-----------------------------------------------+
|
Variable_name | Value
|
+--------------------------+-----------------------------------------------+
|
character_set_client | utf8 |
|
character_set_connection | utf8 |
|
character_set_database | utf8 |
|
character_set_filesystem | binary |
|
character_set_results | utf8 |
|
character_set_server | utf8 |
|
character_set_system | utf8 |
|
character_sets_dir | /usr/local/server/mysql/share/mysql/charsets/ |
|
collation_connection | utf8_general_ci |
|
collation_database | utf8_general_ci |
|
collation_server | utf8_general_ci |
|
completion_type | 0 |
|
concurrent_insert | 1 |
|
connect_timeout | 10
|
+--------------------------+-----------------------------------------------+
14
rows in set (0.15 sec)
mysql> quit
Bye
[root@localhost
conf]#
==========
apache, php, mysql에 대한 다른 추가적인 내용들은 CentOS
리눅스 구축관리실무 서적을 참고한다.
--끝--
[출처] 슈퍼유저코리아
'Linux > CentOS' 카테고리의 다른 글
| CentOS phpMyAdmin 설치 (0) | 2012.03.05 |
|---|---|
| CentOS6 Apache+PHP+MySQL (0) | 2012.03.05 |
| CentOS Apache 설치 (0) | 2012.03.05 |
| CentOS APM 설치 (0) | 2012.03.02 |
| CentOS FTP (0) | 2012.03.02 |
