'분류 전체보기'에 해당되는 글 114건

  1. 2012.03.05 CentOS phpMyAdmin 설치
  2. 2012.03.05 CentOS6 Apache+PHP+MySQL
  3. 2012.03.05 CentOS 5.x + APM + 제로보드 XE 설치 + 그누보드 UTF-8
  4. 2012.03.05 CentOS Apache 설치
  5. 2012.03.02 CentOS APM 설치
  6. 2012.03.02 CentOS FTP
  7. 2012.03.02 CentOS ssh 접속 한글깨짐 수정
  8. 2012.03.02 CentOS 방화벽 설정
  9. 2012.03.02 CentOS 명령어
  10. 2012.03.02 CentOS 단축키
Linux/CentOS2012. 3. 5. 18:03
yum을 이용해서 mysql 웹 관리 툴인 phpMyAdmin을 설치한다.

RPM Forge에서 패키지 정보를 다운로드 후 설치를 한다. (phpmyadmin은 기본적인 저장소가 없기 때문)

1. wget을 이용해서 패키지를 다운 받는다.
[root@www ~]# wget http://packages.sw.be/rpmforge-release/rpmforge-release-0.3.6-1.el5.rf.i386.rpm

2. 다운 받은 패키지를 설치한다.
[root@www ~]# rpm -Uvh rpmforge-release-0.3.6-1.el5.rf.i386.rpm

3. yum을 이용해서 phpMyAdmin을 설치한다.
[root@www ~]# yum -y install phpmyadmin

4. 설치한 후 phpmyadmin의 알리아스(Alias) 설정 파일인 phpmyadmin.conf 설정 파일을 열어서 Alias 부분을 제외하고는 주석 처리(#) 한다.
[root@www ~]# vi /etc/httpd/conf.d/phpmyadmin.conf
... 생략 ...
Alias /phpmyadmin /user/share/phpmyadmin
Alias /phpMyAdmin /user/share/phpmyadmin
Alias /mysqladmin /user/share/phpmyadmin


5.. phpmyadmin은 기본적으로 cookie 방식으로 인증을 한다. 하지만 이 방식은 보안에 좋지 않으므로 http 형식으로 로그인을 할 수 있게
변경하길 권장한다. phpmyadmin 설정 파일이 있는 해당 디렉토리로 이동한다.
[root@www ~]# cd /usr/share/phpmyadmin

6. config.sample.inc.php 파일을 config.inc.php 파일로 복사한다.
[root@www phpmyadmin]# cp config.sample.inc.php config.inc.php

7. vi 에디터로 config.inc.php 파일을 연 후
/* Authentication type */ 부분에서 $cfg[Servers'][$i]['auth_type'] = 'cookie' -> http로 변경한 후 저장하고 나온다.
[root@www phpmyadmin]# vi config.inc.php
/* Authentication type */
$cfg[Servers'][$i]['auth_type'] = 'http';
[root@www phpmyadmin]#

8. 아파치를 재시작한다.
[root@www phpmyadmin]# service httpd restart

9. 웹 브라우저를 띄운 후 phpMyAdmin 주소를 입력해서 확인한다.


http://localhost/phpmyadmin
http://127.0.0.1/phpmyadmin

The configuration file now needs a secret passphrase (blowfish_secret).
<-- 이런 오류 문구가 발생했다면(클릭)


phpmyadmin 설치
# cd ~
# wget http://download.fedoraproject.org/pub/epel/6/x86_64/epel-release-6-8.noarch.rpm
# rpm -ivh epel-release*
# yum -y install phpmyadmin

# vi /etc/phpMyAdmin/config.inc.php

# vi /usr/share/phpMyAdmin/config.inc.php 여기에 있을수도..

$cfg['Servers'][$i]['auth_type']     = 'http';         // 로그인시 쿠키를 사용하지 않도록 설정


http://아이피 또는 도메인/phpmyadmin 으로 접속하여 잘 보이면 다음 과정은 생략하고 화면이 뜨지 않고

internal server error가 나오시는 분들은 다음 환경화일의 항목들을 모두 주석처리 해줍니다.


# vi /etc/httpd/conf.d/phpMyAdmin.conf                        

#<Directory /usr/share/phpMyAdmin/>
#   <IfModule mod_authz_core.c>
#     # Apache 2.4
#     <RequireAny>
#       Require ip 127.0.0.1
#       Require ip ::1
#     </RequireAny>
#   </IfModule>
#   <IfModule !mod_authz_core.c>
#     # Apache 2.2
#     Order Deny,Allow
#     Deny from All
#     Allow from 127.0.0.1
#     Allow from ::1
#   </IfModule>
#</Directory>


출처: https://sohoweb.tistory.com/15 [아이엔의 블로그]


'Linux > CentOS' 카테고리의 다른 글

웹서버 세팅에 관한 문서2  (0) 2012.03.06
웹서버 세팅에 관한 문서1  (0) 2012.03.06
CentOS6 Apache+PHP+MySQL  (0) 2012.03.05
CentOS 5.x + APM + 제로보드 XE 설치 + 그누보드 UTF-8  (0) 2012.03.05
CentOS Apache 설치  (0) 2012.03.05
Posted by iWithJoy
Linux/CentOS2012. 3. 5. 17:43

서버를 구성하면서 사용한 스크립트..
나중에 재사용을 위해서 블로그에 올리자!!
Apache -> MySQL -> PHP 순으로 설치!

모든 설치 파일 혹은 소스는 하단 디렉토리에 위치한다.

Apache : http://apache.org
MySQL : http://dev.mysql.com
PHP     : http://php.net

최근 릴리즈 버전을 /usr/local/src에 다운로드 한다.

Apache 설치 

1
2
3
4
5
6
7
8
9
10
11
12
13
14
15
## 컴파일 및 설치
cd /usr/local/src
tar xvzf httpd-2.2.14.tar.gz
cd httpd-2.2.21
./configure --prefix=/usr/local/apache \
--enable-mods-shared=all \
--enable-so \
--enable-module=rewrite
make
make install
 
## 관리를 위해 Symbolic Link로 연결
cd /usr/local
mv apache apache-2.2.21
ln -s apache-2.2.21 apache
## 컴파일 및 설치
cd /usr/local/src
tar xvzf httpd-2.2.14.tar.gz
cd httpd-2.2.21
./configure --prefix=/usr/local/apache \
--enable-mods-shared=all \
--enable-so \
--enable-module=rewrite
make
make install

## 관리를 위해 Symbolic Link로 연결
cd /usr/local
mv apache apache-2.2.21
ln -s apache-2.2.21 apache

MySQL 설치

1
2
3
4
5
6
7
## 압축 해제 설치
tar xzvf mysql-5.5.19-linux2.6-x86_64.tar.gz
mv mysql-5.5.19-linux2.6-x86_64 /usr/local/
cd /usr/local
 
## 관리를 위해  Symbolic Link로 연결
ln -s mysql-5.5.19-linux2.6-x86_64 mysql
## 압축 해제 설치
tar xzvf mysql-5.5.19-linux2.6-x86_64.tar.gz
mv mysql-5.5.19-linux2.6-x86_64 /usr/local/
cd /usr/local

## 관리를 위해  Symbolic Link로 연결
ln -s mysql-5.5.19-linux2.6-x86_64 mysql

자세한 설치는  .bwp-syntax-wrapper li {white-space: normal;}

1
2
3
4
5
6
7
8
9
10
11
12
13
14
15
16
17
18
19
20
21
22
23
24
25
26
27
28
29
## 필요 라이브러리 설치
## 추가 필요한 라이브러리는 yum 으로 따로 업데이트
yum install libzip* libcurl* openssl*
 
## 컴파일 및 설치
tar xzvf php-5.3.8.tar.gz
cd php-5.3.8
./configure --prefix=/usr/local/php \
--with-apxs2=/usr/local/apache/bin/apxs \
--with-mysql=/usr/local/mysql \
--with-config-file-path=/usr/local/apache/conf \
--with-exec-dir=/usr/local/apache/bin \
--enable-sigchild \
--with-curl \
--with-openssl \
--with-curlwrappers \
--with-gd \
--enable-ftp \
--enable-zip \
--disable-debug
 
make
make install
cp php.ini-production /usr/local/apache/conf/php.ini
 
## 관리를 위해 Symbolic Link로 연결
cd /usr/local
mv php php-5.3.8
ln -s php-5.3.8 php
## 필요 라이브러리 설치
## 추가 필요한 라이브러리는 yum 으로 따로 업데이트
yum install libzip* libcurl* openssl*

## 컴파일 및 설치
tar xzvf php-5.3.8.tar.gz
cd php-5.3.8
./configure --prefix=/usr/local/php \
--with-apxs2=/usr/local/apache/bin/apxs \
--with-mysql=/usr/local/mysql \
--with-config-file-path=/usr/local/apache/conf \
--with-exec-dir=/usr/local/apache/bin \
--enable-sigchild \
--with-curl \
--with-openssl \
--with-curlwrappers \
--with-gd \
--enable-ftp \
--enable-zip \
--disable-debug

make
make install
cp php.ini-production /usr/local/apache/conf/php.ini

## 관리를 위해 Symbolic Link로 연결
cd /usr/local
mv php php-5.3.8
ln -s php-5.3.8 php

Apache 환경 변수 변경

1
2
3
4
5
vi /usr/local/apache/bin/envvars
## 하단 내용 추가
export MYSQL_HOME=/usr/local/mysql
export PATH=$PATH:$MYSQL_HOME/bin:.
export LD_LIBRARY_PATH=$LD_LIBRARY_PATH:$MYSQL_HOME/lib/
vi /usr/local/apache/bin/envvars
## 하단 내용 추가
export MYSQL_HOME=/usr/local/mysql
export PATH=$PATH:$MYSQL_HOME/bin:.
export LD_LIBRARY_PATH=$LD_LIBRARY_PATH:$MYSQL_HOME/lib/

httpd.conf 변경

1
2
3
4
5
6
7
8
9
10
11
12
13
vi /usr/local/apache/conf/httpd.conf
 
## 인덱스 파일에 php 추가
<IfModule dir_module>
DirectoryIndex index.php index.html index.htm
</IfModule>
## 주석 제거
Include conf/extra/httpd-vhosts.conf
Include conf/extra/httpd-default.conf
 
## 하단에 Type 추가
AddType application/x-httpd-php .php
AddType application/x-httpd-php-source .phps
vi /usr/local/apache/conf/httpd.conf

## 인덱스 파일에 php 추가
<IfModule dir_module>
DirectoryIndex index.php index.html index.htm
</IfModule>
## 주석 제거
Include conf/extra/httpd-vhosts.conf
Include conf/extra/httpd-default.conf

## 하단에 Type 추가
AddType application/x-httpd-php .php
AddType application/x-httpd-php-source .phps

가상 호스트 설정

1
2
3
4
5
6
7
8
9
10
11
12
13
14
15
16
17
18
vi /usr/local/apache/conf/extra/httpd-vhosts.conf
 
## 디렉토리 설정 및 가상 호스트 추가
<Directory /data/www/gywn.net>
Options Indexes FollowSymLinks
AllowOverride All
Order allow,deny
Allow from all
</Directory>
 
<VirtualHost *:80>
ServerName gywn.net
ServerAdmin gywndi@gmail.com
DocumentRoot "/data/www/gywn.net"
ServerAlias www.gywn.net
ErrorLog "logs/gywn.net-error_log"
CustomLog "logs/gywn.net-access_log" common
</VirtualHost>
vi /usr/local/apache/conf/extra/httpd-vhosts.conf

## 디렉토리 설정 및 가상 호스트 추가
<Directory /data/www/gywn.net>
Options Indexes FollowSymLinks
AllowOverride All
Order allow,deny
Allow from all
</Directory>

<VirtualHost *:80>
ServerName gywn.net
ServerAdmin gywndi@gmail.com
DocumentRoot "/data/www/gywn.net"
ServerAlias www.gywn.net
ErrorLog "logs/gywn.net-error_log"
CustomLog "logs/gywn.net-access_log" common
</VirtualHost>

서비스 등록

1
2
3
4
5
6
7
8
9
10
11
12
13
14
## 아파치 #################
cp /usr/local/apache/bin/apachectl \
/etc/init.d/httpd
vi /etc/init.d/httpd
## "#!/bin/sh" 밑에 하단 라인 추가
# chkconfig: 2345 90 90
 
## MySQL #################
cp /usr/local/mysql/support-files/mysql.server \
/etc/init.d/mysqld
 
## 서비스 등록
chkconfig --add httpd
chkconfig --add mysqld
## 아파치 #################
cp /usr/local/apache/bin/apachectl \
/etc/init.d/httpd
vi /etc/init.d/httpd
## "#!/bin/sh" 밑에 하단 라인 추가
# chkconfig: 2345 90 90

## MySQL #################
cp /usr/local/mysql/support-files/mysql.server \
/etc/init.d/mysqld

## 서비스 등록
chkconfig --add httpd
chkconfig --add mysqld

다음 서버 세팅은 이로서 조금은 편해질듯^^
삽질은 삽질일 뿐 두번하지 말자!

'Linux > CentOS' 카테고리의 다른 글

웹서버 세팅에 관한 문서1  (0) 2012.03.06
CentOS phpMyAdmin 설치  (0) 2012.03.05
CentOS 5.x + APM + 제로보드 XE 설치 + 그누보드 UTF-8  (0) 2012.03.05
CentOS Apache 설치  (0) 2012.03.05
CentOS APM 설치  (0) 2012.03.02
Posted by iWithJoy
Linux/CentOS2012. 3. 5. 16:44
일반적으로 Linux 배포판들에서는 MySQL, Apache, PHP를 rpm 패키지로 지원한다. 하지만, 메이저버전이 올라가면 업데이트를 제공하지 않는다. 그래서 각 애플리케이션에 대한 업데이트가 불편할 뿐만 아니라, 엉뚱한 버전으로 업데이트하다 보면 오류가 발생할 여지도 있다.

결국, 업데이트 및 안정적인 애플리케이션 사용을 위해 소스 컴파일을 권장한다. 소스 컴파일을 사용하여 설치하면 업데이트도 간편하고, 업데이트 후 오류 발생도 거의 없다.

Point : CentOS 5.2 설치후 selinux 관련을 사용하지 않음으로 설정하고 재부팅한 다음 설치를 시작했다.

[root@localhost ~]# vi /etc/selinux/config
# This file controls the state of SELinux on the system.
# SELINUX= can take one of these three values:
#       enforcing - SELinux security policy is enforced.
#       permissive - SELinux prints warnings instead of enforcing.
#       disabled - SELinux is fully disabled.
SELINUX=disabled
# SELINUXTYPE= type of policy in use. Possible values are:
#       targeted - Only targeted network daemons are protected.
#       strict - Full SELinux protection.
SELINUXTYPE=targeted
[root@localhost ~]# reboot

만약 재부팅을 하지 않고 진행하려면 쉘상에서 setenforce 0을 입력하면 된다.


[root@localhost ~]# setenforce 0
[root@localhost ~]# setenforce
usage:  setenforce [ Enforcing | Permissive | 1 | 0 ]


혹시라도 selinux를 적용해서 사용하고자 할때에는 웹서버 디렉토리 만든다음 selinux 문맥에 맞게 변경해 주어야 한다.

useradd 명령으로 test 사용자를 추가하면 /home/test 디렉토리가 생성된다.
하지만 selinux가 적용된 시스템에서는 /home/test 디렉토리의 보안문맥이 user_home_t 로 구성되는데, 디렉토리 권한이 755로 되어 있어도 기본 보안문맥으로는 웹(80포트)에서 접근이 불가능하다. 

그러므로 사용자 디렉토리에 대한 보안문맥을 chcon 명령어로 아래와 같이 변경해 주어야 한다.

# chcon -R -t httpd_sys_content_t /home/test

이렇게 보안문맥을 지정해 주면 /home/test 디렉토리 아래에 생성되는 모든 파일들은 이제부터 httpd_sys_content_t 문맥의 영향을 받아 모두 httpd_sys_content_t 보안문맥으로 생성된다.

이제 "mkdir /home/test/public_html" 명령으로 디렉토리를 생성하면 위의 httpd_sys_content_t 문맥을 가지는 디렉토리가 생성되고 웹 80포트에서 접속이 가능하게 되는 것이다.

[root@localhost ~]# useradd test
[root@localhost ~]# touch ~test/test.txt
[root@localhost ~]# ls -lZ ~test/
-rw-r--r--  root root user_u:object_r:user_home_t      test.txt
[root@localhost ~]# chcon -R -t httpd_sys_content_t /home/test
[root@localhost ~]# ls -lZ ~test/
-rw-r--r--  root root user_u:object_r:httpd_sys_content_t test.txt
[root@localhost ~]#

===

[root@localhost ~]# su - test
[test@localhost ~]$ ls -lZ
-rw-r--r--  root root user_u:object_r:httpd_sys_content_t test.txt
[test@localhost ~]$ touch selinux.txt
[test@localhost ~]$ ls -lZ
-rw-rw-r--  test test user_u:object_r:httpd_sys_content_t selinux.txt
-rw-r--r--  root root user_u:object_r:httpd_sys_content_t test.txt
[test@localhost ~]$


[* 참고 *]

만약 다른곳의 파일을 /home/test 디렉토리 아래로 복사 또는 이동할때에는 어떻게 될까?

cp 명령에 의한 복사시에는 기존 파일 자신의 보안문맥과 함께 httpd_sys_content_t 문맥을 추가적으로 붙여서 복사된다.

[root@localhost ~]# touch root.txt
[root@localhost ~]# ls -lZ root.txt
-rw-r--r--  root root user_u:object_r:user_home_t      root.txt
[root@localhost ~]# cp root.txt /home/test
[root@localhost ~]# ls -lZ /home/test/
-rw-r--r--  root root user_u:object_r:httpd_sys_content_t root.txt
-rw-rw-r--  test test user_u:object_r:httpd_sys_content_t selinux.txt
-rw-r--r--  root root user_u:object_r:httpd_sys_content_t test.txt
[root@localhost ~]#

mv 명령에 의한 이동시에는 기존 파일 자신의 보안문맥만 유지하고 파일이 이동된다. 즉 httpd_sys_content_t 보안문맥이 추가되지 않는다는 것이다.

[root@localhost ~]# touch mv.txt
[root@localhost ~]# ls -lZ mv.txt
-rw-r--r--  root root user_u:object_r:user_home_t      mv.txt
[root@localhost ~]# mv mv.txt /home/test/
[root@localhost ~]# ls -lZ /home/test/
-rw-r--r--  root root user_u:object_r:user_home_t      mv.txt
-rw-r--r--  root root user_u:object_r:httpd_sys_content_t root.txt
-rw-rw-r--  test test user_u:object_r:httpd_sys_content_t selinux.txt
-rw-r--r--  root root user_u:object_r:httpd_sys_content_t test.txt
[root@localhost ~]#

그러면 ftp에서는 어떻게 할까?

* ftp 홈에대한 권한적용을 풀어주기 위해 아래와 같이 입력한다.
-P옵션은 재부팅후에도 적용되는 옵션으로 selinux 환경설정이 저장된다는 의미다.

# setsebool -P ftp_home_dir 1 

* ftp에 대해 selinux 파일보안 정책을 사용하지 않도록 하려면 아래와 같이 입력한다.

# setsebool -P ftpd_disable_trans 1 


=======================

* gcc 컴파일러 설치 확인 *

소스 컴파일시 필요한 gcc 관련 패키지들은 yum을 사용하여 원격 설치할 수 있다.

# yum install yum-fastestmirror -y
# yum install gcc gcc-c++ make automake autoconf -y

추가적인 yum 명령어 사용법은 아래 링크를 참고한다.

http://www.lug.or.kr/home/bbs/board.php?bo_table=centos_book&wr_id=93&page=2#bbs

좀더 자세한 내용은 맨페이지를 참고한다.

# man yum

=======================

* yum을 사용하여 개발 패키지 그룹들을 설치해 둔다. *

rpmforge.net 저장소 사용하기 :
(옵션임 : CentOS에서 제공하지 않는 패키지들도 rpm으로 제공한다.)

RHEL5 / CentOS-5
i386용 다운로드 : http://packages.sw.be/rpmforge-release/rpmforge-release-0.3.6-1.el5.rf.i386.rpm
x86_64용 다운로드 : http://packages.sw.be/rpmforge-release/rpmforge-release-0.3.6-1.el5.rf.x86_64.rpm

# lftpget http://packages.sw.be/rpmforge-release/rpmforge-release-0.3.6-1.el5.rf.i386.rpm 
# rpm -ivh rpmforge-release-0.3.6-1.el5.rf.i386.rpm

개발관련 패키지 그룹 설치하기

# yum groupinstall "Development Libraries"
# yum groupinstall "Development Tools"
# yum groupinstall "Legacy Software Development"

=======================


1. MYSQL 설치

mysql 버전 : mysql-5.0.67.tar.gz [5.x대의 안정버전을 사용한다.]
http://dev.mysql.com/get/Downloads/MySQL-5.0/mysql-5.0.67.tar.gz/from/http://mysql.byungsoo.net/

mysql 설치경로 : /usr/local/server/mysql

mysql 유저 생성
# useradd -M -s /bin/false mysql

*아래 컴파일에서 --with-readline 옵션이 있어야만 ssh 원격접속(putty, utf-8) 콘솔에서 한글 입력이 가능하다.

*아래 옵션에서 -enable-thread-safe-client 옵션은 아파치(httpd)를 쓰레드로 운영(--with-mpm=worker)할때 필요한 옵션)

# ./configure --prefix=/usr/local/server/mysql --with-charset=utf8 --with-extra-charsets=all --enable-thread-safe-client --with-readline

# make
# make install

컴파일 시작하기 : mysql 환경설정, 파일 복사, 시작스크립트 복사


[root@localhost ~]# yum install re2c #rpmforge.org에서 제공하는 패키지이다. 설치하지 않아도 무관함.
[root@localhost ~]# mkdir /usr/local/server
[root@localhost ~]# useradd -M -s /bin/false mysql
[root@localhost ~]# mkdir /usr/local/src/APM
[root@localhost ~]# cd /usr/local/src/APM/
[root@localhost APM]# wget http://dev.mysql.com/get/Downloads/MySQL-5.0/mysql-5.0.67.tar.gz/from/http://mysql.byungsoo.net/
[root@localhost APM]# tar xzf mysql-5.0.67.tar.gz
[root@localhost APM]# cd mysql-5.0.67
[root@localhost mysql-5.0.67]# pwd
/usr/local/src/APM/mysql-5.0.67
[root@localhost mysql-5.0.67]# ./configure --prefix=/usr/local/server/mysql --with-charset=utf8 --with-extra-charsets=all --with-readline
[root@localhost mysql-5.0.67]# make
[root@localhost mysql-5.0.67]# make install
[root@localhost mysql-5.0.67]# cp support-files/my-huge.cnf /etc/my.cnf
[root@localhost mysql-5.0.67]# cp support-files/mysql.server /etc/init.d/mysqld
[root@localhost mysql-5.0.67]# chmod 755 /etc/init.d/mysqld
[root@localhost mysql-5.0.67]# chkconfig --add mysqld
[root@localhost mysql-5.0.67]# chkconfig --list mysqld
mysqld          0:해제  1:해제  2:활성  3:활성  4:활성  5:활성  6:해제
[root@localhost mysql-5.0.67]# chkconfig --level 24 mysqld off
[root@localhost mysql-5.0.67]# chkconfig --list mysqld
mysqld          0:해제  1:해제  2:해제  3:활성  4:해제  5:활성  6:해제
[root@localhost mysql-5.0.67]#

mysql 데이터베이스 초기화 및 디렉토리 퍼미션 설정

[root@localhost mysql-5.0.67]# cd /usr/local/server/mysql/
[root@localhost mysql]# chown -R mysql .
[root@localhost mysql]# chgrp -R mysql .
[root@localhost mysql]# bin/mysql_install_db --user=mysql
[root@localhost mysql]# chown -R root .
[root@localhost mysql]# chown -R mysql var
[root@localhost mysql]# /etc/init.d/mysqld start
Starting MySQL                                             [  OK  ]
[root@localhost mysql]#

mysql을 설치한 다음 mysql를 관리하는 root의 패스워드는 기본적으로 설정되어 있지 않기 때문에 패스워드 없이 누구나 접근이 가능하다. 이를 막기 위해 root@localhost의 패스워드를 설정한다.

[root@localhost mysql]# /usr/local/server/mysql/bin/mysql -u root
Welcome to the MySQL monitor.  Commands end with ; or \g.
Your MySQL connection id is 1
Server version: 5.0.67-log Source distribution

Type 'help;' or '\h' for help. Type '\c' to clear the buffer.

mysql> SET PASSWORD FOR 'root'@'localhost' = PASSWORD('newpwd');
Query OK, 0 rows affected (0.00 sec)

mysql> quit
Bye
[root@localhost mysql]#


2. 아파치 설치

httpd 버전 : httpd-2.2.9.tar.bz2
http://ftp.kaist.ac.kr/pub/Apache/httpd/httpd-2.2.9.tar.bz2

httpd 설치경로 : /usr/local/server/httpd
* 아파치를 디폴트로 설치하면 프로세스 기반의 prefork 방식으로 설치된다. 만약 쓰레드 기반으로 설치하고자 한다면 --with-mpm=worker 옵션을 추가적으로 사용하면 된다.

./configure --prefix=/usr/local/server/httpd --enable-so --enable-mods-shared=all --enable-ssl --with-ssl
make
make install

아파치 시작 스크립트 복사 및 수정

[root@localhost APM]# pwd
/usr/local/src/APM
[root@localhost APM]# lftpget http://ftp.kaist.ac.kr/pub/Apache/httpd/httpd-2.2.9.tar.bz2
[root@localhost APM]# tar xjf httpd-2.2.9.tar.bz2
[root@localhost APM]# cd httpd-2.2.9
[root@localhost httpd-2.2.9]# pwd
/usr/local/src/APM/httpd-2.2.9
[root@localhost httpd-2.2.9]# ./configure --prefix=/usr/local/server/httpd --enable-so --enable-mods-shared=all --enable-ssl --with-ssl
[root@localhost httpd-2.2.9]# make
[root@localhost httpd-2.2.9]# make install
[root@localhost httpd-2.2.9]# cp /usr/local/server/httpd/bin/apachectl /etc/init.d/httpd
[root@localhost httpd-2.2.9]# vi /etc/init.d/httpd

#!/bin/sh
# Comments to support chkconfig on CentOS Linux, http://www.lug.or.kr   
# chkconfig: 35 90 90   
# description: A very fast and reliable WebServer engine.  

[root@localhost httpd-2.2.9]# chmod 755 /etc/init.d/httpd
[root@localhost httpd-2.2.9]# chkconfig --add httpd
[root@localhost httpd-2.2.9]# chkconfig --list httpd
httpd           0:해제  1:해제  2:해제  3:활성  4:해제  5:활성  6:해제
[root@localhost httpd-2.2.9]#


3. PHP 설치

php 버전 : php-5.2.6.tar.bz2
http://www.php.net/get/php-5.2.6.tar.bz2/from/this/mirror

php 설치경로 : /usr/local/server/php

configure시 에러메세지 확인 후 libc-client와 libc-client-devel 패키지를 인스톨해 주었다.
그리고 net-snmp-devel 패키지도 설치해 주었다.

GUI를 설치하지 않은 서버용이라면 --with-xpm-dir 옵션은 사용하지 않는다.

아래의 configure 옵션 모두 복사 후 쉘에 붙여넣기 한다.
(\ 문자는 다음줄에 옵션을 계속 연결해서 쓰겠다는 의미)

# ./configure \
--prefix=/usr/local/server/php \
--with-apxs2=/usr/local/server/httpd/bin/apxs \
--with-mysql=/usr/local/server/mysql \
--with-mysqli=/usr/local/server/mysql/bin/mysql_config \
--with-pdo-mysql=/usr/local/server/mysql \
--with-config-file-path=/usr/local/server/httpd/conf \
--enable-magic-quotes \
--enable-mod-charset \
--enable-mbstring \
--enable-sigchild \
--enable-safe-mode \
--enable-bcmath \
--enable-calendar \
--enable-sysvmsg \
--enable-sysvsem \
--enable-sysvshm \
--enable-sockets \
--enable-ftp \
--with-snmp \
--with-openssl \
--with-zlib \
--with-zlib-dir \
--with-jpeg-dir \
--with-png-dir \
--with-freetype-dir \
--with-gd \
--enable-gd-native-ttf \
--with-ttf \
--with-gettext \
--enable-exif \
--with-xpm-dir \
--with-libxml-dir \
--with-pcre-dir \
--with-imap \
--with-imap-ssl \
--with-kerberos \
--with-curl \
--with-ncurses \
--enable-sqlite-utf8 \
--with-regex=php \
--with-bz2 \
--with-mcrypt

한줄로 쓰면 아래와 같다.

# ./configure --prefix=/usr/local/server/php --with-apxs2=/usr/local/server/httpd/bin/apxs --with-mysql=/usr/local/server/mysql --with-mysqli=/usr/local/server/mysql/bin/mysql_config --with-pdo-mysql=/usr/local/server/mysql --with-config-file-path=/usr/local/server/httpd/conf --enable-magic-quotes --enable-mod-charset --enable-mbstring --enable-sigchild --enable-safe-mode --enable-bcmath --enable-calendar --enable-sysvmsg --enable-sysvsem --enable-sysvshm --enable-sockets --enable-ftp --with-snmp --with-openssl --with-zlib --with-zlib-dir --with-jpeg-dir --with-png-dir --with-freetype-dir --with-gd --enable-gd-native-ttf --with-ttf --with-gettext --enable-exif --with-xpm-dir --with-libxml-dir --with-pcre-dir --with-imap --with-imap-ssl --with-kerberos --with-curl --with-ncurses --enable-sqlite-utf8 --with-regex=php --with-bz2 --with-mcrypt


간혹 각종 라이브러리들이 설치가 안되어 있을 경우 설치시 에러가 발생하는데 이럴때에는 아래의 라이브러리 패키지를 설치해 주고, php를 처음부터 다시 컴파일 한다.

# yum install libjpeg-devel libpng-devel libXpm-devel freetype-devel gd-devel libc-client libc-client-devel net-snmp-devel libmcrypt libmcrypt-devel -y


[주의 사항]
./configure 할때 아래와 같은 에러가 나타난다면?
configure: error: Cannot find libmysqlclient_r under /usr/local/mysql.
Note that the MySQL client library is not bundled anymore!


이 문장의 의미는 아파치를 쓰레드 기반(--with-mpm=worker)으로 설치했지만, mysql은 쓰레드기반으로 설치되지 않아 libmysqlclient_r 라이브러리가 없다는 뜻이다. 그러므로 mysql 설치시에 libmysqlclient_r 라이브러리를 생성하도록 ./configure 옵션에 --enable-thread-safe-client 옵션을 추가하여 mysql을 설치해 주어야 한다.


컴파일 문제없이 잘됩니다.

[root@localhost APM]# pwd
/usr/local/src/APM
[root@localhost APM]# yum install libjpeg-devel libpng-devel libXpm-devel freetype-devel gd-devel libc-client libc-client-devel net-snmp-devel libmcrypt libmcrypt-devel -y
[root@localhost APM]# wget http://www.php.net/get/php-5.2.6.tar.bz2/from/this/mirror
[root@localhost APM]# tar xjf php-5.2.6.tar.bz2
[root@localhost APM]# cd php-5.2.6
[root@localhost php-5.2.6]# ./configure --prefix=/usr/local/server/php --with-apxs2=/usr/local/server/httpd/bin/apxs --with-mysql=/usr/local/server/mysql --with-mysqli=/usr/local/server/mysql/bin/mysql_config --with-pdo-mysql=/usr/local/server/mysql --with-config-file-path=/usr/local/server/httpd/conf --enable-magic-quotes --enable-mod-charset --enable-mbstring --enable-sigchild --enable-safe-mode --enable-bcmath --enable-calendar --enable-sysvmsg --enable-sysvsem --enable-sysvshm --enable-sockets --enable-ftp --with-snmp --with-openssl --with-zlib --with-zlib-dir --with-jpeg-dir --with-png-dir --with-freetype-dir --with-gd --enable-gd-native-ttf --with-ttf --with-gettext --enable-exif --with-xpm-dir --with-libxml-dir --with-pcre-dir --with-imap --with-imap-ssl --with-kerberos --with-curl --with-ncurses --enable-sqlite-utf8 --with-regex=php --with-bz2 --with-mcrypt
creating cache ./config.cache
checking for Cygwin environment... no
checking for mingw32 environment... no
..... 중간생략 ...

creating main/internal_functions.c
creating main/internal_functions_cli.c
+--------------------------------------------------------------------+
| License:                                                           |
| This software is subject to the PHP License, available in this     |
| distribution in the file LICENSE.  By continuing this installation |
| process, you are bound by the terms of this license agreement.     |
| If you do not agree with the terms of this license, you must abort |
| the installation process at this point.                            |
+--------------------------------------------------------------------+

Thank you for using PHP.

[root@localhost php-5.2.6]#
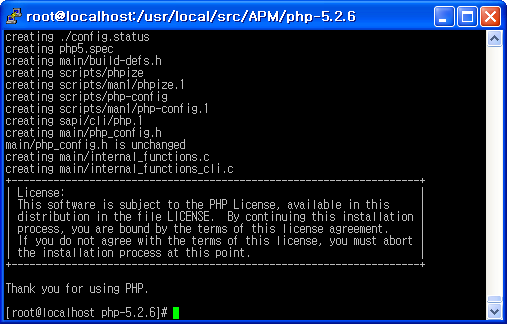


[root@localhost php-5.2.6]# make
[root@localhost php-5.2.6]# make install


4. php 설치 후 php.ini 복사하기

[root@localhost php-5.2.6]# pwd
/usr/local/src/APM/php-5.2.6
[root@localhost php-5.2.6]# cp php.ini-dist /usr/local/server/httpd/conf/php.ini


5. 아파치 httpd.conf 에 php 확장자를 php 스크립트로 인식하도록 하기

[root@localhost php-5.2.6]# cd /usr/local/server/httpd/conf/
[root@localhost conf]# vi httpd.conf

<IfModule dir_module>
    DirectoryIndex index.php index.html
</IfModule>

<IfModule mime_module>
...생략...
    #AddType text/html .shtml
    #AddOutputFilter INCLUDES .shtml

    AddHandler php5-script .phtml .php .inc .ini .html
    AddType application/x-httpd-php-source .phps .incs .inis


</IfModule>


6. phpinfo()함수 호출을 위한 페이지 작성

설치후 아파치의 기본 페이지 디렉토리가 /usr/local/server/httpd/htdocs 이므로 이 디렉토리 아래에 php.php 파일을 작성한다.

[root@localhost conf]# vi /usr/local/server/httpd/htdocs/php.php

<?php phpinfo(); ?>


7. php.php 파일에 접속

[root@localhost conf]# /etc/init.d/httpd start


* 쉘상에서 php와 mysql 명령을 경로를 적어주지 않고 php, mysql만 입력하여 사용하고자 한다면 PATH 변수에 실행 바이너리 파일의 경로를 추가해 주면 된다.

[root@localhost ~]# vi .bash_profile
# .bash_profile

# Get the aliases and functions
if [ -f ~/.bashrc ]; then
        . ~/.bashrc
fi

# User specific environment and startup programs

PATH=$PATH:$HOME/bin:/usr/local/server/php/bin:/usr/local/server/mysql/bin

export PATH
unset USERNAME
[root@localhost ~]# source .bash_profile
[root@localhost ~]# which php
/usr/local/server/php/bin/php
[root@localhost ~]# which mysql
/usr/local/server/mysql/bin/mysql
[root@localhost ~]#


http://192.168.1.99/php.php
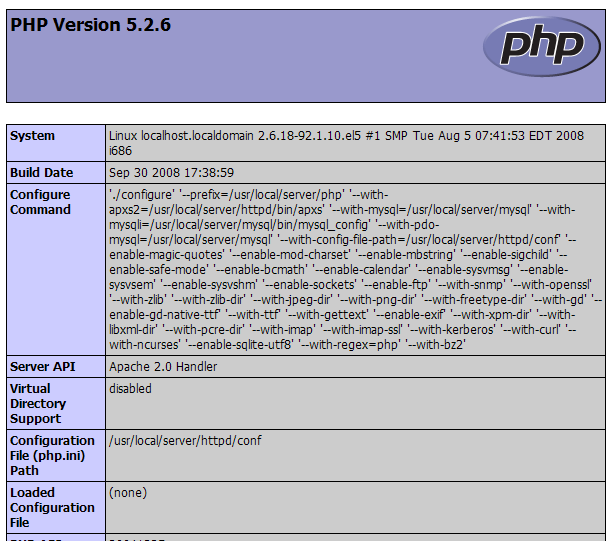


== 문서 추가 ==


[CentOS 5.2 zbxe 설치를 위한 APM 설정 설명서]

일반적으로 웹페이지를 운영할때 아파치 자체 디렉토리에서 운영하지 않는다.
즉, 계정 디렉토리에서 운영한다. 계정 디렉토리에서 운영해야 추후 ftp가 가능한 편집기를 이용해서 php소스 수정하기가 편리하다.

아래는 노트북에 설치된 CentOS 5.2에서 제 개인 계정인 multi 유저계정에서 방금 설정한 내용이다.


1. zbxe 다운로드(svn 이용)

* 각 계정은 기본 생성시 700 퍼미션으로 생성되므로 other가 읽을 수 있도록 701퍼미션을 부여하고, 생성하는 public_html 디렉토리 역시 701 퍼미션을 부여한다.
제로보드 XE 설치시 php 상에서 디렉토리를 생성하도록 하고 있으므로 zbxe 디렉토리는 707로 퍼미션을 부여한다.

[multi@localhost multi]# pwd
/home/multi
[multi@localhost multi]# chmod 701 ~multi
[multi@localhost multi]# ls -l /home
합계 12
drwx-----x 22 multi multi 4096  1월 23 16:18 multi
drwx------  8 test  test  4096  1월 12 17:21 test
[multi@localhost multi]# mkdir public_html
[multi@localhost multi]# chmod 701 public_html/
[multi@localhost multi]# ls -al | grep public_html
drwx-----x  4 multi multi  4096  1월 23 16:49 public_html
[multi@localhost multi]# cd public_html/
[multi@localhost public_html]# svn checkout http://svn.zeroboard.com/zeroboard_xe/trunk zbxe
...생략...
A    zbxe/classes/handler
A    zbxe/classes/handler/Handler.class.php
A    zbxe/index.php
체크아웃된 리비전 21.
[multi@localhost public_html]# chmod 707 zbxe
[multi@localhost public_html]$ ls -al | grep zbxe
drwx---rwx 11 multi multi    4096  1월 23 16:28 zbxe
[multi@localhost public_html]#


2. 아파치 설정

multi 계정아래의 public_html 디렉토리를 사용하며, 아래와 같이 아파치 설정파일인 httpd.conf 파일에서 # 주석을 해제해 준다. 그리고 버추얼호스트부분인 httpd-vhosts.conf 파일을 아래와 같이 추가해 준다.

[multi@localhost public_html]$ su -
암호:
[root@localhost ~]# cd /usr/local/server/httpd/conf/
[root@localhost conf]# vi httpd.conf
# Supplemental configuration
#
# The configuration files in the conf/extra/ directory can be
# included to add extra features or to modify the default configuration of
# the server, or you may simply copy their contents here and change as
# necessary.

# Server-pool management (MPM specific)
Include conf/extra/httpd-mpm.conf

# Multi-language error messages
Include conf/extra/httpd-multilang-errordoc.conf

# Fancy directory listings
Include conf/extra/httpd-autoindex.conf

# Language settings
Include conf/extra/httpd-languages.conf

# User home directories
Include conf/extra/httpd-userdir.conf

# Real-time info on requests and configuration
#Include conf/extra/httpd-info.conf

# Virtual hosts
Include conf/extra/httpd-vhosts.conf

# Local access to the Apache HTTP Server Manual
#Include conf/extra/httpd-manual.conf

# Distributed authoring and versioning (WebDAV)
#Include conf/extra/httpd-dav.conf

# Various default settings
Include conf/extra/httpd-default.conf


[root@localhost conf]# vi extra/httpd-vhosts.conf
[root@localhost conf]# vi /usr/local/server/httpd/conf/extra/httpd-vhosts.conf
#
# Virtual Hosts
#
# If you want to maintain multiple domains/hostnames on your
# machine you can setup VirtualHost containers for them. Most configurations
# use only name-based virtual hosts so the server doesn't need to worry about
# IP addresses. This is indicated by the asterisks in the directives below.
#
# Please see the documentation at
# <URL:http://httpd.apache.org/docs/2.2/vhosts/>
# for further details before you try to setup virtual hosts.
#
# You may use the command line option '-S' to verify your virtual host
# configuration.

#
# Use name-based virtual hosting.
#
NameVirtualHost *:80

<VirtualHost *:80>
    ServerAdmin
webmaster@dummy-host2.example.com
    DocumentRoot "/home/multi/public_html"
    ServerName 192.168.1.99
#    ErrorLog "logs/dummy-host2.example.com-error_log"
#    CustomLog "logs/dummy-host2.example.com-access_log common"
</VirtualHost>

[root@localhost conf]#


3. mysql 디비 생성 (디비명 zbxe)

[root@localhost conf]# /usr/local/server/mysql/bin/mysql -u root -p
Enter password:
Welcome to the MySQL monitor.  Commands end with ; or \g.
Your MySQL connection id is 67
Server version: 5.0.67-log Source distribution

Type 'help;' or '\h' for help. Type '\c' to clear the buffer.

mysql> create database zbxe;
Query OK, 1 row affected (0.05 sec)

mysql> quit
Bye
[root@localhost conf]#


4. 아파치 재시작

[root@localhost conf]# /etc/init.d/httpd restart


5. http://192.168.1.99/zbxe 로 접속해서 설치한다.

ps.

아파치에서 일반적으로 디렉토리에 관한 권한 설정은 conf/extra/httpd-userdir.conf 에서 관리하도록 되어 있는데, 여기에 보면 각 계정의 public_html 디렉토리에 대한 권한 설정이 기본적으로 만들어져 있기 때문에 각 계정아래에 public_html 디렉토리만 만들어 주면 되며, httpd.conf 파일에서 Include conf/extra/httpd-userdir.conf 주석을 해제해 주었다.

[root@localhost conf]# cat /usr/local/server/httpd/conf/extra/httpd-userdir.conf
# Settings for user home directories
#
# Required module: mod_userdir

#
# UserDir: The name of the directory that is appended onto a user's home
# directory if a ~user request is received.  Note that you must also set
# the default access control for these directories, as in the example below.
#
UserDir public_html

#
# Control access to UserDir directories.  The following is an example
# for a site where these directories are restricted to read-only.
#
<Directory "/home/*/public_html">
    AllowOverride FileInfo AuthConfig Limit Indexes
    Options MultiViews Indexes SymLinksIfOwnerMatch IncludesNoExec
    <Limit GET POST OPTIONS>
        Order allow,deny
        Allow from all
    </Limit>
    <LimitExcept GET POST OPTIONS>
        Order deny,allow
        Deny from all
    </LimitExcept>
</Directory>

[root@localhost conf]#


그리고 왠만하면 httpd.conf 파일의 제일 하단에 기본 캐릭터셋을 UTF-8로 설정해 두자.
이렇게 설정해 두면 meta 태그를 적지 않아도 텍스트파일의 경우 UTF-8로 읽혀진다.
물론 UTF-8로된 저장된 텍스트 파일을 업로드 해야한다.(대부분의 윈도우의 텍스트 에디터들은 UTF-8 저장을 지원한다.)

AddDefaultCharset UTF-8
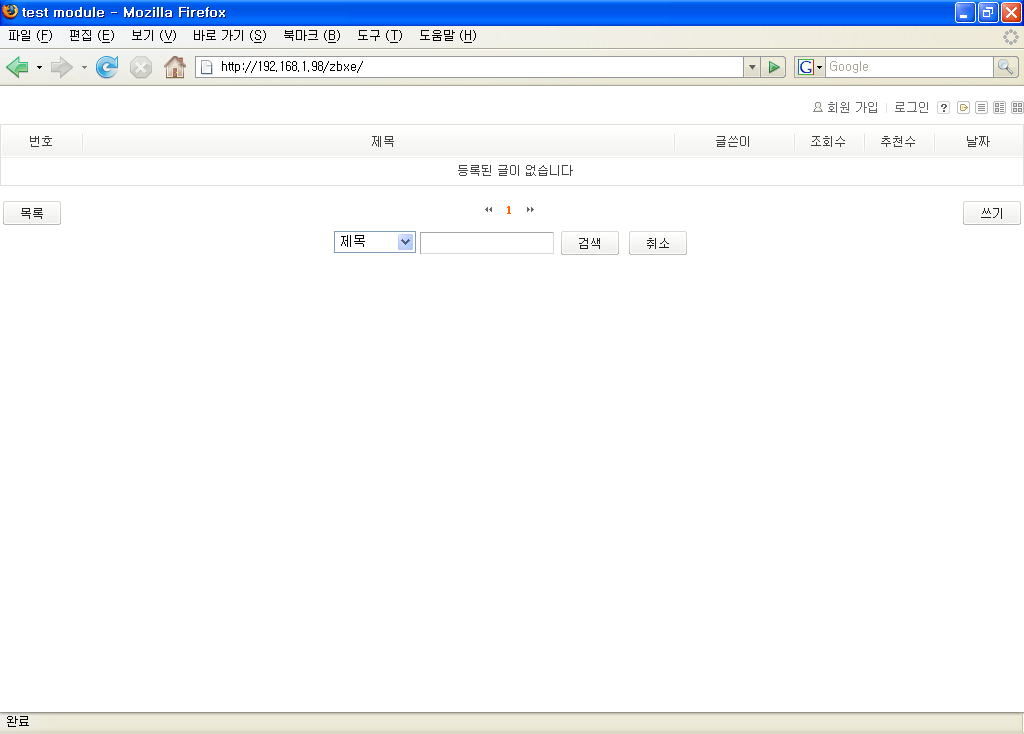


* 그누보드 utf8 버전 설치시 *


아래 그누보드 내용들은 APM을 rpm 파일로 설치하고 테스팅한 것이지만, APM 소스 설치시의 mysql 설정과 동일함.

install/install_db.php 파일의 mysql_query문 앞쪽에 아래와 같이 mysql_query를 utf8 로 설정하는 구문을 추가한다. @mysql_query("set names utf8");


[187번 줄]
// 테이블 생성 ------------------------------------
$file = implode("", file("./sql_gnuboard4.sql"));
eval("\$file = \"$file\";");

$f = explode(";", $file);
for ($i=0; $i<count($f); $i++) {
    if (trim($f[$i]) == "") continue;
    @mysql_query("set names utf8");
    mysql_query($f[$i]) or die(mysql_error());
}
// 테이블 생성 ------------------------------------

[312번 줄]
@mysql_query("set names utf8");
@mysql_query($sql);


참고로 mysql의 기본 캐릭터셋이 utf8이 아닌(컴파일시 utf8을 지정하지 않은) rpm 파일을 설치했다면 /etc/my.cnf에 각 항목별 캐릭터셋을 지정, 저장하고 mysqld를 재시작한다.
(아래의 붉은색 부분 추가)

[root@localhost ~]# vi /etc/my.cnf
[mysqld]
user=mysql
# Default to using old password format for compatibility with mysql 3.x
# clients (those using the mysqlclient10 compatibility package).
old_passwords=1
init_connect=SET collation_connection = utf8_general_ci
init_connect=SET NAMES utf8
default-character-set=utf8
character-set-server=utf8
collation-server=utf8_general_ci


[client]
default-character-set=utf8


[mysql]
default-character-set=utf8


[root@localhost ~]# /etc/init.d/mysqld restart
Shutting down MySQL.                                       [  OK  ]
Starting MySQL.                                            [  OK  ]
[root@localhost conf]# mysql -u root -p mysql
Enter password:
Welcome to the MySQL monitor.  Commands end with ; or \g.
Your MySQL connection id is 1
Server version: 5.0.67-log Source distribution

Type 'help;' or '\h' for help. Type '\c' to clear the buffer.

mysql> show variables like 'c%';
+--------------------------+-----------------------------------------------+
| Variable_name            | Value                                         |
+--------------------------+-----------------------------------------------+
| character_set_client     | utf8                                          |
| character_set_connection | utf8                                          |
| character_set_database   | utf8                                          |
| character_set_filesystem | binary                                        |
| character_set_results    | utf8                                          |
| character_set_server     | utf8                                          |
| character_set_system     | utf8                                          |
| character_sets_dir       | /usr/local/server/mysql/share/mysql/charsets/ |
| collation_connection     | utf8_general_ci                               |
| collation_database       | utf8_general_ci                               |
| collation_server         | utf8_general_ci                               |
| completion_type          | 0                                             |
| concurrent_insert        | 1                                             |
| connect_timeout          | 10                                            |
+--------------------------+-----------------------------------------------+

14 rows in set (0.15 sec)

mysql> quit
Bye
[root@localhost conf]#


==========

apache, php, mysql에 대한 다른 추가적인 내용들은 CentOS 리눅스 구축관리실무 서적을 참고한다.


--끝--

[출처] 슈퍼유저코리아

'Linux > CentOS' 카테고리의 다른 글

CentOS phpMyAdmin 설치  (0) 2012.03.05
CentOS6 Apache+PHP+MySQL  (0) 2012.03.05
CentOS Apache 설치  (0) 2012.03.05
CentOS APM 설치  (0) 2012.03.02
CentOS FTP  (0) 2012.03.02
Posted by iWithJoy
Linux/CentOS2012. 3. 5. 10:26

 [CentOS] Apache 설치하기


운영체제를 깔때 서버 버전으로 깔아서 기본적으로 Httpd 가 설치되어 있었다.

하지만 내가 복사해야될 폴더며 내가 필요한 것들은 당췌 어디 있는지... 알 수가 없었다 ;;;

그래서 과감히 소프트웨어 추가 삭제에서 삭제를 하고, 다운 받아서 다시 깔았다.


http://www.apache.org  에서 Linux 용 최신 버전 다운


1. tar 파일의 압축을 푼다.


# tar xvf httpd-2.2.13.tar


2. 컴파일 스크립트 수행


# ./configure --with-layout=apache --prefix-/usr/local/web/apache --enable-module=so --enable-mods-shared=all --enable-so -enable-rewrite 


prefix = 설치 경로

--enable-module=so 는 tomcat 연동이나 다른 연동시 필요하므로 꼭 추가.

여기서

configure: error: no acceptable C compiler found in $PATH

이런 에러가 뜬다면 gcc 가 깔려 있는지 확인하자.

# rpm -qa | grep gcc


없다면.

# yum install gcc


mod_deflate has been requested but can not be built due to prerequisite failures 

에러가 난다면.


# yum -y install zlib-devel


뭐 대략적으로 설치가 안되서 나는 에러다.

.configure --prefix=/user/local/apache


관련 에러

  증상)

  configure: error: APR not found.  Please read the documentation.


  조치) 

  yum install apr apr-devel

  yum install apr-util-devel


  증상)

  configure: error: pcre-config for libpcre not found. PCRE  is required and available fromhttp://pcre.org


  조치)

  yum install pcre-devel


3. 컴파일


# make


4. install


# make install


에러 없이 설치가 되었다면 성공.


부팅시 자동으로 띄우고 싶다면.


#cp /usr/local/web/apachectl /etc/init.d/httpd


#vi /etc/init.d/httpd


#!bin/sh 밑에 아래 내용을 넣는다.


#chkconfig: 2345 90 90

#processname: /usr/local/web/apache/bin/apachectl

#config: /usr/local/web/apache/conf/httpd.conf

#pidfile: /usr/local/web/apache/logs/httpd.conf


저장.


#chkconfig --add httpd

#chkconfig --list httpd


하면 httpd 가 있는지 확인.


# ntsysv


하면 파란 화면이 뜬다.

여기서 httpd 에 * 가 쳐져 있다면 자동 실행된다.


#service httpd start


하고


http://localhost


들어가면


It works!


라고 뜬다.

 출처 http://srue.net/80


'Linux > CentOS' 카테고리의 다른 글

CentOS6 Apache+PHP+MySQL  (0) 2012.03.05
CentOS 5.x + APM + 제로보드 XE 설치 + 그누보드 UTF-8  (0) 2012.03.05
CentOS APM 설치  (0) 2012.03.02
CentOS FTP  (0) 2012.03.02
CentOS ssh 접속 한글깨짐 수정  (0) 2012.03.02
Posted by iWithJoy
Linux/CentOS2012. 3. 2. 16:48
CentOS는 RedHat Enterprise의 클론 리눅스다.. 무료로 RHEL의 검증되고 안정된 서버를 구축할 수 있다는 장점을 가지고 있다.

서버용으로 설치한다고는 해도 설치과정은 GUI로 할 수 있으니 파티션 잡는 것만 잘 넘어간다면 어려운 것은 없으니 언급하지 않겠다. 기회가 되면 이것도 한번 다뤄보는 것도 좋을 듯 싶기도 하고..

사실 APM설치에 대해 인터넷에서 검색해보면 굉장히 많은 자료가 나오고 그 자료 마다 컴파일 하는데 있어서의 방법 등에 있어서 상당히 다른 방법을 제시하는 경우가 많다.

그들을 무시 하는 것은 아니지만 초보가 보기에는 상당히 혼란스럽고 어렵기만 하다. 또한 안정적으로 검증된, 제공된 방법으로 설치를 하고 싶을 수도 있고..
세세한 커스터마이즈는 나중에 해보기로 하고 지금 당장 설치를 원하는 초보들을 위해 yum으로 설치하는 방법을 소개하고자 한다. (더 쉬운 건 첨에 설치할 때 패키지 설치 해버리면 끝이겠지만......)
더보기

일단 인터넷이 되는지 확인 해보자 그래야 yum이던 뭐든 할것이다. 구글사마께 핑을 드려보자.
# ping -c3 google.com
자 핑이 잘 뜨면 인터넷은 잘 된다고 보고~ 이제 본격적으루다가..

준비작업
(현 단계에서는 필수가 아니고 약간의 편의를 위해서 이므로 넘어가도 되고 아래 실제 설치 단계에서도 사용하지는 않는다.)
1. putty
   리눅스 자체 콘솔 보다는 Putty가 다루는데 많은 편의를 제공 할 것이다.
   "창 - 변환 - 수신 데이터의 문자 셋 변환"에서 UTF8로 설정하고 접속 하면 한글도 잘 보이고 좋다.

2. FTP서버
  ftp서버 환경을 미리구성하고 놓고 작업을 하면 조금은 더 편하다. 언젠가는 설치 해야 하니까 FTP환경을 구축해보자. 설치는 vsftpd를 해보자.
# yum -y install vsftpd

설정 편집은 다음과 같이 하자.
# vi /etc/vsftpd/vsftpd.conf
편집은 i키를 누르고 수정, esc키를 눌러 편집 종료, :wq 라고 입력하고 엔터 하면 저장 하고 종료.
특별히 지금은 설정할 필요가 별로 없다. 나중에 인터넷의 각졸 글들을 참조 해서 설정해주고 일단 chroot_list만 비활성또는 주석 되어 있는지 확인만 하자. 이유는 내 폴더의 상위에 접속 할 수 있어야 설치 단계에서는 그나마 편하기 때문인데 나중에 보안의 문제가 있으니 나중에는 막아 두길 권장한다.
 
서버 재기동시 해당서비스 자동실행
chkconfig vsftpd on
/etc/initd.d/vsftpd start
/etc/initd.d/vsftpd stop
/etc/initd.d/vsftpd restart


뿌띠와 FTP서버가 준비 되었으면 설치 작업을 시작 한다.

알림. 아래  방법대로 설치시 PHP 5.1.6으로 설치 된다. 이러저러한 이유로 상위 버전으로 설치하고 싶다면 이 글의 제일 아래부분을 확인 하자.
apacahe, mysql, php순으로 APM 설치
# yum -y install httpd
# yum -y install mysql
# yum -y install php

보통 알아서 빠른 미러를 찾아 의존성까지 확인해서 연계된 필수 패키지까지 알아서 설치 해준다.

관련 라이브러리 설치
# yum -y install gd gd-devel
# yum -y install libpng libpng-devel
# yum -y install libjpeg libjpeg-devel
# yum -y install freetype freetype-devel
# yum -y install fontconfig  fontconfig-devel
# yum -y install libxml2 libxml2-devel
# yum -y install openssl openssl-devel
# yum -y install gmp gmp-devel
# yum -y install mhash mhash-devel
# yum -y install libmcrypt libmcrypt-devel
# yum -y install mysql-server
# yum -y install php-mysql
# yum -y install php-devel
# yum -y install php-gd
# yum -y install php-mbstring
# yum -y install php-mhash
이 밖에도 pear나 pear-MDB2등 원하는 패키지를 설치 할 수도 있다.
* 제일 처음에 나오는 gd를 설치하면 뒤에 나오는 libjpeg, libpng, freetype, fontconfig과 같이 자동으로 설치되지만 혹시나 하는 분들은 확인겸 설치 해보기 바란다.

MYSQL 설정
이제 설정을 하자... 안하고 패스 해도 됨
mysql에서 사용할 환경 설정파일을 복사해야 하는데 시스템에 따라서 좀 다르다. 아래를 참조하자
my-huge.cnf       1GB 이상 메모리
my-large.cnf       512MB ~ 1GB
my-medium.cnf  128MB ~ 256MB
my-small.cnf      64MB 이하
# cp /usr/share/mysql/my-large.cnf /etc/my.cnf
본인은 Virtual Box로 설치해봤는데 512여서 large를 사용했다.

기본관리 db를 설정하고, 권한지정도 해주자
# /usr/bin/mysql_install_db --user=mysql
# chown -R root /usr/bin/
# chgrp -R mysql /usr/bin/
# chown -R mysql /var/lib/mysql/

이제 콘솔에서도 mysql 명령들을 사용 할 수 있도록 등록해보자.
# vi ~/.bash_profile?
PATH부분에 다음과 같이 추가 한다
PATH=$PATH:$HOME/bin:/usr/bin

지루한 mysql 설정은 이제 다 끝났다 다만 재부팅 후 자동으로 실행 할 수 있도록 등록만 해주면 된다. 일단 확인 해보자.
# chkconfig  --list | grep mysqld
mysqld  0:off 1:off 2:on 3:on 4:on 5:on 6:off
위와 같이 나오지 않는다면?
# chkconfig --level 2345 mysqld on?
다시 확인해 보면 원하는 대로 되어 있을 것이다.

이제 mysql를 시작하고 루트 비밀번호를 설정하고 동작 하는지 확인한 후 mysql은 끝내자.
# /etc/rc.d/init.d/mysqld start
# /usr/bin/mysqladmin -uroot password 비번

동작은 하나?
# netstat -lntp?
위와 같은 명령에서 보이는 결과중 "mysqld"  ":::3306" 뭐 이런 글귀가 보이면 정상적으로 동작한다고 생각해도 된다.

PHP설정
vi /etc/httpd/conf.d/php.conf
아래 두줄을 찾아 아래처럼 고친다. 
AddHandler php5-script .php .htm .html
AddType application/x-httpd-php-source .phps .php .htm .html

수정이 끝났으면 저장 하고  같은 방법으로 httpd.conf 파일을 아래와 같은 부분들을 찾아 수정/추가한다.

vi /etc/httpd/conf/httpd.conf

#ServerName www.example.com:80 (자신의 서버이름이니 알아서 적당히)
   => ServerName localhost:80

Options Indexes FollowSymLinks 
  => Options -Indexes

AllowOverride None
  => AllowOverride All

DirectoryIndex index.html index.html.var
 => DirectoryIndex index.html index.htm index.php

AddType application/x-gzip .gz .tgz 을 찾아 그 다음줄에 아래 두줄  내용 추가
AddType application/x-httpd-php .htm .html .php .ph php3 .php4 .phtml .inc
AddType application/x-httpd-php-source .phps

#AddHandler cgi-script .cgi 주석 삭제
  => AddHandler cgi-script .cgi


*  
사실 vi vim 리눅스의 에디터는 윈도우즈에 익숙한 사람에게는 없이 당황하게 만드는 소프트웨어중 하나인데(적응만 한다면 없는 최고의 에디터라지만 적응은 요원하기만 하다!) 쉽게 사용을 원한다면 "#yum -y install mc" 해서 mc 사용해 보라 조금은 편하게 사용 있을 것이다.
 사실 제일 편한건 콘솔에서 직접 하는 것보다 뿌띠로 열어서  하는것과 FTP로 수정 하는것이다.. 위에서 FTP로는 에디트플러스 같은걸로 바로 수정하면 되니까..

여기서 수정하고 추가 할것이 많기는 많다. 엄청.. 인터넷을 뒤져 보면 이부분에 대한 많은 분서를 접할 수 있을 거라고 생각 되는데  이 문서가 부족하다고 느끼는 사람이 있거나 입맛에 맞는 설정을 원하는 사람은 맛보기로 설치 해보고 제대로 공부 해보자. 친절히 설명된 많은 문서를 볼 수 있을것이다(검색의 수고로움이 더해져야 하지만.. 대부분 자기는 안다고 휘리릭 넘어가는 경우가 많다....)
 
마지막으로 apache!
설정 것은 일단 하나뿐이고 어렵 않으니 후딱하도록 하자!
 
특별히 다른 것은 없고 부팅 자동 실행이 되도록 되어 있나 확인만 해보자
# chkconfig  --list | grep httpd
httpd  0:off 1:off 2:on 3:on 4:on 5:on 6:off
역시나 위처럼 나오지 않는다면 아래와 같이 설정한다.
# chkconfig --level 2345 httpd on
다시 확인해 보면 원하는 대로 되어 있을 것이다.

이제 apache를 시작해보고 동작이 되는지 확인한다
# /usr/sbin/apachectl start
# netstat -lntp?
위와 같은 명령에서 보이는 결과중 "httpd"  ":::80" 뭐 이런 글귀가 보이면 정상적으로 동작한다고 생각해도 된다.

끝으로 시스템을 전체적으로 업데이트 해보자
# yum update?
주루룩 뭔가 많이 지나가고 업데이트 된다. 끝났다면
# reboot
으로 시스템을 재시작 함으로서 모든 설치 과정은 끝난다.
 
테스트 설치 환경
VM : VirtualBox
RAM :  512MB
HDD : 80GB
OS image : CentOS-5.3-i386-bin-DVD.iso
 설치 시 네트워크는 NAT로 사용했고 테스트는 호스트 OS에서 접근을 해야 하므로 HOST-Only로 테스트 했다.
 Virtual Box는 아쉽게도 본인이 사용법을 정확히 이해하지 못했는지 호스트 OS가 바로 게스트 OS에 접근이 불가능했다. 하지만 공유기를 이용하고 IP Virtual Box 호스트 어댑터와 같은 대역으로 맞춘다면 인터넷도 가능 하리라 생각해본다. (귀찮아서 공유기 연결 안 했음)
 
사실 apache httpd.conf의 설정 등 세세한 것이 아~~~주 많이 남았지만 위에 설명한 것 만으로도 처음 글을 시작할 때 yum으로 간단히 설치하기의 취지에 조금 벗어나지 않았나 싶을 정도로 긴 설치였다.
 
하지만 차근히 따라만 한다면 쉽게 끝낼 수 있으리라 본다. 다만 vi의 사용법이 더 어려울지도 모르겠다. ^^a
 
 그리고 실제 릴리즈된 버전보다 YUM으로 설치하면 버전이 낮은 경우가 많은데 글의 서두에 말했다시피 CentOS RHEL의 클론이다. 즉 안정성에 우선된 검증된 릴리즈를 이용한다는 것이라고 보면 틀리지 않다고 생각된다
 엔터프라이즈 환경에서의 가장 중요한 점은 성능도 성능이지만 안정성이 최우선시 되는 게 당연하다고 본인은 느끼기 때문에 버전이 현재 릴리즈보다 낮다고 나쁠 건 없지 않겠는가?

추가. 위 방법대로 설치시 PHP 5.1.6으로 설치 된다. 이러저러한 이유로 상위 버전으로 설치하고 싶다면 아래처럼 해보자.
 
# cd /etc/yum.repos.d
# wget http://dev.centos.org/centos/5/CentOS-Testing.repo
$ yum --enablerepo=c5-testing update php
이렇게 하면 5.2.10으로 설치된다.
나중에 상위버전으로 설치한 경우 반드시 yum update 해줘야 함을 잊지말자! 꼭..
 

'Linux > CentOS' 카테고리의 다른 글

CentOS 5.x + APM + 제로보드 XE 설치 + 그누보드 UTF-8  (0) 2012.03.05
CentOS Apache 설치  (0) 2012.03.05
CentOS FTP  (0) 2012.03.02
CentOS ssh 접속 한글깨짐 수정  (0) 2012.03.02
CentOS 방화벽 설정  (0) 2012.03.02
Posted by iWithJoy
Linux/CentOS2012. 3. 2. 16:33

1. vsftpd 설치 : Linux에서 사용하는 FTP서버데몬

설치명령은 아래와 같다. (별도로 관련파일 복사없이 그냥 명령어만 치니까 설치가 되더라. 

참고로 홈페이지는 https://security.appspot.com/vsftpd.html )

yum install vsftpd


2. 환경파일 설정

# vi /etc/vsftpd/vsftpd.conf

anoymous_enable=NO  //익명으로 접속시 NO

pasv_enable=YES   //엑티브모드로 사용할 시 NO


3. FTP용 계정생성

# useradd 계정명

# passwd 계정명


4. 방화벽 설정 :  iptables에 20, 21번 포트를 등록해준다.

# vi /etc/sysconfig/iptables


////////////////아래의 내용 추가

-A INPUT -m state --state NEW -m tcp -p tcp --dport 20 -j ACCEPT

-A INPUT -m state --state NEW -m tcp -p tcp --dport 21 -j ACCEPT


//iptable재기동

# service iptables restart


5. FTP서버기동

# service vsftpd start (종료 : stop, 재기동 : restart)


부팅시 FTP자동실행 설정

chkconfig --level 2345 vsftpd on


7. 프로세스 확인 및 포트확인

# ps -ef | grep vsftpd

# netstat -ntlp


참조 : http://blog.naver.com/newkyh00?Redirect=Log&logNo=30111155337


======= 기타 오류 및 정보확인

1. 500 OOPS: could not open chroot() list file:/etc/vsftpd/chroot_list

참조 : http://uiandwe.tistory.com/160

vi /etc/vsftpd/chroot_list 
FTP 로그인할 계정을 등록


2. ftp: connect: No route to host 

참조 : http://vstu77.blog.me/120050132415

리눅스에서 ftp를 사용할 때에 ftp: connect: No route to host

라는 메시지가 나올 때가 있다.

이럴 경우에는 host server 의 iptable을 살펴 보아야 한다.

사용 하지 않을 거면 iptables 를 stop 한다

#/etc/init.d/iptables stop

그 후

500 OOPS : cannot change directory:/root

500 OOPS : child died

라고 나오는 경우 아래와 같이 입력한다.

# setsebool -P ftp_home_dir=1


3. vsftp에서 500 OOPS: cannot change directory 오류가 나올 때

참조 : http://opencode.co.kr/bbs/board.php?bo_table=linux_tips&wr_id=27

/etc/vsftpd/vsftp.conf를 수정했는데도 불구하고 500 애러가 나오면서 접속이 안될때는
SELinux 때문이라고 합니다. 

# setsebool -P ftp_home_dir=1

이렇게 하면, ftp directory에 대한 접근을 허가 하게된다. 
"-P"는 Rebooting 될더라도 값을 저장하여, 
정상적으로 동작 하도록 한다. 


vsftpd(vsftp 데몬)의 상태를 보기
service vsftpd status

iptables(방화벽)의 상태를 보기
service iptables status


4. vsftpd.conf 파일의 정보

참조 : http://kch1183.blog.me/50099324984


5. CentOS. FTP 총정리

참조 : http://blog.naver.com/newkyh00?Redirect=Log&logNo=30111155337


////////////////////////////////////////////

실제로 설치하면서 발생했던 오류들


- OOPS: cannot change directory:/home/ueco

-> # setsebool -P ftp_home_dir=1 명령으로 해결


- OOPS: could not read chroot() list file:/home/ueco

-> vsftp.conf설정에서 chroot관련 설정을 모두 주석처리함


- OOPS: 500 OOPS: child died

디렉터리 목록을 획득할 수 없습니다.

Entering Passive Mode (10,250,114,243,21,35).

->컴퓨터의 FTP툴에서 Passive 모드를 비활성화해서 접속함


가볍게 실행이 가능하다.

실행을 해보자.

설치는 root로 하였지만 실행은 개인 계정으로 실행했다.

이와 같은 창이 나타난다. GUI 이므로 쉽게 서버에 접속해서 데이터를 다운 받을 수 있을 것이다.

프로토콜은 위와 같이 지원한다. 


'Linux > CentOS' 카테고리의 다른 글

CentOS Apache 설치  (0) 2012.03.05
CentOS APM 설치  (0) 2012.03.02
CentOS ssh 접속 한글깨짐 수정  (0) 2012.03.02
CentOS 방화벽 설정  (0) 2012.03.02
CentOS 명령어  (0) 2012.03.02
Posted by iWithJoy
Linux/CentOS2012. 3. 2. 16:18

원격 접속시 발생하는 한글 깨짐 현상 해결법


먼저 /etc/sysconfig/i18n 파일을 불러오신후 기존 내용을 지우신후 다음과 같이 입력해 주세요.(혹시 모르니 백업은 필수)

LANG="ko_KR.eucKR"
SUPPORTED="en_US.UTF-8:en_US:en:ko_KR.eucKR:ko_KR:ko"
SYSFONT="latarcyrheb-sun16"


위의 내용을 저장하신후 종료하시고 다음의 파일을 불러오신다음 제일 아래쪽에 추가해 주시고 재부팅 하시거나

# source /etc/profile
# source /etc/sysconfig/i18n 이라고 입력하셔도 됩니다.

/etc/profile
export LESSCHARSET=utf-8

이렇게 하시면 한글이 ssh에서 깨지지않습니다 ^^

추가

CentOS 설치할때 언어를 한글로 설치 하였다면 UTF-8 로 기본 설정이 되어 있을 것입니다.

vi /etc/sysconfig/i18n 안에 LANG="ko_KR.UTF-8" 부분을 LANG="ko_KR.eucKR" 로 변경 합니다.

LANG="ko_KR.UTF-8"
SYSFONT="latarcyrheb-sun16"


설치시 모두 영문으로 설치후 한글 문제처리

/etc/sysconfig/i18n 파일

LANG="ko_KR.eucKR"
SUPPORTED="en_US.iso885915:en_US:en:ko_KR.eucKR:ko_KR:ko"
SYSFONT="lat0-sun16"
SYSFONTACM="iso15"

위와 같이 수정하여 넣고

SecureCRT 5.22에서 환경설정(속성)의 Appearance의 Character를 Default로

설정하면 한글 보고 쓸수 있습니다.


 # cd /etc/sysconfig

# cat i18n

LANG="en_US.UTF-8"

SYSFONT="latarcyrheb-sun16"

위와 같이 나올것이다.

아래와 같이 수정하신 후, 쉘 프로프트에서 # bash 실행해주시고..

# cat i18n


LANG="ko_KR.eucKR"

SYSFONT="latarcyrheb-sun16"


# locale


LANG=ko_KR.eucKR

LC_CTYPE="ko_KR.eucKR"

LC_NUMERIC="ko_KR.eucKR"

LC_TIME="ko_KR.eucKR"

LC_COLLATE="ko_KR.eucKR"

LC_MONETARY="ko_KR.eucKR"

LC_MESSAGES="ko_KR.eucKR"

LC_PAPER="ko_KR.eucKR"

LC_NAME="ko_KR.eucKR"

LC_ADDRESS="ko_KR.eucKR"

LC_TELEPHONE="ko_KR.eucKR"

LC_MEASUREMENT="ko_KR.eucKR"

LC_IDENTIFICATION="ko_KR.eucKR"

LC_ALL=

'Linux > CentOS' 카테고리의 다른 글

CentOS APM 설치  (0) 2012.03.02
CentOS FTP  (0) 2012.03.02
CentOS 방화벽 설정  (0) 2012.03.02
CentOS 명령어  (0) 2012.03.02
CentOS 단축키  (0) 2012.03.02
Posted by iWithJoy
Linux/CentOS2012. 3. 2. 15:03

1. ssh 포트 열기

 # iptables -A INPUT -p tcp --dport 22 -j ACCEPT


2. telnet 포트 열기

# iptables -A INPUT -p tcp --dport 23 -j ACCEPT


3. web 포트 열기

# iptables -A INPUT -p tcp --dport 80 -j ACCEPT

# iptables -A INPUT -p tcp --dport 443 -j ACCEPT 

443 포트는 ssl 적용이 되는 웹 서비스를 하실 경우만 열어주시면 됩니다. (https:// 를 이용)


4. ftp 포트 열기

# iptables -A INPUT -p tcp --dport 20 -j ACCEPT

# iptables -A INPUT -p tcp --dport 21 -j ACCEPT 


'Linux > CentOS' 카테고리의 다른 글

CentOS FTP  (0) 2012.03.02
CentOS ssh 접속 한글깨짐 수정  (0) 2012.03.02
CentOS 명령어  (0) 2012.03.02
CentOS 단축키  (0) 2012.03.02
CentOS VNC(Virtual Network Computing)  (0) 2012.03.02
Posted by iWithJoy
Linux/CentOS2012. 3. 2. 14:31


NO.
INTENTION
COMMAND / WORK
ETC.
001
ROOT 계정 암호 변경
Change 'root' Account Password
# passwd root OPTIONAL
002

프로필 설정
Configure a profile

# vi /etc/profile
(필요한 경우, 아래의 내용을 추가하도록 합니다.)

stty erase ^H
stty erase ^?
export PS1="[\t][\u@\h:\w]\$ "
export PATH=$PATH:

OPTIONAL
시스템 로케일 설정
Configure System Default Locale
# vi /etc/sysconfig/i18n
(참고 : 아래의 내용은 시스템 기본 로케일을 대한민국_한국어.UTF-8로 설정한 경우입니다.)

LANG="ko_KR.UTF-8"
SUPPORTED="en_GB.UTF-8:en_US.UTF-8:en_GB:en_US:en:ko_KR.UTF-8:ko_KR.eucKR:ko_KR:ko"

OPTIONAL
003

네트워크 설정
Configure Network & NIC

# system-config-network

[서비스 재시작 Restart Network Service]
# service network restart

ESSENTIAL
004
보안 및 방화벽 설정
Configure OS' Security Level & Firewall

# system-config-securitylevel

[서비스 재시작 Restart Firewall Service]
# service iptables restart

[시작 서비스 관리 Config Boot-up-start Services]
# ntsysv

ESSENTIAL
005

커널 최신 업데이트
Update Kernel to be lastest

# yum update kernel

[OS 버전 확인 Display current OS version]
# lsb_release -a
# cat /etc/issue

ESSENTIAL
설치된 모든 패키지 업데이트
Update all installed packages

# yum update

ESSENTIAL
006

SSH 설정
Configure SSH

# vi /etc/ssh/sshd_config
(참고 - 다음 설정은 root 사용자의 SSH 로그인 허용 여부를 결정하는 값입니다.)

PermitRootLogin [no | yes] 
(작성 예시 Example : PermitRootLogin no)

# service sshd restart

OPTIONAL
007 GNOME 데스크톱 환경 및 
VNC 원격 데스크톱 서버 설치
Install GNOME Desktop Environment & VNC Server for Remote Desktop via VNC Client

# yum groupinstall "X Window System"
# yum groupinstall "GNOME Desktop Environment"
# yum install "vnc-server"

[필수 - VNC 서버 설정 파일 생성 및 설정 
Essential - Make & Configure VNC setting file]

# vi /etc/sysconfig/vncservers

VNCSERVERS="1:VNC-접속-로그인-사용자-이름"
VNCSERVERARGS[1]="-geometry VNC-접속-화면-해상도"

[설정 예시 Example - 사용자가 root 이고 해상도를 1024x768, SSH 보안 접속만 허용으로 설정한 값]
VNCSERVERS="1:root"
VNCSERVERARGS[1]="-geometry 1024x768 -nolisten tcp -nohttpd -localhost"


[참고] SSH 보안 접속만 허용한 경우, Putty SSH 포트 포워딩을 이용한 VNC 클라이언트 접속 방법에 대한 자세한 정보는 다음 웹 사이트 URL을 참고하십시오.
http://allkr-textcube.blogspot.com/2009/09/vncserver-%EB%A6%AC%EB%88%85%EC%8A%A4%EC%97%90-%EC%84%A4%EC%A0%95%ED%95%98%EA%B8%B0-%EB%B3%B4%EC%95%88%ED%84%B0%EB%84%90ssh%EC%9D%84-%EC%9D%B4%EC%9A%A9%ED%95%B4%EC%84%9C-%EC%82%AC%EC%9A%A9.html

# cd                    
(위의 설정에서 지정한 사용자의 홈 디렉토리로 이동하십시오.)

# mkdir .vnc            
(위의 설정에서 지정한 사용자의 홈 디렉토리 루트에서 .vnc 폴더를 생성하십시오.)

# cd .vnc
# vncpasswd
(VNC 접속 암호를 지정, 설정하십시오.)
# vi ./xstartup
(VNC 원격 데스크톱의 기본 환경으로 GNOME을 사용하기 위해 아래와 같이 내용을 수
정, 작성하십시오.)

#!/bin/sh

# Uncomment the following two lines for normal desktop:
unset SESSION_MANAGER
exec /etc/X11/xinit/xinitrc

[ -x /etc/vnc/xstartup ] && exec /etc/vnc/xstartup
[ -r $HOME/.Xresources ] && xrdb $HOME/.Xresources
xsetroot -solid grey
vncconfig -iconic &
xterm -geometry 80x24+10+10 -ls -title "$VNCDESKTOP Desktop" &
# twm &
gnome-session &

# service vncserver restart

# system-config-securitylevel
(외부에서 VNC 접속 허용을 위해 방화벽에서 TCP 5901번 포트를 열어주십시오.)

OPTIONAL
008 자바 설치
Install Java Runtime
[64비트 CentOS]
# yum install "java-1.6.0-openjdk-devel.x86_64"

[32비트 CentOS]
# yum install "java-1.6.0-openjdk-devel.x86"
OPTIONAL
009 톰캣 설치
Install Apache Tomcat 5.5
[64비트 CentOS]
# yum install "tomcat5.x86_64"

[32비트 CentOS]
# yum install "tomcat5.x86"
 
참고사항 REFERENCE
R1
시스템 언어 / 로케일 변경
Change System Locale
# vi /etc/sysconfig/i18n
(작성 예시 Example) 

LANG="ko_KR.UTF-8"
SUPPORTED="en_GB.UTF-8:en_US.UTF-8:en_GB:en_US:en:ko_KR.UTF-8:ko_KR.eucKR:ko_KR:ko"

 
R2
아파치 웹 서버 경로
[기본 번들]
1) 설치 경로 : /etc/httpd
2) 설정 파일 디렉토리 경로 : /etc/httpd/conf
3) 기본 홈 문서 경로 : /var/www/html
 
R3 FTP 서버 (vsftpd) 경로
[기본 번들]
1) 설치 경로 : /etc/vsftpd
2) 설정 파일 경로 : /etc/vsftpd/vsftpd.conf
3) 기본 홈 루트 경로 : /var/ftp/pub
 
R4 자바 OpenJDK 경로
(java-1.6.0-openjdk)
[yum 설치 번들]
/usr/lib/jvm/java $JAVA_HOME
R5 Tomcat 5.5 경로
[yum 설치 번들]
/usr/share/tomcat5 $CATALINA_HOME
$TOMCAT_HOME
R6 MySQL Server 5.0 경로
[기본 번들 / yum 설치 번들]
1) 설치 경로 : /usr/share/mysql
2) 설정 파일 경로 : /etc/mysql.cnf
3) 데이터 경로 : /var/lib/mysql
4) 소켓 파일 경로 : /var/lib/mysql/mysql.sock
 
R7
SSH 서버 키 생성
Generate SSH Key on Server
# cd /usr/bin
# ssh-keygen -t rsa1 -f /etc/ssh/ssh_host_key -N ""
# ssh-keygen -t dsa -f /etc/ssh/ssh_host_dsa_key -N ""
# ssh-keygen -t rsa -f /etc/ssh/ssh_host_rsa_key -N ""
# service sshd restart
 
R8 기본 시스템 명령어
Basic System Commands
1) 프로세스 조회
# ps -ef
# pstree

2) 시스템 자원 조회
# top              (실시간 CPU 사용량 및 메모리, 프로세스 모니터링)
# free             (메모리 사용량 조회)
# df -h            (디스크 사용량 조회)

3) 네트워크 설정 조회
# ifconfig -a

4) 마지막 로그인 기록 조회
# lastlog

5) .tar.gz 파일 설치 방법
# tar -zxvf 파일명.tar.gz
# tar jzvf 파일명.tar.bz
# ./configure
# make
# install


CentOS용 프로그램

  • 시스템 라이브러리 설치
yum -y install zlib curl   
yum -y install gcc g++ cpp gcc-c++ compat-gcc-34-g77
yum -y install libxml2 libxml2-devel
yum -y install gd gd-devel
yum -y install freetype freetype-devel
yum -y install libpng libpng-devel
yum -y install libjpeg libjpeg-devel
yum -y install fontconfig  fontconfig-devel
yum -y install mhash mhash-devel
yum -y install libmcrypt libmcrypt-devel
yum -y install openssl openssl-devel
yum -y install gmp gmp-devel
yum -y install flex
yum -y install libtermcap-devel ncurses-devel libc-client-devel bzip2-devel
  • 필요한 경우 컴파일러를 설치 한다.
yum -y install gcc gcc-c++ termcap libtermcap libtermcap-devel gdbm-devel

vsftpd 설치

  • vsftp 현황 확인
yum list | grep vsftpd               #--- 설치 가능한 package 확인
yum list installed | grep vsftpd     #--- 설치된 package 확인
  • vsftpd 설치
yum -y install vsftpd
rpm -qa | grep vsftpd                #--- vsftpd 설치 확인
  • 아래 설치 정보에 정리된 블랙 리스트에서 ftp를 사용할 사용자를 빼준다.
  • vi /etc/vsftpd/ftpusers
  • vi /etc/vsftpd/user_list
  • 방화벽에서 20, 21 port를 개방 한다.
system-config-securitylevel
  • FTP 클라이언트에서 접속이 디렉토리 목록이 표시되지 않을 경우
  • FTP Client 설정에서 문자셋을 UTF-8로 강제로 설정하고 접속 한다.
  • 설치 정보
  • 실행 파일 : /usr/sbin/
  • 환경 파일 : /etc/vsftpd/vsftpd.conf
  • 블랙 리스트 : /etc/vsftpd/ftpusers, /etc/vsftpd/user_list
  • 기동 종료 : /etc/init.d/vsftpd start, stop, restart, status
  • 서비스 확인 : ps -ef | grep vsftpd | grep -v grep
  • showinfo_vsftp.bash
#!/bin/bash
echo 'vsftp 버전     : vsftp 2.0.5'
echo '환경 파일      : vi /etc/vsftpd/vsftpd.conf'
echo '블랙 리스트    : /etc/vsftpd/ftpusers, /etc/vsftpd/user_list'
echo '기동 종료      : service vsftpd restart' 
echo '서비스 확인  : ps -ef | grep vsftpd | grep -v grep'


'Linux > CentOS' 카테고리의 다른 글

CentOS ssh 접속 한글깨짐 수정  (0) 2012.03.02
CentOS 방화벽 설정  (0) 2012.03.02
CentOS 단축키  (0) 2012.03.02
CentOS VNC(Virtual Network Computing)  (0) 2012.03.02
CentOS 관련 사이트  (0) 2012.03.02
Posted by iWithJoy
Linux/CentOS2012. 3. 2. 14:28
Alt+F1: 상단의 풀다운 메뉴 (윈도우와 비교하면, Control + ESC 키조합)
Alt+F2: Run Application 대화창 (윈도우와 비교하면, Window + R 키조합)
Alt+F4: 실행 중인 프로그램 종료
Alt+F12: 상단의 풀다운 메뉴에 있는 노트 아이콘의 메뉴 펼침
Alt+Tab: 프로세스 전환
Shift+F2: Rename
Control + I: Properties
Control + O: Open
Control + F: Search
Ctrl + F10: 메뉴 - Open in Termianl 메뉴 포함 (윈도우와 비교하면, 마우스 우측 버튼 메뉴)
Ctrl + Alt + F2: 명령어 쉘로 이동


'Linux > CentOS' 카테고리의 다른 글

CentOS ssh 접속 한글깨짐 수정  (0) 2012.03.02
CentOS 방화벽 설정  (0) 2012.03.02
CentOS 명령어  (0) 2012.03.02
CentOS VNC(Virtual Network Computing)  (0) 2012.03.02
CentOS 관련 사이트  (0) 2012.03.02
Posted by iWithJoy